In 1844, Edmund Morewood got a patent for a metal coating machine that used a part called a “universal joint” to accommodate small alignment errors between the engine and rolling mill shafts. But it is the late Clarence W. Spicer who gets credit for inventing the universal joint that we are more familiar with in the automotive universe.
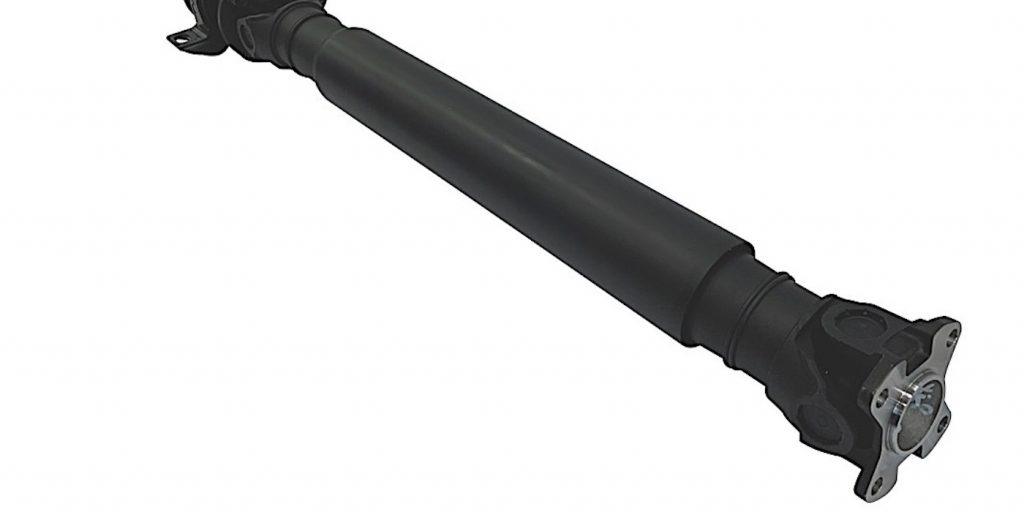
Thanks to the demand of reducing noise, vibration and harshness (NVH), modern engines, tires and suspension systems must operate smoother and quieter than ever. Driveshaft vibrations in rear-wheel and all-wheel drive vehicles are not acceptable from the factory nor after replacement u-joints are installed.
The average backyard mechanic used to be able to replace his or her universal joints without worrying about vibration or misalignment. Back in the day, if the driveshaft got a little distorted during the process of beating and banging on it, it may have created some vibration, but it wasn’t the end of the world. That is not the case anymore.
Installing a u-joint correctly more often than not requires special tools – besides a hammer – these days, and potentially a rebalance (which may involve sending the part to a driveline specialist). Also, replacing u-joints without distorting the driveshaft yokes and the aluminum tubes require more care to prevent damage. It is better to take your time and use finesse rather than brute force. Otherwise, you may see it again when the customer complains of a vibration. Clamping a shaft or yoke in a vise may be counter-productive if you are not careful to protect it from becoming damaged. This is especially the case with aluminum driveline components.
Operating Angles
U-joint operating angles are calculated during vehicle design, which is why vehicles usually do not leave the factory with vibration problems. But suspension parts wear over time; springs can sag and or a lift kit may be installed, which causes vehicle heights to change and causes operating angles to change as well. Because every application is different, you can look up a torsional analysis calculator online to make sure you are within specifications. A couple of points to remember are the smaller the operating angle, the fewer the inertia vibrations. And the closer the operating angles at each end of a driveshaft are to being equal, the lower the torsional vibrations.
As a general rule, the maximum angle that a driveshaft should have is 3-degrees in a multi-shaft setup. More than that can put too much stress on the joint. Technicians should also be cautious of the driven member angle. It should be the same as the angle of the next-to-last driveshaft in your setup.
Over the years, driveshafts have become more compact (especially for imports). Many vehicles use a “staked” universal joint, which means it is welded or locked in place and, therefore, not technically serviceable. However, some aftermarket suppliers offer kits that allow these types of driveline components to be serviced. The 1988-89 Jaguar has this type of u-joint. In addition, maintenance-free replacement kits are available for the 3-piece Mercedes-Benz Sprinter driveshaft (from 2010-2014). Other compact u-joints for import applications are maintenance-free and have a triple lip seal to keep the grease inside the cap. No grease fitting is necessary.
Replacement Tips
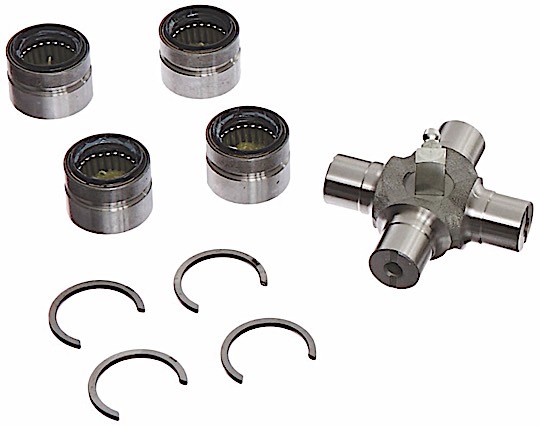
The techniques you use to service the u-joint depend on the yoke design and where the c-clips (or g-clips) that hold the bearing in place are located. Some clips are on the inside of the yoke, and others are placed on the outside.
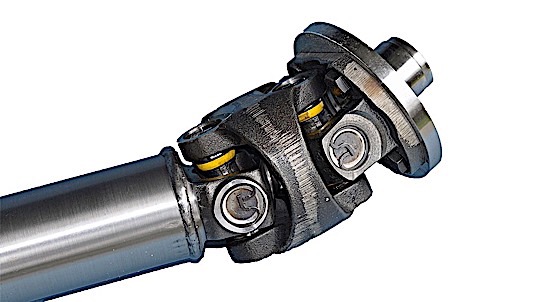
If the u-joint is not pressed into the yoke, it may be fastened into place by a half-moon shaped clamp or collar. The bolts must be removed to get the u-joint out of the yoke. Make sure you note the position of the shaft by drawing a line from the shaft to the yoke and slip joint and be sure to mark the position of the splines as well. When you install the driveshaft, the marks you made should all line up to ensure the shaft is balanced.
Driveshaft Inspection
A common symptom of a failing driveshaft is a clunking sound coming from underneath the vehicle. Worn out u-joints can cause the driveshaft to vibrate. You should be able to shake the driveshaft back and forth by hand to tell if it is worn. If the u-joints aren’t serviced promptly, it can lead to further damage to other drivetrain components.
Before removing the driveshaft, check for play in the yoke and slip joint. If the u-joints are failing, you should be able to see movement in the shaft as you apply leverage with a prybar or your body weight. Aside from the u-joints, the output shaft should also be inspected for play up-and-down and side-to-side. Rotational play can be checked at this point as well, but any movement may be from a worn pinion gear or output shaft splines.
Use care when removing the flange mounting bolts. These can be very tight, so use quality tools to avoid stripping them. Some bolts have 12-point heads and will require a 12-point socket to remove. These bolts also use thread lock to prevent them coming loose that should always be reapplied when reinstalling.
Both Edmund Morewood and Clarence Spicer might be somewhat surprised that in the 21st century, we still use their inventions (they probably imagined we’d be getting around in flying cars by now!). Although the materials and design may be a little different today, the need for u-joints has not diminished in more than 150 years.