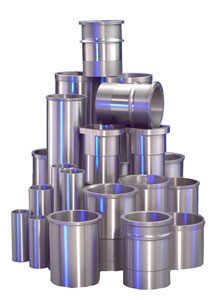
t only gain more displacement, but also increased strength and reliability. Wet sleeve conversion kits are available for certain late-model import engines as well as domestic V8s such as Chevy LS engines.
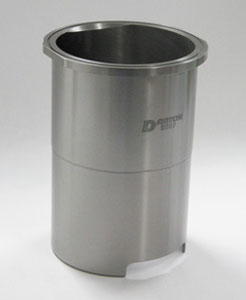
Dry Sleeve Installation Tips
One of the most critical decisions you’ll have to make when installing dry sleeves is how much interference fit is right for the application. Aluminum blocks have more thermal expansion than cast iron blocks, so they generally (but not always) require more interference fit to keep the sleeves from moving. But how much interference?
Answers will vary depending on whom you ask. Different sleeve suppliers gave us different recommendations. One said most aluminum blocks typically need about .003˝ to .004˝ of interference fit between flangless sleeves and the block to keep the sleeves in place. If the block can accept a flanged sleeve, then you may not need any interference at all.
Another said .0015˝ to .003˝ of interference fit is all you need with most aluminum blocks, and if you go much beyond .004˝ you will probably distort the block. Bore distortion is bad because it prevents the hole from being round when you hone it. That, in turn, will prevent good ring sealing and allow compression losses and blowby – neither of which are good for emissions or performance.
One supplier said they have changed their thinking about interference fit altogether on some aluminum engine applications. The sleeves can be installed with minimal interference (.0005˝ to .001˝) and locked in place with anaerobic sealer. A sealer such as Loctite 518 is applied to the bottom third of the cylinder to keep it in place and to prevent oil from migrating up between the bottom end of the sleeve and the block. Anything that gets between the sleeve and block (be it oil, carbon deposits or even air) can interfere with good heat transfer.
With water-cooled cast iron blocks, the general recommendation for installing dry flangless sleeves is to use about .0015˝ to .002˝ of interference fit. One tip for make sleeve installation easier while improving heat transfer is to lightly hone the cylinder with #280 grit stones after it has been bored out to accept the sleeve. A smoother finish inside the bore will improve metal-to-metal contact between the sleeve and block when the sleeve is slid into place.
On some air-cooled small displacement engines (motorcycle and small engines, for example), more interference fit may be required because the cylinders run at higher temperatures. We have heard of engine builders using as much as .006˝ to .008˝ of interference fit to assure the sleeves stay in place.
Something else to keep in mind is that if you are sleeving only one damaged cylinder in a block to repair it, the sleeve may distort the adjacent cylinders somewhat – especially if you use a lot of interference fit. The result may be ring sealing problems, compression losses and blowby in the adjacent cylinders.
One way to minimize or correct cylinder bore distortion is to use torque plates when boring and honing the block. In fact, torque plates may be required on many thin wall blocks (sleeved or not) to achieve a really good bore finish that is round and straight. Install the torque plate and head gasket on the block, then tighten the head bolts to specifications before honing.
Measuring Interference
To accurately determine the amount of interference, you need two dimensions: the average outside diameter (OD) of the sleeves, and the average inside diameter (ID) of the bores in the block. To measure these dimensions you need an accurate OD micrometer and ID micrometer or bore gauge.
Measure the sleeve at the top, middle and bottom. Write down the numbers. Then rotate the sleeve 90 degrees and measure again. Average together all of these numbers to calculate the average OD of the sleeve. The rounder the sleeve, the better.
Next, do the same thing for the bore. Measure the top, middle and bottom, then rotate your bore gauge or ID mike 90 degrees and repeat. Again, average the numbers together. As before, the rounder and straighter the hole, the better. The bore ID dimensions should be smaller than the sleeve OD dimensions to create an interference fit.
Subtract the average bore ID from the sleeve OD to determine the interference fit.
Easier Installation
The old school way of installing a dry sleeve was to place it in the bore, put a block of wood over the top of the sleeve and then pound it down into the block with a hammer. That may have worked years ago when dimensions and clearances are not as critical as they are today, but that kind of installation procedure has no place in today’s machine shops.
The recommended way to install sleeves is to chill or freeze the sleeves and to preheat the block. Placing the sleeves in a household deep freeze will typically shrink their outer diameter about .002˝. Packing them with dry ice or spraying them with some liquid nitrogen will shrink them even more, typically .003˝ or so. This often allows the sleeves to drop right in with little or no effort, reducing the risk of damaging or distorting the sleeves. Preheating the block slightly to about 120 degrees will also open up the bores a bit, making installation easier. If you do need to apply force to push the sleeve into place, use a mandrel to press it in. Don’t beat on it with a hammer!
Here’s another tip for performance engine builders: stress relieve the block after sleeving it. This can be done by mounting the block on a vibratory table and letting it shake at high frequency for 15 to 30 minutes. Cryogenically treating the block (freezing it down to minus 300 degrees F below zero in a long slow freeze and thaw cycle) is another method that can stress relieve blocks and reduce block distortion.
Finishing the Cylinders
Once the sleeves have been installed, the inside of the cylinder can be finished to specifications. Getting the rings to seat and seal properly requires a ring-friendly finish. By ring friendly, we mean a finish that provides good support for the rings, retains oil and does not require a lengthy break-in period. For most late-model and performance engines, that means a plateau finish.
A plateau bore finish is what all types of rings eventually produce when they are fully seated, so the closer the bore can be prefinished to a plateau-like condition the less the rings and cylinders will wear as the engine breaks in, the better the rings will seal right from the start, and the longer the rings will last.
For moly rings, a two-step honing process can be used to achieve a plateau finish. First, hone with a conventional #280 grit silicon carbide vitrified abrasive. Then finish by briefly touching the bores with a #400 grit stone or giving them several strokes with an abrasive nylon honing tool or brush.
If the cylinders are honed with diamond stones, you can follow up with a finer grit diamond, a fine grit vitrified abrasive or a brush to finish the bores.
If you’re not applying a plateau finish to the cylinders, honing with #220 grit silicon carbide stones works well with plain cast iron or chrome rings. Use #280 grit stones for moly-faced rings, or #320 to #400 grit stones for moly rings if the engine is being built for racing or performance.
After the cylinders have been honed, don’t forget to scrub them out with warm soapy water and a brush to remove all honing and metallic debris. This is an often overlooked step that can ruin a new set of rings in a hurry.
Diesel Wet Liners
If you’re rebuilding a diesel or industrial engine that has wet liners, interference fit is not a concern. Most such liners are a simple slip fit installation, and many are prefinished to specifications. Even so, you should pay close attention to the condition of the counterbores in the block so the liners are supported properly – especially if the engine has been rebuilt before. If the counterbore that supports the liner flange is damaged or corroded, it will have to be remachined to support the liner properly.
Use the type of seal lubricant specified by the manufacturer. Using the wrong type of lubricant may cause the seal to swell, preventing the liner from fitting properly.
If the old liners have a heavy coating of lime or scale on the outside, the cooling jackets in the block as well as the rest of the cooling system should be cleaned. Anything that sticks to the outside of the liners can inhibit heat transfer.
Many late-model diesel engines require cylinder liners that are induction hardened, ductile iron or some other type of high quality wear-resistant iron alloy. Cheaper materials won’t hold up and will likely result in rapid wear and premature failure. A good quality liner should easily last 500,000 miles or more in a Class 8 over-the-road truck.
Liner protrusion must also be correct for the head gasket to seal properly. If one cylinder liner sits higher than those in the adjacent cylinders, it can affect sealing.