By Eric Seifert, ALLDATA Automotive Technical Editor
A strange noise may cause concern to owners of some Chrysler vehicles. The noise may occur when the vehicle is in park, and the engine is running between idle and 1,400 rpm at normal operating temperature. The sound is heard at the upper end of the engine (cylinder head) toward the right front side (passenger side), and is irregular, not periodic or harmonious. The frequency of the noise will increase with rpm. The sound is more of a high-pitched “snapping” noise, not a low metallic knock.
If the customer describes the noise and the technician determines that the sound is coming from the described location, perform the repair procedure. The procedure involves chamfering the bore radius on cam bearing caps L2 through L5 and R2 through R5.
Applicable Vehicles
2001-’04 (JR) Sebring Convertible/Sebring Sedan/Stratus Sedan
2002-’04 (KJ) Liberty
2002-’04 (KJ) Cherokee (International Markets only)
2003-’04 (PL) Neon
2001-’04 (PT) PT Cruiser
2001-’04 (RG) Chrysler Voyager (International Markets only)
2001-’04 (RS) Town & Country/Caravan/Voyager
2003-’04 (TJ) Wrangler
Note: This procedure applies to vehicles equipped with a 2.0L, 2.4L DOHC or 2.4L Turbo engine (sales code ECC, EDZ, ED1, EDV, ED2 or EDT).
Repair Procedure
Review safety procedures in ALLDATA Repair before beginning.
1. Remove the cylinder head cover.
2. Remove L2 cam bearing cap (see Figure 1).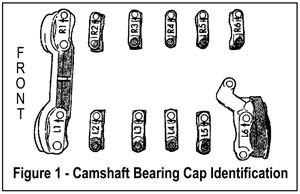
Note: Do not remove the L1/R1 or L6 cam bearing caps, or loosen the fasteners.
Note: Only remove one cam bearing cap at a time.
3. Lightly chamfer the two bore radius edges with a small hand file, creating a 45° chamfer 1.0 to 1.5 mm in width along the edge of each bore radius (see Figure 2).
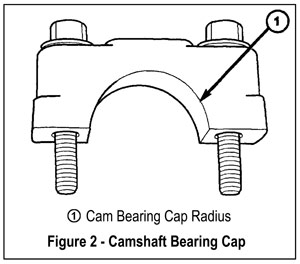
Caution: Be careful not to scratch the bore surface of the cam bearing cap(s). Chamfer both bore radius.
4. Clean the part to remove any aluminum filings prior to reinstalling.
5. Reinstall the L2 cam bearing cap by loosely assembling the fasteners. Prior to and during the torquing of each fastener, twist the cam bearing cap by hand in a clockwise direction, as viewed from the top of the engine. Torque M6 fasteners to 12 Nm (105 in.-lbs.) while maintaining a clockwise twisting force on the cam bearing cap.
6. Repeat steps 2 through 4 for cam bearing caps L3, L4, L5, R2, R3, R4, R5 and R6.
7. Reinstall the cylinder head cover.
8. Verify the repair.
Courtesy of ALLDATA.