Some customers may complain about an abnormal noise from the rear of the vehicle that increases in volume as vehicle speed increases. The noise is commonly described as a whining, humming, roaring or growling noise. The source of the noise may be a damaged transmission coupling assembly and two ball bearing assemblies. Follow the repair procedure in this TSB to diagnose and repair this condition.
Applicable vehicles: 2003-’06 Matrix vehicles equipped with AWD (4WD)
Note: Vehicles towed with two wheels off the ground or driven with mismatched tires can display this noise condition. These vehicles are not covered under warranty due to the failure by the customer to follow owner’s manual instructions to prevent damaging the AWD (4WD) system.
Repair Procedure:
1. Test-drive the vehicle and confirm the customer’s complaint.
2. Isolate the source of the noise using a technician’s stethoscope or similar tool. Is the noise coming from the area indicated in Fig. 1? – If yes, this TSB applies. Go to Step 3. – If no, STOP — This TSB does not apply. Continue diagnosis using the repair manual.
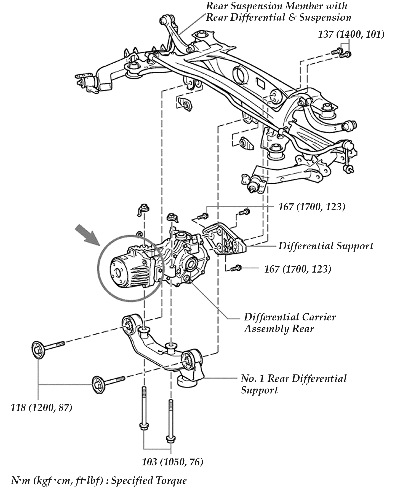
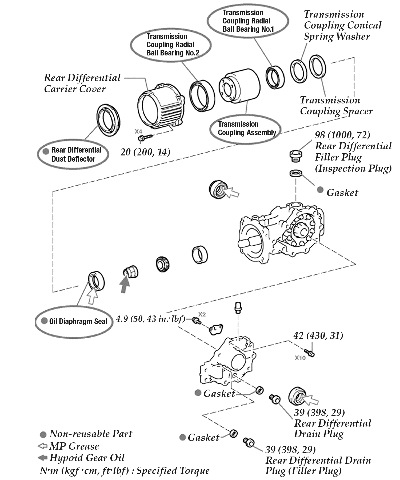
3. Replace the Transmission Coupling Assembly, Radial Ball Bearing No. 1 and Radial Ball Bearing No. 2, to repair the vehicle. (Refer to Fig. 2 on page 54 for the circled parts that are required to be replaced.)
4. Remove the rear differential carrier assembly from the vehicle. Refer to the Technical Information System (TIS): – 2003-’05 Matrix Repair Manual, Drivetrain – Axle/Differential – “Rear Differential Carrier Assy. Rear (for 4WD): Overhaul.” – 2006 Matrix Repair Manual, Drivetrain – Axle/Differential – “Differential: Rear Differential Carrier Assembly (for 4WD): Removal.”
5. Replace the transmission coupling assembly (viscous coupling), both radial ball bearing assemblies and the rear differential dust deflector, using the procedures below.
a. Remove the rear differential carrier cover by removing the four bolts.
b. Remove the transmission coupling conical spring washer.
c. Remove the transmission coupling spacer.
d. Using a screwdriver, remove the rear differential dust deflector. Hint: Tape the screwdriver tip before use.
e. Remove the transmission coupling assembly from the differential carrier cover.
6. Reassemble the rear differential carrier assembly.
a. Using the SSTs and a press, install the transmission coupling radial ball bearing No. 1. – SST P/N 09502-12010 – SST P/N 09550-55011 (09550-05061) – SST P/N 09950-70010 (09951-07150)
b. Using the SSTs and a press, install the transmission coupling radial ball bearing No. 2. – SST P/N 09223-15030 – SST P/N 09950-70010
c. Install the transmission coupling assembly to the rear differential carrier cover.
d. Using the SSTs and a press, install the new rear differential dust deflector. See Fig. 3. – SST P/N 09518-36020 – SST P/N 09950-70010 (09951-07150)
e. Install the transmission coupling spacer.
f. Install the transmission coupling conical spring washer. Note: Install the transmission coupling conical spring washer so that the side marked orange faces to the front of the vehicle (coupling side).
g. Install the new oil diaphragm seal.
h. Install the rear differential carrier cover with the four bolts to the differential carrier. Torque: 20 Nm (14 ft.-lbf.) 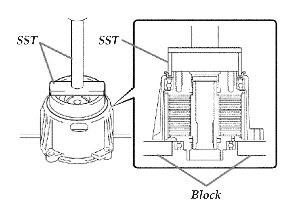
7. Install the rear differential carrier assembly in the vehicle. Refer to TIS: – 2003-’05 Matrix Repair Manual, Drivetrain – Axle/Differential – “Rear Differential Carrier Assy Rear (for 4WD): Overhaul.” – 2006 Matrix Repair Manual, Drivetrain – Axle/Differential – “Differential: Rear Differential Carrier Assembly (for 4WD): Installation.”
8. Test-drive the vehicle and confirm the vehicle is repaired.
Courtesy of ALLDATA.