The following Tech Tip comes courtesy of ALLDATA
We have noticed an increase in oil pressure switch-related problems with late-model Honda vehicles recently. Two switches that seem to be consistently problematic are the rocker arm oil pressure switch and the engine oil pressure switch. Each exhibits a unique set of symptoms, but the fix is the same for both: replace it.
Rocker Arm Oil Pressure Switch
If the vehicle’s malfunction indicator lamp (MIL) is on and diagnostic trouble codes (DTC) P3400 (VPS Stuck Off Bank 1) and/or P3497 (VPS Stuck Off Bank 2) are present, Honda recommends that one or both of the rocker arm oil pressure switches be replaced.
The following models are included:
2008-’12 Accord, 2 & 4-door, V6, A/T
2010-’12 Crosstour, 2WD, V6
2010-’12 Crosstour, 4WD, V6
2008-’11 – Odyssey EX-L/Touring
2012 Odyssey
2009-’12 Pilot, 2WD
2009-’11 Pilot, 2WD
2012 Pilot 4WD
The front and/or rear rocker arm oil pressure switch may fail intermittently. Be sure to check the wiring and connectors from the engine control module (ECM) to each of the switches and the grounds. If all test results are good, the switches are at fault. Note: You may not be able to duplicate symptoms after clearing the DTC(s).
Diagnosis
1. Check the engine oil level on the dipstick.
2. If the engine oil level is below the end of the dipstick (there is no oil on the dipstick), the low engine oil level is likely causing the DTCs. Continue with excessive oil consumption troubleshooting.
3. If the engine oil level is on the dipstick (it may be low, but there is oil on the dipstick), go to the repair procedure.
Repair Procedure
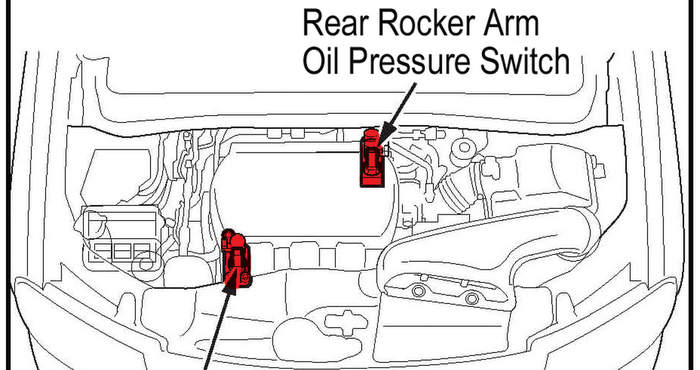
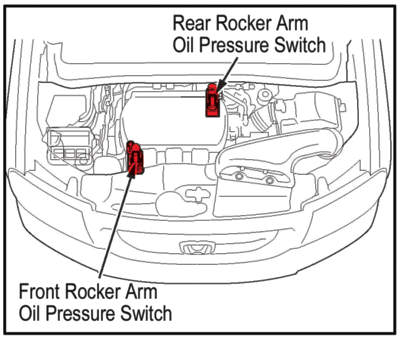
1. Remove the engine cover. Remove the appropriate rocker arm oil pressure switch, depending on which DTC is stored (Fig. 1).
• P3400 – Replace the Bank 1 rear rocker arm oil pressure switch.
• P3497 – Replace the Bank 2 front rocker arm oil pressure switch.
2. Install the new rocker arm oil pressure switch with a new O-ring. Torque each to 16 ft.-lbs. (22 Nm).
3. Reinstall the engine cover.
4. Clear the DTC(s) with a scan tool. Test drive the vehicle to verify the problem has been resolved.
Engine Oil Pressure Switch
With correct engine oil level, a “Check Engine Oil Level” message may appear on the MID or the navigation screen. The “Low Oil Pressure” indicator on the instrument panel may also be on. After verifying the wiring and connectors are in good condition, replace the oil pressure switch.
The following models are included:
2008-’10 Accord, V6, 2-door with M/T
2009-’10 Odyssey, LX and EX
2009-’11 Ridgeline
Repair Procedure
1. Start the engine. Turn the steering wheel fully to the right and then shut off the engine.
2. Raise the vehicle on a lift. Make sure it’s securely supported.
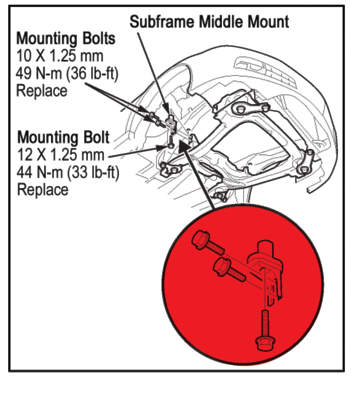
3. On an Accord, remove the front sub-frame middle mount (Fig. 2).
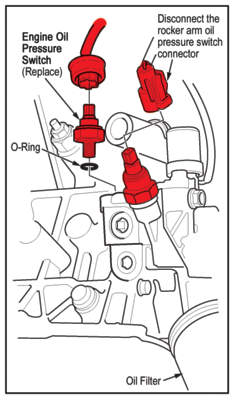
4. For easier removal of the engine oil pressure switch, disconnect the rocker arm oil pressure switch connector (Fig. 3).
5. Disconnect the engine oil pressure switch connector, and then remove the switch. Clean the area around the switch hole.
6. Apply a very thin layer of liquid gasket to the threads of the new switch. Install a new O-ring, then install the switch and torque it to 13 ft.-lbs. (18 Nm).
7. Reconnect the engine oil pressure switch connector and the rocker arm oil pressure switch connector.
 8. On an Accord, reinstall the front sub-frame middle mount with new bolts, and tighten them to the following specifications:
• Tighten the two 10 x 1.25mm bolts to 36 ft.-lbs. (49 Nm).
• Tighten the 12 x 1.25mm bolt to 33 ft.-lbs. (44 Nm).
9. After changing the engine oil and filter, run the engine for five minutes and then check for leaks.
Reset the maintenance reminder display as follows:
1. Turn the ignition switch to the ON (II) position.
2. Press the select/reset knob repeatedly until the engine oil life indicator is displayed.
3. Press the select/reset knob for about 10 seconds. The engine oil life and the maintenance item code(s) will blink.
4. Press the select/reset knob for another five seconds. The maintenance item code(s) will disappear, and the engine oil life will reset to 100.
Written by the ALLDATA Community Automotive Diagnostic Team, a select group of automotive experts dedicated to helping technicians fix hard-to-repair vehicles. Meet the team by visiting. ©2014 ALLDATA LLC.