 Applies to:
2003 Accord V6 — All
2004 Accord V6 2-door — From VIN 1HGCM8… 4A000001 through 1HGCM8… 4A024092
2004 Accord V6 4-door — From VIN 1HGCM6… 4A000001 through 1HGCM6…4A1 00943
If a customer complains one of the above vehicle models is experiencing excessive cranking or hard starting, there are two possible causes:
1. Contamination in the fuel pressure regulator causes the regulator to stick or intermittently stick, causing a delay in fuel pressure at start-up.
2. Exhaust gas backflow into the intake manifold at engine shutdown may cause a poor mixture of intake air and fuel at the next engine start-up.
Corrective Action:
Replace the fuel pressure regulator, if needed, and use the HDS to update the PGM-FI software in the ECM/PCM.
Note: The 2004 Accords within the following VIN ranges already have an improved fuel pressure regulator.
For these vehicles, skip Diagnosis, and go to step 10 of the Repair Procedure to update the PGM-FI software in the ECM/PCM:
— VIN 1HGCM8…4A018621 through 1HGCM8…4A024092
— VIN 1HGCM6…4A068600 through 1HGCM6…4A100943.
Parts/Tool Information:
Fuel Pressure Regulator: P/N 16015-SDB-A00
Fuel Pump Module Gasket Set: P/N 17046-SDA-A30
Fuel Sender Wrench: P/N 07AAA-S0XA100 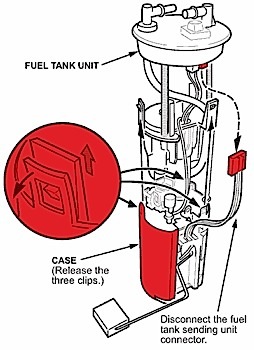
Diagnosis:
1. Install a fuel pressure gauge. (Refer to steps 1 and 2 on page 11-332 of the 2003-’06 Accord V6 Service Manual Supplement, or online, enter keyword Gauge Test, and select Fuel Gauge Sending Unit Test [V6 Engine] from the list.)
2. Start the engine, and let it idle for 2 minutes.
3. Turn off the engine. Check the fuel pressure gauge. Pressure should be 380 to 430 kpa (55 to 63 psi).
4. Monitor the fuel pressure reading. If the fuel pressure bleeds down quickly after the engine is turned off, go to the Repair Procedure. If the fuel pressure does not drop quickly, go to step 10 of the Repair Procedure to update the PGM-FI software.
Note: There is no specification for fuel pressure bleed rate. Many variables can affect fuel line pressure, such as the fuel pump and fuel injectors. A bad regulator will lose most of the fuel pressure in the first few minutes after shutting off the engine.
Repair Procedure:
1. Relieve the fuel pressure.
2. Remove the fuel tank unit.
3. Remove the fuel tank unit from the case.
— Disconnect the fuel tank sending unit connector. See Figure 1.
— Release the three clips, and then pull out the fuel tank unit from the case. See Figure 2.
4. Release the clips, then remove the fuel pressure regulator mount from the fuel tank unit.
5. Remove the clip, then remove the fuel pressure regulator. Install the new regulator with new O-rings. Reassemble the fuel tank unit.
6. Place the new gasket onto the tank body.
7. Align the marks on the fuel tank unit and the fuel tank. (See page 11-327, step 11 of the 2003-’06 Accord V6 Service Manual Supplement.) Install the fuel tank unit into the tank without dislodging the gasket. Using hand pressure only, slide the fuel tank unit into the tank until it is properly seated.
8. Using the fuel sender wrench, torque the new fuel tank locknut to 93 Nm (69 lb.-ft.). Note: Do not use the locknut to force the pump into the tank. 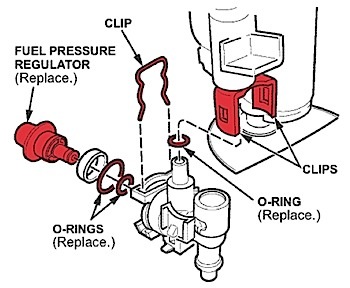
9. Reinstall all removed parts.
10. Use the HDS to update the PGM-FI software in the ECM/PCM, using HDS version 2.004.004 or later. To update the PGM-FI software, refer to service bulletin 01-023, Updating Control Units/Modules.
11. Do the idle learn procedure:
— Make sure all electrical items (A/C, audio unit, defogger, lights, etc.) are off.
— Start the engine, and let it warm up to its normal operating temperature (the cooling fans cycle twice).
— Let the engine idle (throttle closed and all electrical items off) for 10 minutes.
12. Do the low-rpm CKP pattern learn procedure:
— Test-drive the vehicle on a level road. With the A/T in second gear or the M/T in second or third gear, decelerate (with the throttle fully closed) from an engine speed of 2,500 rpm down to 1,000 rpm.
— Stop the vehicle, and put the transmission into park or neutral. Set the parking brake. Do not turn off the ignition.
13. Connect the HDS to the DLC, and check the status of PULSER F/B LEARN:
— On the Selection Menu, select PGM-FI.
— On the Mode Menu, select Data List.
— Check the value of PULSER F/B LEARN.
— If the value is Completed, go to step 14.
— If the value is Not Completed, be sure the engine is at normal operating temperature (the ECT SENSOR [1] value is 176 or higher), and repeat step 12.
14. Do the high-rpm CKP pattern learn:
Note: The low-rpm CKP pattern learn must be completed before you do the high-rpm CKP pattern learn.
— Test-drive the vehicle on a level road. With the transmission in first gear, decelerate (with the throttle fully closed) from an engine speed of 5,000 rpm down to 3,000 rpm.
— Stop the vehicle, and put the transmission into park or neutral. Set the parking brake. Do not turn off the ignition.
15. Connect the HDS to the DLC (if not already connected), and check the status of PULSER F/B LEARN (HIGH RPM):
— On the Selection Menu, select PGM-FI.
— On the Mode Menu, select Data List.
— Check the value of PULSER F/B LEARN (HIGH RPM).
— If the value is Completed, you’ve completed the CKP pattern learn procedure.
— If the value is Not Completed, be sure the engine is at normal operating temperature (the ECT SENSOR [1] value is 176 or higher), and repeat step 14.
16. Start the vehicle a couple times to make sure the symptom is repaired. If it is not, continue with normal troubleshooting procedures for hard-starting problems.
Courtesy of ALLDATA.