In the early days of the automobile, starting an engine consisted of first retarding the spark and adjusting the hand choke to optimum fuel mixture. The next step was to pull a cylinder onto compression stroke and “snap” the piston past top dead center with the hand crank. With any luck, the engine would start on the first try without breaking your wrist! Obviously, the invention of the electric starter became a quantum leap in making the automobile day-to-day transportation. But it took early engineers a while to understand that a small, high-torque electric motor could crank an engine, providing it was used in short bursts to prevent overheating the motor windings.
Originally, the starter motor pinion gear was manually engaged with the flywheel gear by pressing and releasing a spring-loaded pedal. Later versions used an inertia-based drive pinion that spun along a helical spline cut into the motor shaft to engage the flywheel gear. The inertia drive was eventually discarded because it would usually disengage at a critical time when trying to clear a flooded engine. Modern starters, of course, use an electric solenoid to close the circuit between the battery and starter motor and to keep the drive pinion engaged with the flywheel until the engine achieves idle speed. An overrun roller clutch mounted on the drive pinion allows the starter motor to disengage when the engine is accelerated.
STARTER ELECTRICAL CIRCUITS
A number of electrical configurations are used to activate the starter circuit. A fuse, for example, may protect some starter circuits. While most starter systems use the ignition switch to directly activate the starter solenoid, some insert a starter relay between the ignition switch and starter solenoid to handle higher-than-normal solenoid current draws. In some leading-edge technology, the ignition switch no longer functions in a conventional manner. Instead of acting directly upon the starter solenoid, the ignition switch commands the Powertrain Control Module (PCM) to activate a starter relay. Whatever the application, a little homework goes a long way in helping to diagnose an intermittent or hard starter failure.
STARTERS AND COMPUTERS
The PCM contains an adaptive memory that stores barometric pressure and fuel trim adjustments, each of which might be critical to a quick start. Without adaptive memory, the engine may not start in a normal fashion or may experience cold driveability problems.
Moreover, the PCM is usually programmed to “look” for a minimum cranking speed before it will activate the electric fuel pump and fuel injectors. Generally, the minimum cranking voltage should also be above 10 volts to ensure that the PCM, fuel injectors and ignition system are properly activated. In all applications, a minimum cranking speed is required to keep the incoming fuel atomized and ready for combustion.
 MODERN STARTER DESIGN
Early starters used heavy steel frames incorporating pole magnets surrounded by field windings. The field windings were used to create a magnetic field that would force the armature to rotate. These starters were bulky because they were required to develop sufficient low-speed torque to overcome the inertia of the engine’s rotating assembly without the benefit of a built-in gear reduction drive. The ratio between the drive gear and flywheel ring gear on these applications ranges from about 1:10 to 1:20, which means that the starter motor must spin at least 1,000 rpm to achieve a cranking speed of 100 rpm.
Modern starters incorporate an internal reduction gear that increases the reduction ratio. This reduction simultaneously allows the starter motor to run at much higher speeds and multiply starter motor torque. The net result is a starter motor that is more durable and requires less cranking amperage than the earlier, pole-magnet designs.
BATTERY FUNDAMENTALS
An OEM-specification battery is vital to good starter performance. Remember, for example, that a conventional lead-acid battery may lose as much as 40% of its cranking amperage at 0°F temperature. Even worse, as ambient temperatures fall, more torque is required to overcome viscous engine and accessory lubricants. To address cold-weather starting issues, OEM-specification starter motors and batteries are designed with substantially extra cranking capacity. When aftermarket components of lesser performance are substituted, starting performance will suffer.
Of course, even OEM-specification batteries lose their cold-cranking efficiency due to normal aging and wear. Batteries can be tested either via an adjustable carbon pile load tester, a specific gravity test of the electrolyte in the individual cells, an open-circuit voltage test, or a cell conductance or “electronic” test.
In brief, a fully-charged battery at room temperature should load-test for 15 seconds at one-half of its rated cold-cranking amperage capacity. Batteries with removable cell caps can be tested for a specific gravity at 1.250 times the density of pure water, with a maximum variance of 0.050 between cells. The open-circuit voltage (OCV) is based upon a fully-charged automotive battery developing 2.1 volts per cell or 12.6 volts on a 12-volt battery with the surface charge removed. A 12.4 OCV indicates that the battery is about 75% charged, while an OCV of 12.2 or lower indicates that the battery is discharged or defective.
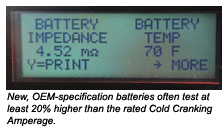
Many modern charging system analyzers use the conductance test to determine battery plate condition. In most cases, conductance tests are very reliable but, during a critical diagnosis, it wouldn’t hurt to follow up with a load-test and, if applicable, specific gravity test.
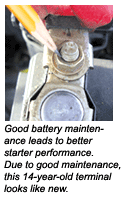
 TERMINALS AND CABLES
The general rule of thumb is that most starter circuits shouldn’t generate more than a 0.5 voltage drop at any connection, so clean battery terminals are absolutely essential for accurate starter testing. To test for voltage drop, set a digital volt-ohm or multimeter on DC volts. Connect the leads to each side of the suspect cable, solenoid or electrical connection. The voltage drop will appear as the engine is cranked.
On occasion, even a clean-appearing battery terminal can cause intermittent cranking complaints. Remember that the critical interface is between the cable and the battery post. In addition to a common baking soda solution, many types of chemical battery terminal cleaners and corrosion inhibitors are available to clean and retard the formation of corrosion.
In other instances, cheap aftermarket cables are manufactured with an insufficient wire gauge size, which restricts current flow to the starter. In addition, many quick-repair terminals quickly become corroded because the copper wire is exposed to gaseous emissions from the battery. When replacing a negative battery cable, remember that the engine, frame and body must be grounded to the negative battery terminal.
 STARTER DIAGNOSIS
Most import OEMs publish a set of cranking voltage and amperage specifications for starters. However, because of better manufacturing methods and materials, most starters fail because the starter drive fails to engage the flywheel. Similarly, a starter may fail if it doesn’t disengage smoothly due to a sticky solenoid or defective overrun clutch.
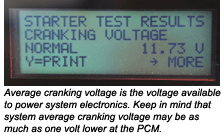
Cranking amperage is usually measured with the ignition or fuel system disabled to prevent starting. Cranking voltage, on the other hand, is a good real-world indicator of both battery and starter condition.
STARTER INSTALLATION
Several precautions should be taken to ensure a more reliable starter installation.
Keep in mind that a harsh impact can crack the permanent magnets in a modern starter and cause very unpredictable starter cranking issues.
Always inspect the flywheel for worn or broken teeth.
Clean dirt or grease from the starter’s mounting surface to ensure correct alignment with the flywheel.
Torque the mounting bolts evenly to prevent warping of the starter’s mounting flange.
Inspect the wiring and cables for potential chafing against ragged sheet metal or contact with hot exhaust manifolds. An ounce of prevention may save an expensive towing fee!