I would have to say, without a doubt, this is where my long time involvement with electricity started. It’s where I learned the difference between a N.O. relay and a N.C., and a few other electrical terms and techniques. (Watch the movie and see if you can spot the N.C. relay.)
What does this have to do with diagnosing today’s cars? Plenty. I call it “playing bomb,” just like in the movie when he asks “cut the red wire or the blue wire?” I use the same method when I’m diagnosing hard-to-find electrical shorts.
Here’s an example: 2002 Hyundai Sonata 2.7 – no start- ECU/EGR fuse blows as soon as you turn on the key. No spark, no fuel pump, no injector signal, no service light.
Coding the car wasn’t an option. For one thing, the fuse that kept blowing also powered up the ECU. So there weren’t any codes that could be read because the ECU was not responding. The big issue was how to find the short that was causing the problem.
Looking at the wiring diagrams just made it worse. There were seven different components tied to the same fuse. From the top of the motor to the bottom, and from the trunk to the front of the engine. I guess you could have disconnected each and every one of the components. Time consuming for sure, but that would have only been helpful if the short was from the connector to the component, and not the entire wiring harness.
At this point, you don’t have a clue as to what component or what part of the car the problem is at, so how do you narrow down the problem into smaller sections that you then can narrow down even further? My method was to find a spot where all of these components get their positive voltage from. The obvious spot was the fuse box.
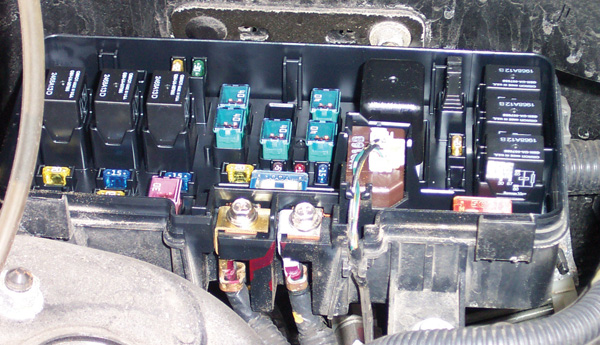
I turned the fuse box over and removed the protective cover to expose the wires. With the battery still hooked up and the fuse removed, I used a standard test light with the end hooked to the positive post of the battery, and probed each of the wires in the circuit with the light. If I came across the correct “grounded” lead, the test light would light up showing that it was the circuit that was grounded.
The leads on the back of the fuse box were in a pairs, two to each terminal on the back of the fuse box. After a few tries, I found the pair that was grounded. Now, to separate the two remaining wires, and get it down to one lead. This is where playing bomb comes in … which one to cut? In this case, they are both the same color, but which one? Leaving the test light connected, I cut one of the wires … BOOM … the light went off. I guess I know which lead to check now.
With this one lead out of the way, I could put a fuse back into the fuse box, and see if all the other systems came back on. They sure enough did. But, I still don’t know which of the seven different components this particular lead went to.
The next thing to do was try to start it with this one lead cut. Of course, I wasn’t expecting it to start, but what I was hoping for was a code and, if this particular lead wasn’t the direct voltage to the ECU, I should get something —P0335 or crank sensor circuit. So far, so good Time to locate and go directly to the crank sensor and disconnected it.
With the sensor disconnected, I could then reattach the lead that I just cut and see if was still shorted. It wasn’t so the problem had to be between the connector and the crank sensor itself. Sure enough, the three leads of the sensor had all their insulation rotted off and the three wires were all tangled together.
Replacing the crank sensor, repairing the wire I cut, and reinstalling the fuse box finished the job up in record time.
Oh, and by the way, this car was at another shop for four days trying to find this problem. All said and done, I spent about 30 minutes diagnosing it. It’s a fast and effective way of finding these type of problems.
This method works well when you have multiple wires on the same circuit, and can also be helpful when there are only two wires in the circuit.
The big thing is, do ya cut the blue one or the red one?… tick-tick, tick-tick, BOOM.
Scott “Gonzo” Weaver is the owner of Superior Auto Electric. He is the author of the book “Hey Look! I Found the Loose Nut”, that can be purchased online at Amazon.com or at gonzostoolbox.com.