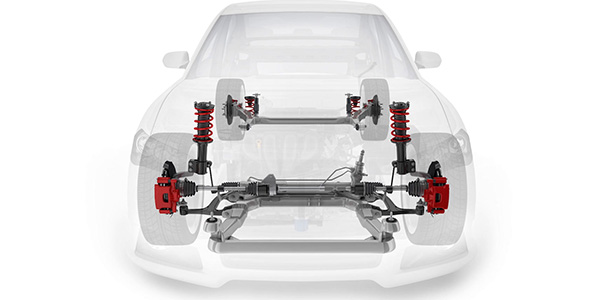
Some 2001-’04 Tributes may experience premature wear and/or noise from the tie rod end, especially from the outer tie rod.
This procedure is designed to provide a more detailed procedure for inspecting tie rod ends. It’s also intended to help prevent unnecessary replacement of the steering rack when diagnosing customer concern of “noise when turning the steering wheel.”
Customers who have this concern should have their vehicles repaired using the following procedure.
Repair Procedure:
1. Free Play: Check the outer tie rod ends by grasping them by hand and pushing up and down. Check the inner tie rod ends, pushing them front to rear.
If any free play is observed in a joint, it’s worn and should be replaced.
2. Stud Lash Free Play: While the vehicle is on the ground or on a drive-on hoist, have an assistant rotate the steering wheel rapidly back and forth from 10 o’clock to 2 o’clock to 10 o’clock while observing the inner and outer tie rods.
If the outer tie rod ends have any vertical movement or the inner tie rod ends have any horizontal movement, the tie rod end with the observed movement should be replaced.
3. Seal/Boot Inspection: Raise the vehicle on the hoist and remove the front wheels. The wheels need to be turned to the left to inspect the passenger’s side inner tie rod end and to the right to inspect the driver’s side inner tie rod end. Inspect all four seals/boots for tears, perforations and wear.
If there is any indication of wear or damage to the seal/boot for the inner tie rod, the seal/boot should be replaced after confirming there is no damage to the inner tie rod end ball joint.
For wear, damage or failure at the outer seal/boot, the tie rod end itself should be replaced.
4. Stud Corrosion: If a squeak is noticed during step 2, disconnect the tie rod from the knuckle and articulate the stud in the socket. If a squeak, binding or looseness is verified, replace the part.
Note: If any tie rod ends are removed, inspect the seal and the stud again, noting any differences in appearance and feel from when the part was on the vehicle. Checking the component after removal helps improve effective diagnosis when inspecting parts on the vehicle.
5. Verify the repair.
Courtesy of IDENTIFIX.
For additional tech tips, visit www.identifix.com.