Tech Tip: Toyota Prius Metallic Knock – UnderhoodService

Tech Tip: Toyota Prius Metallic Knock

Some Prius owners may complain of a metallic knock or clunk noise from the engine bay heard only while driving over speed bumps or rough road conditions. The engine mount assembly has been improved to prevent this condition. Follow the repair procedure in this tech tip to correct the condition.

By Dennis Shortino, ALLDATA editor and Jeff Webster, ALLDATA technical writer.

Some Prius owners may complain of a metallic knock or clunk noise from the engine bay heard only while driving over speed bumps or rough road conditions. The engine mount assembly has been improved to prevent this condition. Follow the repair procedure in this tech tip to correct the condition.

Applicable Models:
This TSB applies to 2004-’08 Prius vehicles ­produced before the production change effective VINs shown.

PLANT                   PRODUCTION CHANGE EFFECTIVE VIN*
Tsutsumi                 JTDKB2#U#83430579
Toyota Auto Body    JTDKB2#U#87793270
*Underlined number in VIN (11th digit) represents assembly plant line code.

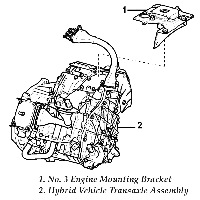
Note: The affected mount is attached to the hybrid transaxle. The part name in this service bulletin is “Engine Mounting Insulator LH” (left-hand). This is also referred to as “No. 3 Engine Mounting Bracket.”

Repair Procedure:

After verifying that the “knock” noise is coming from the area near the hybrid transaxle, replace the engine mounting insulator LH with a new part.
fig. 1
1. Remove the inverter w/converter assembly. Note: Do not replace the inverter.

2. Support the hybrid transaxle assembly by using a transmission jack.

3. Remove and replace the engine mounting insulator LH (No. 3 Engine Mounting Bracket) (see Fig. 1).

  a. Remove the engine mounting insulator sub-­assembly LH from the vehicle.
fig. 2
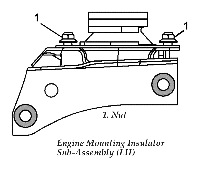
  b. Remove the two nuts from the engine mounting insulator sub-assembly LH (see Fig. 2).

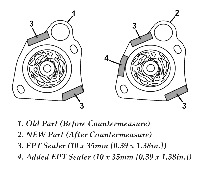
  c. Replace the engine mounting insulator LH with the new part (P/N 12372-21111) (see Fig. 3).

  d. Tighten the two nuts. Torque: 47 ft.-lb. (64 Nm).

  e. Attach the engine mounting insulator sub-assembly LH on the vehicle. Torque: 59 ft.-lb. (80 Nm).

4. Install the inverter w/converter assembly.
Fig. 3
5. Road-test to verify proper operation of the vehicle.

Courtesy of ALLDATA.

You May Also Like

Hybrid Vehicle Fluid Maintenance

There are opportunities your shop can’t pass up just because the car or SUV has a hybrid badge on the back.

There are more than seven million hybrid vehicles on the roads in the U.S. The one thing they all have in common is that they will need maintenance. Even EV vehicles will require maintenance and potentially a certain amount of service at some point.

Many hybrid vehicles will have more maintenance items than a conventional internal combustion-only vehicle due to the hybrid drivetrain. These are opportunities your shop can’t pass up just because the car or SUV has a hybrid badge on the back.

Repairing Wiring Harnesses

A guide to probing and poking.

Diesel Air Filter Replacement

Here are some diesel air filter replacement tips in order to keep these vehicles running as intended.

Belt Service For Hybrid and Stop/Start Systems

Knowing how to “force start” a hybrid vehicle can be helpful if you are trying to diagnose a noise problem that involves the accessory belt drive system.

Diesel Turbocharging Basics

There’s a reason diesels typically utilize compound turbo setups instead of twin turbochargers.

Other Posts

Why Alternators Are Subject To Ripple Voltage

The alternator produces an AC current that must be converted into DC current by way of a rectifier.

Belts and Pulley Alignment

A misalignment of the plane of the belt can occur when a pulley is not parallel to the other pulleys on the belt drive system.

Diagnosing Misfires

What if there are no codes and a misfire is intermittent? This is where it gets complicated.

Lifter Deactivation

The area of contact between the lifters and cam lobes is the highest loaded surface inside an engine.