When removing and/or replacing the fuel injector(s), it’s imperative that the below instructions be strictly followed. Failing to do so may result in damage to the injector(s).
Applicability: All Legacy, Impreza and SVX models.
 Note: Pliers or any other tools not specified in these instructions should not be used under any circumstances to prevent damage to the fuel injector(s).
Fuel Injector Removal:
1. Disconnect the fuel pump connector. Start the engine and allow the engine to stall. Crank the engine for five seconds and turn the ignition switch to the off position.
2. Remove the air cleaner upper case, air flow meter and the air inlet boot as an assembly. On SVX vehicles, also remove the power steering hose tie-wrap on the right side of the engine.
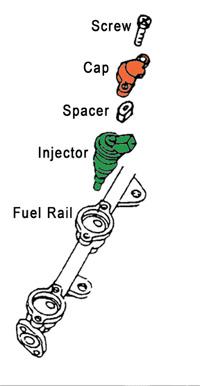
3. Remove the fuel injector cap(s), being very careful not to misplace the rubber spacer(s) fitted between the cap(s) and the injector(s). The rubber spacer(s) must be reinstalled with the new injector(s). Refer to Figure 1.
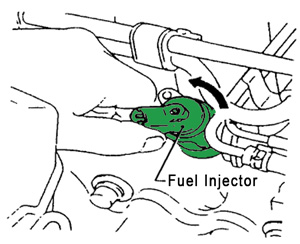
4. Using only your fingers, turn the fuel injector(s) 90°. The fuel injector(s) connectors on both sides of the engine should be pointed toward the front of the vehicle. See Figure 2.
5. Using a large flat screwdriver with a 3/8” to 1/2” blade, gently pry the injector up by twisting the screwdriver between the underside of the fuel injector connector area and the fuel injector cap mounting area. See Figure 3.
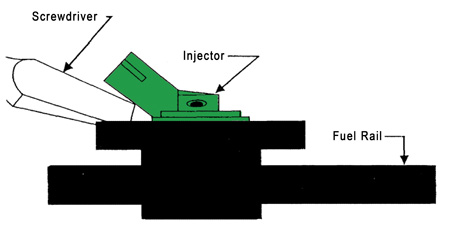
Note: Be careful not to damage the fuel injector cap mounting threads.
6. Remove the fuel injector(s) and place it in the box that contained the new injector(s) or wrap it to protect it during return shipping and handling. Any injectors received “damaged” will not be accepted.
Fuel Injector Installation:
1. Coat the fuel injector “O” ring(s) of the new injector(s) and the mating area of the fuel rail with engine oil. Install the fuel injector(s) into the fuel rail and carefully push it in by hand until it’s fully seated. Make sure the injector connector is in the correct position so the injector cap can be correctly installed.
2. Place the rubber spacer(s) back in position and install the injector cap and bolts.
3. Reconnect the fuel pump connector.
4. Reinstall the air cleaner case, air flow meter, air inlet boot and tie-wrap for SVX vehicles that were previously removed.
5. Start the engine while holding the accelerator open 1/4 throttle to clear any fuel that may have dripped into the intake manifold.
6. Carefully check each injector for leaks.
Technical service bulletin courtesy of ALLDATA.
For additional information, visit www.alldata.com.