The traffic whizzed by at seventy plus. The good news: The flat is on the rear passenger side and the lug nuts came off with little strain. The bad news: The alloy wheel is seized on the hub and it isn’t going anywhere. Twist of fate: I forgot to chock the front wheel and the car rolls off the jack. The bad news: Don’t know if I can get the jack back under the car. The good news: The fall from the jack has knocked the wheel loose and it is now resting on the studs. Conclusion: I chocked a front wheel, managed to reposition the jack, raise the car and change the tire. When a wheel seizes on a hub, it will take some kind of force to remove it and heat is not your friend.
In the Northeast and Midwest, a flat tire and the alloy wheel seized (two parts jammed or stuck) on the hub is a common occurrence caused by corrosion. Corrosion and rust are nasty stuff that makes it difficult to repair a vehicle. Corrosion is the product of an electrochemical reaction. A recipe for corrosion: Two dissimilar metals and an electrolyte. Ingredients: An alloy wheel, a steel bearing hub and saltwater. There is a difference between oxidation and corrosion.
Oxidation is an element combining with oxygen. The process is accelerated in the presents of water and heat. Iron oxidizes to form rust (Iron Oxide). Aluminum oxidizes to form a white powder (Aluminum Oxide).
The best example of corrosion readily visible is the white or bluish green stuff that appears around battery connections. The end result is this stuff fills the gap and seizes the parts into one immoveable object or destroys the part.
Seized Wheel
A wheel that has seized on a bearing or axle hub can slow down a brake job. Shop solution: Loosen the lug nuts and spray a penetrating agent on the hub. Try rocking the vehicle from side to side. Last resort: drive the vehicle slowly 50 to 100 feet and rock the steering wheel from side to side. Heat is not your friend. The gas wrench can lead to some not-so-good results.
Composite and Cast Drum
The composite drum was developed out of a need to reduce the weight of passenger cars and light trucks. The composite drum is produced by stamping a steel flange and placing it into a mold. Molten iron is poured into the mold.
The flange fuses with the molten iron to form the drum. Tabs cut during the stamping process also help form a mechanical bond. There are also full cast drums that were the first type of brake drum used on passenger cars and light trucks. The additional stiffness of these drums allow tighter machining tolerances, as well as better static balance by machining both the interior and exterior surfaces.
Drum and Rotor Removal
Moving on to other nasty things. A drum seized on the hub. First things first, removing the retaining clips. There are two types of clips. The push nut is used to retain the drum or rotor during the assembly of the vehicle and can be discarded. The C clip is the second. Drums and rotors that use a C clip should be replaced or reinstalled.
So how do you get a seized drum off without destroying it and or ruining the hub or drum flange? There are penetrating agents, pullers, hammers and the gas wrench.
A penetrating agent can’t hurt. Pullers can distort a drum flange. Hammers break things. Heat must be used with great caution. Lubricants and seals burn.
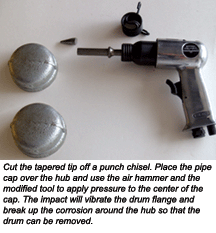
Here is a different twist on the hammer. It starts with a 2 inch and a 2-1/2 inch galvanized pipe cap. These will cover most of the axle and bearing hubs. (You will have to try a plumbing supplier to find a 2-1/2 inch as most home centers stop at 2 inch)
Using an air hammer and modified chisel: Cut the tapered tip off a punch chisel. Place the pipe cap over the hub and use the air hammer and the modified tool to apply pressure to the center of the cap. The impact will vibrate the drum flange and break up the corrosion around the hub so that the drum can be removed.
You should wear a respirator when you use the tool, as it will raise dust that could contain asbestos.
 Rotor Seized on the Hub
Rotors can be full cast or composite with a stamped steel center hat section mated to a cast iron rotor friction surface that is either solid or vented. Composite rotors began to appear in 1980s on a number of vehicle applications.
You can use the same process to remove this type of rotor as used on the drum.
The composite rotor is lighter than conventional one-piece cast iron rotor, but tended to warp and proved difficult to machine. The composite rotor is normally replaced with a full cast rotor. If you are replacing a composite rotor, you should replace both of the rotors to ensure proper braking. The alignment should be checked after the rotors have been replaced as the change in the thickness of the hat section of the rotor can affect camber and change the track of the front wheels.
The two-piece rotor is starting to appear on some performance vehicles. The hat of the rotor is machined aluminum and is fitted to the bearing or axle hub assembly and provides a series of mounting lugs for the rotor friction surface. The rotor is mechanically attached to the hat section with bolts and anti-rattle clips. These rotors are referred to as floating rotors that allow the friction surfaces of the rotor to expand and contract without putting any stress on the hat section.
The drum-in-hat rotor brake assembly can use either a solid or a vented rotor. The addition of a drum in the flange or hat allows for a conventional drum parking brake. The brake is a conventional Bendix-type self-energizing backing plate and shoe set with the mechanical actuator and no wheel cylinder.
There is no self-adjusting mechanism for the brake. Some of these rotors are pressed onto the hub and will require two bolts be screwed into two taped holes in the rotor. The bolts are used to push the rotor off the hub and studs. An example of this is a late-model four-wheel-disc-brake-equipped vehicle.
 For your safety and good health, it is suggested that you use an OSHA-approved “wet collection” method for cleaning brake assemblies. There are a lot of unknown substances floating around in the dust that gets blown around, even if there is no asbestos.
What can I do to prevent this from happening again? When you reinstall, clean the mounting surfaces and lug cavities of the wheel, bearing flange and hub, and both sides of the brake drum flange or brake disc hat. This will insure that the wheel torque to the lug nut or wheel bolt will remain proper and the lug nut or wheel bolt will not loosen when the vehicle is driven. You can apply a light coating of dielectric grease or anti-seize compound to the bearing or axle hub and drum or disc flange where it mates to the hub.
A parting thought: If the engine quits at seventy plus, you have a chance of braking to a safe stop. If the brakes fail at seventy plus, you are probably going to come to a crashing stop. Cover your assets by doing everything to make for good, reliable stops.