Use the following procedure when adjusting the mechanical camshaft belt tensioner on 1998 Volvo S70/V70/C70 (B52X2/B52X4) vehicles with engine serial number 1266128-on.
Service Procedure:
1. Install the timing belt.
2. Ensure that the belt is tight between the crankshaft and the intake pulley; if not, reinstall it.
3. Tighten the center screw to 5 Nm (4 ft.-lb.).
4. Holding the center screw stationary, turn the eccentric (A) with a 6 mm Allen wrench counter-clockwise until the tension indicator passes the right side of the adjustment window (B). See Fig. 1.
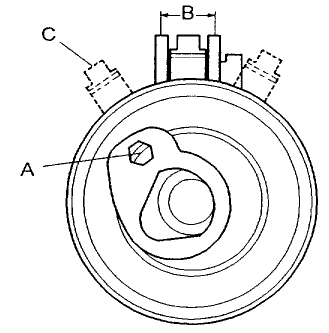 5. Turn the eccentric (A) back clockwise until the indicator (C) reaches the correct position based on the temperature of the engine (see Fig. 1).
6. Hold the eccentric secure and tighten the center screw to 20 Nm (15 ft.-lb.).
Note: When setting the final adjustment, the needle (C) must enter the adjustment window (B) from the right. If the needle exits the window to the left, it must be readjusted past the window so that it enters from the right. See Fig. 1.
7. Press on the timing belt and verify that the indicator moves in response to the pressure.
8. If the bolts holding either cam wheel had been loosened, tighten them at this time to 20 Nm (15 ft.-lb.).
9. Press the camshaft belt and check that the belt tensioner needle moves freely.
Needle Position at Different Temperatures:
Note: This adjustment is always carried out on a cold engine. A suitable temperature is approximately 20°C/68° F.
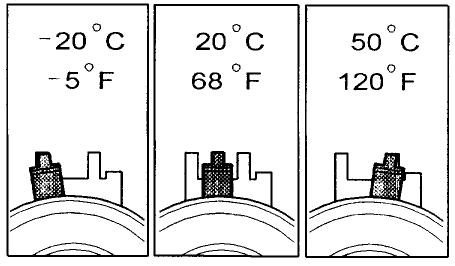 At higher temperatures, for example with engine at operating temperature or at higher ambient temperature, the indicator is farther to the right. See Fig. 2 which shows the needle position when adjusting the camshaft belt tensioner at different engine temperatures.
Courtesy of IDENTIFIX.
For additional information, visit www.identifix.com.

