Since TPMS became standard equipment in 2008, many sensors are starting to show their age. While some of these sensors may have a lot of battery life left, the sensors’ stems are starting to fall victim to corrosion. Here are five tips that can help you avoid snapping stems and have the shop eat a sensor.
1. Replace Valve Caps
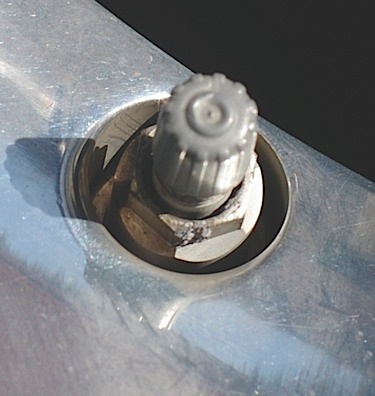
If someone put a chrome or steel valve cap onto an aluminum stem, there will be galvanic action causing the cap to seize to the stem. The appropriate valve caps are plastic or aluminum or a valve caps that have a nickel coating on the outside to prevent them from seizing. Many manufacturers are finding that their cars in the salt belt states that have the correct aluminum valve caps are still experiencing corrosion and caps are sticking to the stems. Some manufacturers are recommending that you change all the valve stem caps to plastic caps. Depending on where you live, this may be a good proactive course of action.
2. Advising A Customer About Stuck Valve Cores
A valve core stuck in the stem can be a productivity killer and potential problem for your shop and customer. The core can become stuck due to corrosion or crossed threads. You have three options and all options involve telling the customer before possibly snapping off the stem. The first option is to leave it alone and tell the customer about the condition. This can prevent getting a car stuck in the bay or the customer stuck in your waiting room. The second option is to exceed torque limit when trying to remove the valve core. It could come loose or it could snap the stem. Make sure to sell the customer a sensor before attempting this. The third option is to drill out the old stem, tap the opening and install a specialty replacement stem. All three methods involve telling the customer ahead of time before attempting to remove the valve core. It is not your fault if a stem breaks due to corrosion.
3. Ask If Previous TPMS Work Has Been Performed
If a customer brings a car in with a TPMS light on, ask them if there has been any previous work performed on the vehicle and if any sensors have been replaced. Hopefully, your shop replaced the sensor, but if another shop did the work, you need to check the sensors before you give the customer an accurate estimate. If one or more sensors do not look like the others, you could be stuck in a diagnostic conundrum. Some aftermarket sensors need to be programmed by proprietary methods to clone the OE sensor. This can be a problem if your shop does not have the tool.
4. No More Dish Soap And Water
Water and dish soap have always been the tire technician’s best friend. But, to the TPMS sensor, it can be it’s worst enemy. Water inside the rim and tire can cause corrosion. Also, dry air and humid air have different properties. It will cause the TPMS light to come on sooner as the tire cools or heats up. Use only mounting paste. The price of a small bucket of paste is less than the cost of a comeback.
5. Always Install A New Nut
The best way to prevent corrosion is to replace the kit every time the sensor is removed or disturbed. The typical kit includes a nut, valve core, grommets and valve cap. Each component has a specific function and lifespan that is not only determined by time, but what happens when – and after – it is installed. This goes for sensors that are six months old or six years old. TPMS fastener nuts are designed in anodized aluminum to eliminate the contact of two dissimilar metals that would create galvanic corrosion and material deterioration. The nut has a bonded lubricant to help provide the proper torque required for seating a new grommet. If a nut is reused, the anodized surface may be scratched away and corrosion could occur between the sensor, wheel and the stem.