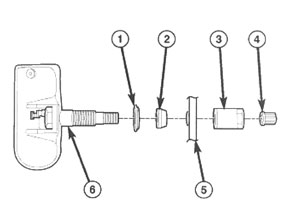
Anytime a TPM sensor is reused on a wheel, it is necessary to install a new sensor-to-wheel seal (2), metal washer (1) and valve stem nut (3), to ensure proper sealing around the sensor valve stem (6). See Figure 1.

1. Wipe the area clean around the sensor/valve stem mounting hole in the wheel (5). Make sure the surface of the wheel is not damaged.
Caution: To avoid damaging the sensor antenna strap, hold pressure against the rear of the metal valve stem while the sensor is inserted through the wheel mounting hole and the nut is installed.
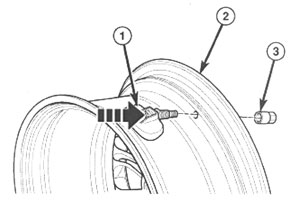
2. Insert the sensor (1) through the wheel (2) as shown in Figure 2 keeping pressure against the rear of the metal valve stem (see arrow). The potted side of the sensor is to be positioned toward the wheel. Do not attempt to mount the sensor otherwise, damage may occur.

3. Install the sensor nut (with pressed-in washer) (3) by hand.
Note: Before tightening the sensor nut, push downward on the sensor housing in an attempt to make it flush with the interior contour of the wheel.
4. While holding the sensor in position, tighten the sensor nut to 6.5 Nm (58 in.-lbs.).
Caution: Over-torquing the sensor nut by as little as 12 Nm (106 in.-lbs.) may result in sensor separation from the valve stem. Under this condition, the sensor may still function. However, the condition should be corrected immediately.
5. Mount the tire on the wheel following the tire changer manufacturer’s instructions, paying special attention to the following to avoid damaging tire pressure sensor:
a. Rotating Wheel Tire Changers — Once the wheel is mounted to the changer, position the sensor valve stem approximately 210° from the head of the changer in a clockwise direction before rotating the wheel (also in a clockwise direction) to mount the tire. Use this procedure on both the upper and lower tire beads.
b. Rotating Tool Tire Changers — Position the wheel on the changer so that the sensor valve stem is located approximately 210° clockwise from the installation end of the mounting/dismounting tool once the tool is mounted for tire installation. Make sure the sensor is clear of the lower bead breaker area to avoid damaging the sensor when the breaker rises. Rotate the tool in a counterclockwise direction to mount the tire. Use this procedure on both the upper and lower tire beads.
6. Adjust air pressure to that listed on the Tire Inflation Pressure Label (placard) provided with the vehicle (applied to driver’s side B-pillar). Make sure the original style and color valve stem cap is securely installed to keep moisture out of the sensor.
7. Install the tire and wheel assembly on the vehicle. Tighten wheel mounting nuts to 135 Nm (100 ft.-lbs.).
8. Lower the vehicle.
Note: Once a sensor has been replaced and the vehicle has remained stationary (0 mph) for more than 19 minutes, the WCM automatically learns and stores the sensor’s ID while driving.
9. Drive the vehicle for a minimum of 10 minutes while maintaining a continuous speed above 15 mph. During this time the system will learn the new sensor ID code and will clear any DTCs automatically (refer to above note).
Note: If a sensor cannot be trained, refer to appropriate diagnostic information.
Courtesy of ALLDATA.
For additional information on ALLDATA, visit www.alldata.com.


