Note: Worn differential fluid that has not been replaced at the recommended service intervals can cause the same condition. Determine if the fluid has been replaced at the recommended intervals. If it has not been replaced at the recommended intervals, follow the below Repair Procedure.
Diagnosis:
To duplicate the problem, do 10 figure-eight patterns with the steering wheel at full lock. Listen for a noise and feel for a shake. Accelerate at the start of each circle to make sure the clutches engage and disengage. Do not use the VTM-4 LOCK button. As an alternative to doing figure-eight patterns, you may do 10 circles to the left and 10 circles to the right instead. If you can hear the noise and feel the shaking, follow the Repair Procedure; otherwise continue with normal troubleshooting. Replacing the contaminated differential fluid will usually solve the problem.
Applicable models: all 2003 and later Pilot and all 2006 and later Ridgeline.
Repair Procedure:
1. With the engine off, raise the vehicle on a lift in a level position.
2. Remove the differential filler plug and its sealing washer. Save the sealing washer. See Fig. 1.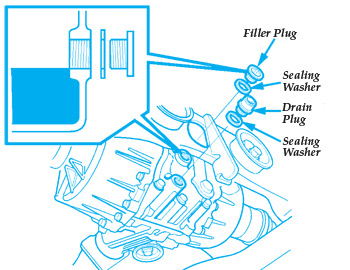
3. Remove the differential drain plug and its sealing washer to drain the differential fluid. Save the sealing washer. See Fig. 1.
Note: The drained fluid should look red. If it looks pink, it means water entered the VTM-4 differential through the vent tube breather in the rear subframe. This can happen after launching a boat or driving through water deep enough to cover the tires. If the fluid looks pink, replacing the fluid may not get rid of the noise and judder.
4. Clean the drain plug, then reinstall it with the sealing washer you saved in step 3. Torque the drain plug to 35 lb.-ft. (47 Nm).
5. Fill the differential with differential fluid until the fluid level reaches the bottom of the filler hole.
Note:
• To avoid contamination, always fill from an unopened fluid container.
• Always use a dedicated hand-operated fluid pump to fill the differential. Never use a pump driven by compressed air.
6. Reinstall the filler plug with the sealing washer you saved in step 2. Torque the filler plug to 35 lb.-ft. (47 Nm).
7. Drive the vehicle in a figure-eight pattern with the steering wheel at full lock. Accelerate at the start of each circle to ensure the clutches engage and disengage. Complete at least 10 patterns.
8. With the engine off, raise the vehicle on a lift in a level position.
9. Remove the oil filler plug and its sealing washer. Discard the sealing washer.
10. Remove the drain plug and its sealing washer to drain the differential fluid. Discard the sealing washer.
11. Clean the drain plug, then reinstall it with a new 18 mm sealing washer (P/N 90471-PX4-000). Torque the drain plug to 35 lb.-ft. (47 Nm).
12. Fill the differential with VTM-4 differential fluid (P/N 08200-9003) until the fluid level reaches the bottom of the filler hole.
13. Reinstall the filler plug with a new 20 mm sealing washer (P/N 94109-20000). Torque the filler plug to 35 lb.-ft. (47 Nm).
14. Test-drive the vehicle in a figure-eight pattern to make sure the noise and judder are gone. Accelerate at the start of each circle to ensure the clutches engage and disengage. Note: You may need to do up to 10 patterns to get rid of the noise and judder.
Written by Jeff Webster, ALLDATA technical writer.