By Brendan Baker
Senior Editor
Engine Builder Magazine
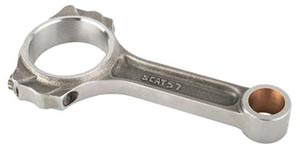
When you’re looking at connecting rods and considering returning them to service, there are many things you must consider. They are one of the most critical pieces of the engine puzzle and under great strain when in operation, so you must pay attention to the details during the rebuilding process.
There are many times when reconditioning the connecting rods is a necessary part of engine rebuilding. In many applications it is acceptable, and significantly less expensive, to rebuild rather than replace a set of rods. In the heavy-duty market, for instance, many engine rebuilders prefer to recondition the connecting rods whenever possible because the components are typically expensive to replace and it’s not always necessary. However, like the rest of the engine, there are “best” practices that must be followed to ensure a quality engine build and to avoid costly comebacks.
Experts say reconditioning connecting rods involves thoroughly cleaning them first to check for any visible damage. After cleaning and inspecting them, you may find obvious clues that damage exists. Knicks and burrs, or discolored rods can often be signs of a rod that will fail down the road.
The next step is to put the connecting rods through a magnetic particle inspection (MPI). This step will reveal any hidden damage such as cracks or other stressors and imperfections that cannot be seen. After the MPI has been performed, if the rods still look to be in good shape, they should be checked for bend and twist, which if too much, may negate the rest of the reconditioning process. Experts say too much bend or twist may have been the result of an over-revved engine or insufficient oil clearance, and if not properly straightened or replaced, will lead to certain engine failure.
 Careful inspection and handling isn’t reserved only for used rods, however. One engine builder cautions that you should always check the connecting rods thoroughly even when they’re new, because you never know when one will be out of spec and create problems down the road. And new or used, that’s the last thing you want to have happen to your rebuilt or remanufactured engine.
The main purpose of reconditioning rods is to build a set of rods that are straight and of the correct length. In typical light-duty applications, four- and six-cylinder gasoline and diesel engines, experts say the rods should be machined back to original specs with no more than .0025" of bend and .00425" of twist. A rod with too much bend will limit oil clearance from one side to the other and possibly lock up at the pin end or at the thrust face on the crankshaft. Furthermore, they must have round and concentric bores, and the fasteners must also be able to withstand the stresses of that application — whether it’s a performance engine or heavy-duty application.
To ensure long engine life, the rods must be aligned correctly and the bearing surfaces must be smooth and perfectly round. Any lobing, chatter or misalignment, particularly in engines that operate at higher revs, will affect the engine’s performance.
After the rod has been cleaned and inspected thoroughly, it should be put back together with the rod bolts torqued. With a stretch gauge, check each rod bolt for proper stretch. If the stretch is out of specification, then replace the bolt. While some engine builders say that it is safer and less expensive to just replace the rod bolts instead of measuring the stretch, others say that practice really depends on the application, because some high performance rod bolts can be quite expensive.
After the caps are torqued on with acceptable rod bolts, measure the big end bores. This will help you to determine how much to take off the caps and what size you’ll need to hone them to. In general, you want to take off as little material as possible to make the bore round again. Experts say you should not take off more than .002" of material off the big-end at a time. After you hone the big end, measure the rod to see what size bushing you need to put in the pin end.
If during the inspection process a bent or twisted rod is found, it may be possible to straighten. One method of correcting bend or twist is called cold bending. This can be achieved using a special holding fixture. When performing this procedure, it is important not to nick or scratch the rod, caution experts. Nicks and scratches weaken the connecting rod and may lead to possible breakage. Experts say you must first determine the direction of bend or twist.
Most bends in the rod will be located near the small-end bore. Place the connecting rod into the straightening fixture using the correct size big-end and small-end adapters. Install the cap and torque the cap bolts to specifications. Select the appropriate bending bar. It should closely fit the rod to prevent nicks and scratches. Use the bar to bend the rod in small increments. Measure the progress on a rod alignment fixture.
Once the connecting rods are straightened, bored and honed, then you can put the proper size bushing in the small end, which is a very important step according to some engine builders. It is recommended that you press out the old piston-pin bushing and install new ones. And to ensure that the bushing won’t rotate, you should expand it to conform to the small end bore. To expand this bushing, press a hardened steel ball through the I.D. of the new bushing. This will lock in the new bushing and prevent it from spinning in the bore. If you heat the rod to install the new bushing, you should allow it to cool before you expand the bushing with this broaching technique. Then grind the cap to the correct center-to-center dimension and hone the big end and install new rod bolts.
There are many different types of connecting rods from cast steel to powder metal (PM) “cracked” rods to all the various types of performance rods.
More than half of the connecting rods used in today’s late-model engines are powder metal I-beam design. PM rods are constructed by compressing powdered steel into a mold and heating it to a high enough temperature where the powder melts and fuses into a solid piece. This process allows the rods to be cast with very precise tolerances, thus reducing the amount machining required to finish the part, making it less expensive to produce higher quality rods.
PM rods are made up of a composite of alloys that allow rod caps to be “cracked” at the parting line rather than split with a straight cut. Many PM rods are not serviceable because you cannot grind down the caps to bring it back to original specifications. In some cases, there are oversize O.D. bearings available that will allow you to hone the big-end and fit a larger bearing.
The benefit to manufacturers is that the fractured PM rod is popped out like an egg with very little machining to make the center-to-center distances right. It comes out of the casting process the final size and is broken at a scored line that is part of the design. A PM rod can be manufactured for less cost than traditional rods and is a more durable component, experts note.
The resulting fracture is like a piece of broken china. It has a very distinctive surface that custom fits together. The fracture has more surface area because you have peaks and valleys, and the alignment is more accurate since the cap only fits together one way.
For engine builders, there’s not much you can do with fractured PM rods. You can’t cut the caps because of the unique break on each one. And, for the most part, you cannot hone the bore because there are very few oversize O.D. bearings available. Some suppliers carry oversize O.D. bearings for the big end of popular applications, but we’re uncertain if bushings are available for the pin end.
For performance applications, some engine builders check the Rockwell hardness level of the rods before continuing with a rebuild. Performance rod manufacturers know what heat treatments have been applied and what hardness range is acceptable. Before reconditioning a performance rod it may be a good idea to contact the rod manufacturer. One manufacturer of performance rods says that any rod over 43 Rockwell C, isn’t worth rebuilding. If the hardness level has dropped, it’s a good indication that the rods were overheated and it has affected the heat treatment. Experts also caution that the color of the rods may be misleading, if the problem is caught soon enough and it hasn’t affected the heat treatment then they’ll probably be acceptable to recondition.
After rods pass the hardness test and are cleaned and inspected, the caps should be bolted back on and then torqued to specification. Using a stretch gauge, check each rod bolt for proper stretch according to manufacturer specifications. Some experts say you that you should replace all rod bolts as a matter of practice but others say it depends on the application because performance rod bolts can be expensive.
It is recommended that if the rod requires straightening to replace the rod bolts after the straightening process. Most connecting rod bolts are press-fit into the connecting rod, so it’s a good practice to press both bolts out at the same time instead of hammering them out one at a time. They should press out easily. If excessive pressure is required, you may have to heat them in a rod heater, otherwise you could break or bend the rod.
After the caps and rods are machined, new bolts can be installed. When installing the bolts, it is important to protect the parting surface of the rod. A fixture can be made or purchased for installing the bolts. With the rod located over the fixture, the bolts can be seated with a punch or hammer.
Reconditioning connecting rods is an important and often times a necessary step in the engine rebuilding process. They are under tremendous stress from continuously stopping and changing direction, combined with the weight of the piston and speed of the engine beating on the bearings and pulling on the rod bolts that hold everything together. The processes used to recondition connecting rods vary a little from engine to engine but the end result should be the same – straight rods and smooth, round bores.
As a rule of thumb, this checklist should be followed to properly recondition connecting rods:
1) Check the parallelism, alignment and the roundness of the connecting rods.
2) Replace or recondition the unaligned or bent connecting rods.
3) Replace all the connecting rod bearings/bushings.
4) Inspect rod bolts for stretching and thread damage. If in doubt, replace the rod bolts. This should be done before the connecting rod is resized because some bolts are pressed into the rod and will cause distortion that will be corrected during the resizing process.