Rich Diegle
Senior Automotive Editor
Some 2004-2006 Pontiac GTO customers may comment on a knock noise from the front suspension when driving at low speeds over bumps or uneven road surfaces.
This condition may be caused by the lower coil of the spring touching on the side lip of the spring seat. The illustration shows the rub mark on the spring coil.
The spring coils contacting the body sheet metal within the wheelhouse area may also cause this condition.
To make the appropriate repairs, follow the inspection and service guidelines below.
Service Procedures 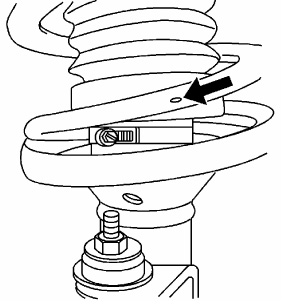 (Review safety procedures in ALLDATA Repair before beginning)
Inspection
1. Inspect the tightness of all front suspension fasteners. If they are OK, proceed to Step 2.
2. Inspect the body sheet metal around the inside of the strut tower for signs of spring coil rubbing.
3. Inspect the second lower coil on the inboard side of the spring for signs of chipped or marked paint, as shown in the illustration.
4. If marks are found as described in Steps 2 and 3, proceed to Procedure A.
Procedure A
1. Remove the spring from the strut assembly and re-install it upside down (with the thin coil end resting on the spring seat).
2. Carefully reinstall the upper bearing (yellow plastic housing), ensuring that it is located correctly in the upper spring seat.
3. While the strut is removed from the vehicle, cycle the control arm up and down.
– If a noise is heard from the lower control arm rod front insulator bushing, reinstall the strut assembly to the vehicle and proceed to Procedure B.
– If no noise is heard, install new strut-to-steering knuckle attaching bolts (Pontiac P/N 11090821) and nuts (Pontiac P/N 92138205). Tighten the nuts while applying pressure to the top of the brake rotor. This will ensure that the camber adjustment bolt is against the strut tube, eliminating the need to perform a front end alignment.
Tightening Procedure
1. Tighten the nuts to 85 N.m (62 lb ft).
2. Tighten the nuts to 100 N.m (74 lb ft).
3. Tighten the nuts an additional 90 degrees.
Procedure B
NOTE: Only perform this procedure if Step 3 from Procedure A confirms that it is necessary.
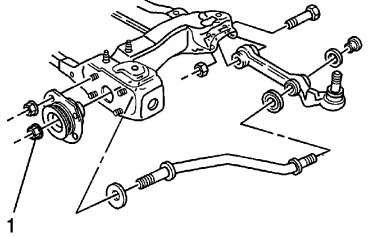 1. Remove the front lower control arm rod nut (1). (Pontiac P/N 11076363)
2. Install a new nut, but do not fully tighten.
3. Bounce the front of the vehicle up and down several times to stabilize the suspension.
4. Tighten the lower control arm rod nuts to 148 Nm (109 lb. ft.).
Written by ALLDATA Senior Automotive Editor, Rich Diegle. Rich is an Advanced Engine Performance Certified, ASE Master Technician with an AA Degree in automotive technology and 23 years of dealership and independent shop experience.
For additional information, visit www.alldata.com.