 Models Affected: 97-’04 Boxter/Boxter S M96.23, M96.24 Engines
Examination of engines that were the subject of complaints revealed other oil leaks in addition to those found in the crankshaft sealing ring on the flywheel side. These engine oil leak areas included:
• Crankcase bolt threads
• Intermediateshaft flange area.
Since March 10, 2004, bolts with a sealant coating on the thread and head have been used during assembly to fasten the crankcase halves in the area of the flywheel.
On vehicles manufactured prior to the above-mentioned date, the four crankcase bolts and the three intermediate shaft flange bolts must be replaced in addition to the crankshaft sealing ring in the event of an oil leak in the area.
Parts Information
999 85 004 09 New/Coated crankcase bolt, M6 x 35 (4 ea. required per vehicle)
900 385 275 09 New/Coated bolt for intermediate shaft, M6 x 20 (3 ea. required per vehicle)
999 113 490 40 Shaft seal
Repair Procedure
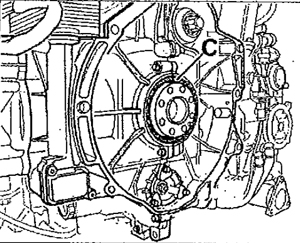
1. Replace crankshaft sealing ring (Figure 1, Item C). (see Technical Manual, Group 1, Repair, 13 59 19 – Removing and installing crankshaft sealing ring – flywheel side.)
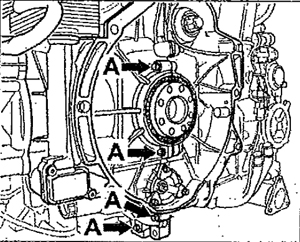
2. Replace four bolts on the crankcase (Figure 2, Item A).
2.1 Unscrew and remove the four bolts (Figure 2, Item A) and clean oil residues out of the threaded holes using a suitable cleaning agent (e.g., brake cleaner).
2.2 Screw the new bolts, Part No. 999 385 004 09, completely into the threaded holes. Tightening torque: 9.5 ft.lbs. (13 Nm)
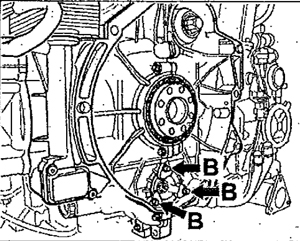
3. Replace fastening bolts on the intermediate shaft flange (Figure 3, Item B). Since the intermediate shaft flange is loaded by the chain tensioners, the fastening bolts must be replaced only one at a time.
3.1 Unscrew and remove one fastening bolt and clean oil residues out of the threaded hole using a suitable cleaning agent (e.g., brake cleaner).
3.2 Fully screw the new bolt, Part No. 900 385 275 09, into the threaded holes. Tightening torque: 7.5 ft.lbs. (10 Nm)
3.3 Repeat steps 3.1 to 3.2 for the second and third fastening bolts.
Some or all of this information was provided by the Automotive Parts Remanufacturers Association (APRA). For more information on technical bulletins available through APRA call (703) 968-2772 or visit www.AutoBulletins.com.


