By Dennis Shortino, ALLDATA editor and Jeff Webster, ALLDATA technical writer
Symptom/Condition
During high humidity climate conditions, some Chrysler, Dodge or Plymouth vehicles may experience a momentary loss of power assist for the steering when turning corners with the A/C or defroster on or recently on. This Tech Tip describes two repair procedures depending on the diagnosis. Correcting this condition involves installing a spout on the A/C condensate drain, new serpentine drive belt, and on some vehicles, installing a revised serpentine belt tensioner.
Applicable Models: 1996-’98 Chrysler Town & Country, Dodge Caravan, Plymouth Voyager
Note: This tech tip applies to vehicles equipped with a 3.3L or 3.8L engine.
Diagnosis
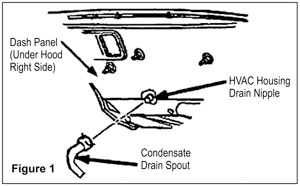
1. Inspect the HVAC housing condensate drain tube to determine if a spout has been installed and is in the 4 o’clock position as viewed from the front of the vehicle (see Figure 6). If a spout is not present, perform Repair Procedure A. If the spout is present but not properly positioned, reposition the spout to the 4 o’clock position.
2. With the engine turned off, check the position of the black pointer on the back side of the serpentine belt tensioner in relation to the tensioner casting. This position is the pointer’s “home position.”
3. Place a 15 mm wrench on the tensioner pulley bolt and apply force to rotate the tensioner clockwise. The tensioner should rotate smoothly and freely with no binding as the tensioner is rotated and released.
4. When the tensioner pulley is released, the black pointer should return to its “home position.” Any binding or resistance to rotation of the tensioner should result in the black pointer not returning to its “home position.” If the black pointer does not return to its “home position,” the tensioner is not supplying adequate tension to the belt, perform Repair Procedure B.
Repair Procedure
Repair Procedure A
1. Install condensate drain tube spout P/N 04677435AA onto the condensate drain tube so the spout is in the 4 o’clock position.
Repair Procedure B
1. Release the tension on the serpentine belt by rotating the tensioner clockwise and remove the serpentine belt from around the tensioner pulley.
2. Remove the nut attaching the tensioner.
3. Install new tensioner P/N 04612894AB. Torque the attaching nut to 45 ft.-lbs. (61 Nm).
4. Install the serpentine belt, P/N 04861322.
Courtesy of ALLDATA.