Applies To:
2008 Odyssey EX-L/Touring – from VIN 5FNRL38…8B000001 through 5FNRL38…8B108822, and from VIN 5FNRL38…8B400001 through 5FNRL38…8B419525;
2008-’09 Accord 2-Door V6 (A/T and M/T) – all, and 4-door V6 – all;
2009 Pilot 2WD – from VIN 5FNYF38…9B000001 through 5FNYF38…9B011674;
2009 Pilot 4WD – from VIN 5FNYF48…9B000001 through 5FNYF48…9B026008; and
2010 Accord 4-door V6 – from VIN 1HGCP3…AA000001 through 1HGCP3…AA016319, and from VIN 5KBCP3…AB000001 through 5KBCP3…AB017720.
Symptom: The engine knocks or ticks at idle. The noise is usually more noticeable when the engine is warm.
Probable Cause: The rocker shaft bridge has excessive clearance, which causes the rocker shaft to rotate and make noise.
Parts Information:
Flange Bolt (Use only if a bridge bolt fails): P/N 95801-08060-08
Intake Manifold Cover Gasket: P/N 17146-R70-A01
Intake Manifold Gasket (Pilot 4WD, Accord): P/N 17105-RCJ-A01
Intake Manifold Gasket (Pilot 2WD, Odyssey): P/N 17105-RCA-A01
Diagnosis:
1. Start the engine, and let it reach normal operating temperature.
2. While the engine is idling, listen for a knock or tick. Use a stethoscope to find the location of the noise.
– If you hear knocking or ticking from either cylinder head, go to Repair Procedure.
– If you hear a noise coming from another location, continue with normal troubleshooting.
Repair Procedure:
1. Remove both cylinder head covers:
– Refer to Cylinder Head Cover Removal in Section 6 of the appropriate service manual; or
– Online, enter keywords COVER REM, then select the appropriate Cylinder Head Cover Removal procedure from the list.
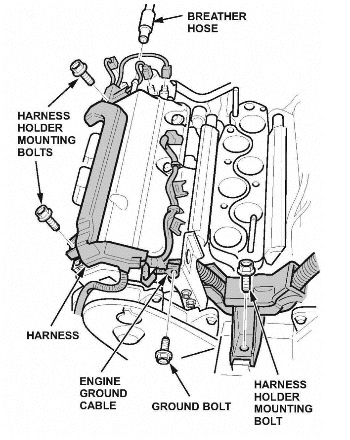
Note: To ease removal of the cylinder head cover, remove the power steering pump with its hoses connected. This allows access to the wire harness mounting bolts. See Fig. 1.
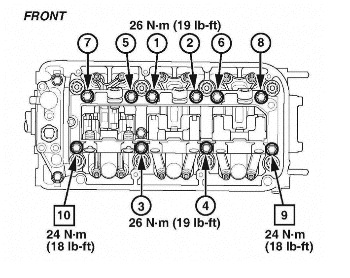
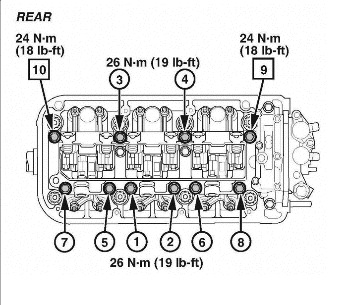
2. Starting with the front cylinder head, loosen and then torque each rocker shaft bridge bolt in the sequence shown in Fig. 2. Torque bridge bolts 1 through 8 to 26 Nm (19 lb.-ft.). Torque bridge bolts 9 and 10 to 24 Nm (18 lb.-ft.).
Note:
– The bridge is designed to crush around the rocker shaft, so when torquing the bolts it may initially feel like the bolt is stripped. This is normal; continue torquing bolts until the appropriate torque value is reached. Do not replace the bolt, the bridge or the head.
– Do not over-torque the bolts. If you do, they may break and will need to be replaced.
– The bridge bolts for VCM and V-TEC engines have the same torque values and tightening sequences. Only VCM cylinder heads are shown in the illustrations.
3. Repeat Step 2 on the rear cylinder head. See Fig. 3.
4. Check the valve clearances, and adjust them if needed:
– Refer to Valve Clearance Adjustment in Section 6 of the appropriate service manual; or
– Online, enter keywords VALVE CLEAR, and select the appropriate Valve Clearance Adjustment procedure from the list.
5. Reinstall the cylinder head covers:
– Refer to Cylinder Head Cover Installation in Section 6 of the appropriate service manual; or
– Online, enter keyword COVER INS, then select the appropriate Cylinder Head Cover Installation procedure from the list.
6. Reinstall all removed parts.
7. Start the engine, and let it reach normal operating temperature. Make sure the noise is gone.
Courtesy of ALLDATA.