Tech Tip: Demystifying Honda ELDs – UnderhoodService

Tech Tip: Demystifying Honda ELDs

Even though Honda has used the Electronic Load Detection (ELD) System since 1988 on the Civic and 1990 on the Accord, there is still a lot of confusion on how this system operates and controls the charging system.

The ELD system inputs the electrical load to the ­engine control module (ECM), then the ECM controls the output of the alternator under various electrical loads, and is capable of completely shutting the alternator off under very low or no-load situations. When the vehicle is first started, the alternator may not begin charging for up to three minutes.

Before performing any tests on the charging system, be sure to put an electrical load on the vehicle electrical system by turning on the headlights or turning on the blower motor or rear defogger. The ELD unit, located in the underhood fuse box, must sense current flow through the fuse box so it can correctly indicate the electrical load on the vehicle to the ECM.

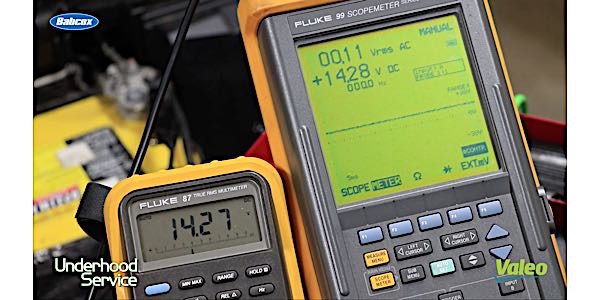
The ELD unit has three wires leading to it, a 12-volt power supply wire, a ground wire and a signal wire. On the signal wire, the ECM will send a reference voltage of approximately 4.5 to 5 volts to the ELD unit. The ELD will pull this reference voltage toward ground depending upon the amount of load on the electrical system. With no or little current flow through the ELD, the ECM will see approximately 3.5 volts on the signal wire. At this time, the ECM can ground the control wire at the alternator and the voltage regulator will turn off the alternator without illuminating the charge light. If the current flow is high, the voltage on the signal wire will be close to 1 volt.

The ECM will then see a high electrical load and stop grounding the control wire so the voltage regulator will allow the alternator to charge.

Disconnecting the control wire from the alternator will disable the ELD control of the charging system, thus allowing the alternator to charge normally. The most important thing to remember when testing the charging system is to be sure to add an electrical load (such as headlights).

Courtesy of Identifix, Inc.

You May Also Like

Chrysler’s Totally Integrated Power Module Simplifies Circuits

The symptoms of a failing TIPM can vary depending on the vehicle. Check out your options for this repair.

TIPM is a fuse box, relay box and electronic module all in one. The electronic module is connected to several data networks.  For engineers, the module reduces a lot of wiring under the hood and passing through the firewall. The TIPM also increases the functionality of a component by allowing several inputs to control one component. 

Trakmotive Tech Tip: Window Regulator Installation

Here are eight tips to make your next window regulator replacement easier.

Multi-Spark Ignition Systems

You may have seen the stories about plasma or laser ignition systems that promise to give new life to the internal combustion engine. But while these ignition systems have yet to make it to market the latest ignition innovation still uses a coil and spark plug.

VIDEO: How Modules Manage Alternator Power

Andrew Markel discusses power flow through the electrical system on a vehicle, and how the modules help provide the right amount of power to different components. Sponsored by Valeo.

VIDEO: Checking Key Fob Signal And Operation

Doug Kaufman discusses how to diagnose key fob issues, from fixing low signal to learning new fobs after they are lost or failed. Sponsored by Blue Streak.

Other Posts

Power Window Regulator and Motor Service

Power windows are great as long as they roll up and down when commanded to do so.

Battery Charging and Diagnostics

Here are six tips to use when diagnosing a vehicle with a dead battery. 

Caring For AGM And Flooded Car Batteries

Loose, corroded or damaged battery cables make poor electrical contact and can cause a battery to run down.

Power Window Regulator Replacement

Blindly replacing a window regulator and motor assembly may not solve a customer’s problem.