Tech Tip: Curing Front Suspension Tapping Noise on Toyota Corolla and Matrix – UnderhoodService

Tech Tip: Curing Front Suspension Tapping Noise on Toyota Corolla and Matrix

Some 2003 Corolla and Matrix vehicles may exhibit a tapping noise from the front upper suspension area. Occasionally, this noise may be interpreted as an instrument panel rattle noise. Use the following instructions to repair the noise.

Applicable Vehicles:
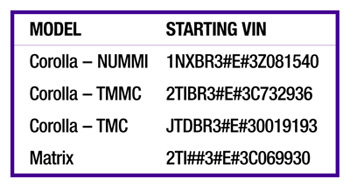
2003 model year Corolla and Matrix vehicles produced before the VINs listed in the chart:

Repair Proce­dure:
1. Remove the front wheel.

2. Disconnect the front stabilizer link assembly by removing the nut and disconnecting the front stabilizer link assembly from the front shock absorber assembly. See Fig. 1.

3. Disconnect the front flexible hose. For vehicles with ABS, remove the bolt, disconnect the brake flexible hose and front speed sensor. For vehicles without ABS, remove the bolt and disconnect the brake flexible hose.

4. Remove the front shock absorber with coil spring.Figure 1

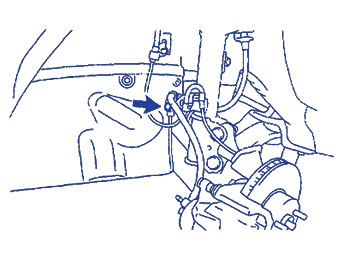
a. Remove the two bolts and nuts on the lower side of the front shock absorber assembly.
Note: When removing the bolt, stop the bolt from rotating and loosen the nut.

b. Remove the three nuts on the upper side of the front shock absorber assembly.

c. Remove the front shock absorber with the coil spring.

5. Prepare the insulating material.
a. Locate the 2 mm EPT Sealer in the Wind Noise kit (P/N 08231-00810).
b. Cut three pieces of EPT Sealer per side of vehicle (6 pieces total) to the following dimensions:

EPT Dimensions:
L: 100 mm (4 in.)
W: 13 mm (0.5 in.)
T: 2 mm (0.08 in.)

6. Apply EPT Sealer to the upper suspension mount.

Note: Avoid applying EPT Sealer within 15 mm (0.6 in.) from the edge of the upper suspension mount bolts.

7. Install the front shock absorber with the coil spring.

a. Install the shock absorber with the two bolts.

b. Install the three nuts to the upper side of the front shock absorber with coil spring.

Torque: 39 Nm (398 kgf.cm, 29 ft.-lbf.)

c. Install the two bolts and nuts to the lower side of the front shock absorber with the coil spring.
Corolla Torque: 153 Nm (1,560 kgf.cm, 113 ft.-lbf.)
Matrix Torque: 220 Nm (2,243 kgf.cm, 162 ft.-lbf.)
Note: When installing the bolt, stop the bolt from rotating and torque the nut.

8. Install the front flexible hose.

a. For vehicles with ABS, install the brake flexible hose and front speed sensor with the bolt.
Torque: 29 Nm (296 kgf.cm, 21 ft.-lbf.)

b. For vehicles without ABS, install the brake hose with the bolt.

Torque: 29 Nm (296 kgf.cm, 21 ft.-lbf.)

9. Install the front stabilizer link assembly with the nut.

Torque: 74 Nm (755 kgf.cm, 55 ft.-lbf.)

Note: If the ball joint turns together with the nut, use a hexagon wrench (6 mm) to hold the stud.

10. Install the front wheel.
Torque: 103 Nm (1,050 kgf.cm, 76 ft.-lbf.)

11. Inspect and adjust the front wheel alignment.

Courtesy of IDENTIFIX.

You May Also Like

Nearly 5,000 To Participate In Auto Value, Bumper To Bumper ‘Festive Walk’ To AAPEX 2018

On Thursday, Nov. 1, nearly 5,000 Auto Value and Bumper to Bumper automotive professionals wearing matching yellow shirts will begin their “festive walk” from the Mirage hotel to AAPEX 2018 at the Sands Expo, temporarily shutting down the busy Las Vegas Boulevard along the way.

On Thursday, Nov. 1, nearly 5,000 Auto Value and Bumper to Bumper automotive professionals wearing matching yellow shirts will begin their “festive walk” from the Mirage hotel to AAPEX 2018 at the Sands Expo, temporarily shutting down the busy Las Vegas Boulevard along the way.

The group is scheduled to depart at approximately 8:30 a.m. (PDT) and start arriving at AAPEX for their day-long visit around 9 a.m. The group will include parts store operators, shop owners, technicians and service writers who are part of the Aftermarket Auto Parts Alliance. Las Vegas showgirls and a marching band will join in the festivities as the group makes its way to AAPEX.

Drive Belt Checklist: What Are You Missing?

You might have only one chance to sell a customer a new serpentine belt. With belts lasting roughly 90,000 miles, proper inspection at the time of failure is critical not only for selling the belt, but also for ensuring add-on sales and better customer satisfaction.

3 Reasons To Replace Cabin Air Filters In Winter

Often driven by an “out of sight, out of mind” mentality, most consumers don’t think about purchasing cabin air filters. That’s why educating consumers on the benefits of cabin air filters can be a shop’s best sales pitch for selling these maintenance add-ons.

VIDEO: Using Airflow To Sell Cabin Air Filters

Andrew Markel introduces an inexpensive tool that can assist in selling cabin air filter replacements. Sponsored by Auto Value and Bumper to Bumper.

airflow-selling-cabin-air-filter-video-featured
Air Conditioning Odor Causes

Air conditioning odors typically result from the uncontrolled growth of bacteria and other microorganisms in the evaporator. Research by independent laboratories has found fungi such as Aspergillus, Cladesporium, Penicillium and others growing on cooling coils and other A/C system areas.

ac air conditioning smells featured

Other Posts

Dorman Launches 300+ New Products In November

Among the new products is an OE FIX climate control module designed to fit 1.7M Chevrolet Express & GMC Savana vehicles.

Curing Springtime Air Conditioning Smells

Air conditioning scents can come from a host of things.

VIDEO: Inspecting Ride Control Components The Correct Way

In this video, Andrew Markel covers why the old-fashioned knee test is not valid for late-model cars and trucks when inspecting shocks and struts. Modern shocks and strut have valving that can sense low- and high-frequency movements that can create problems for technicians who test these components with their knees. Sponsored by Nissan.

VIDEO: R1234yf A/C Update

Andrew Markel answers questions about the new refrigerant, R1234yf. Sponsored by MAHLE.