This bulletin involves the replacement of the Wireless Control Module (WCM), and if equipped, the replacement of the Electric Steering Column Lock (ELV). The WCM is also referred to as the Sentry Key Remote Entry Module (SKREEM).
Models:
2006-’08 Chrysler PT Cruiser (PT)
2007-’08 Ram Truck (1500/2500/3500/ 4500/5500) (DR/DH/D1/DC/DM)
Wrangler (JK)
Sebring (China) (J1)
Avenger/Sebring (JS)
Nitro (KA)
Compass/Patriot (MK)
Caliber (PM)
2008 Liberty/Cherokee (KK)
Note: This bulletin applies to vehicles built on or before May 5, 2008 (MDH 0505XX).
Symptom/Condition:
The customer will experience a no engine crank and a no engine start condition. Also, the remote keyless entry (RKE) system will not operate. This condition may be due to an electrostatic discharge (ESD) from the ignition key into the WCM, causing the WCM to electronically lockup. This condition may occur more frequently in dry and/or cold weather conditions where a sufficient electrostatic charge is more easily produced. This condition is corrected by the replacement of the WCM.
 Diagnosis:
1. With the condition present (i.e. the vehicle in the no-crank/no-start condition), connect the scan tool to the vehicle.
2. Turn the ignition switch to the On position, and power up the scan tool.
3. If the WCM is electronically locked up, the scan tool will display the WCM as being “off bus.”
4. If the no-crank/no-start condition is present, and the WCM is “off bus,” then reset the WCM by temporarily removing the IOD fuse (with the key out of the ignition switch), wait for 10 seconds and then reinstall the IOD fuse.
5. With the IOD fuse reset having been performed, verify that the vehicle will now crank, start and run.
6. If the condition is temporarily corrected by performing the above steps, and if the part number of the WCM is earlier than the part number of the WCM listed in the part reference table in the Parts Required Section below, then perform the Repair Procedure.
Part Number Keyless Entry Module
05026070AP JK
05026071AQ JK/KA/KK/K1
05026072AQ KA/KK/K1
05026073AR JK/KA/KK
05026074AQ JK/KA/KK
050260800AD KJ/KA/KK
05026157AP JS/J1
05026162AP JS
05026164AO JS/J1
05026165AP JS/J1
05026216AM MK/PM
05026218AM MK/PM/PT/P3/P5
05026219AG DH
05026220AN DC/DM
05026221AN DR/D1/DC/DM
05026222AM MK/PM/PT
05026223AN DC/DM
05026224AN DR/DH/D1/DC
05026225AM MK/PM/PT
05026226AM MK/PM/P3
05026228AM MK/PM/PT
Note: Always refer to the parts manual to determine the correct part number. Make certain that the correct WCM is ordered the first time for the specific vehicle in question.
Repair Procedure:
Note: If the vehicle (a JS model vehicle in certain International markets) is equipped with an ELV, then the WCM and the ELV (P/N 05026132AC) must be replaced. Replace the WCM and then the ELV. Next program the WCM and at least one ignition key before programming the ELV. Important: Not following this repair process correctly will cause the new ELV to fail.
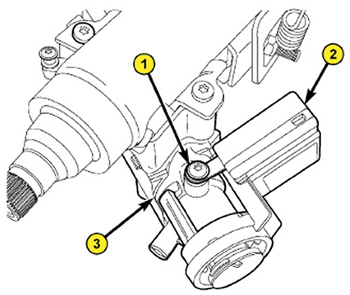
Note: Insert the ignition key into the ignition lock cylinder. This will move the shaft lock module locking bolt to the unlocked position. Leave the key in the lock cylinder while the shaft lock module is being removed.
1. If vehicle is equipped with a Steering Shaft Lock Module (JS – Avenger I Stratus, some International Markets), then the Shaft Lock Module will require replacement.
Note: The shaft lock module cannot be removed from the steering column while the locking bolt is in the locked position without irreversibly damaging the column. Before attempting service, the ignition key must have been inserted into the ignition lock cylinder.
Then, rotate the steering wheel from side to side. If the steering wheel can be rotated, the locking bolt is in the unlocked position. Leave the key in the ignition lock cylinder until shaft lock module removal has been completed.
If the steering wheel cannot be rotated, test and repair the wiring circuits between the module and the ignition switch as required.
If no problem is found in these circuits, the module has failed with the locking bolt in the locked position and both the module and the steering column must be replaced with new units.
2. Replace the WCM/SKREEM.
Note: Obtain the vehicle PIN prior to programming WCM/SKREEM or ELV.
Note: If during the following steps the PIN is properly entered but is rejected, then re-enter the PIN again until it is accepted.
3. After both the WCM/SKREEM and the ELV (if equipped) have been replaced, program the WCM/SKREEM as follows:
a. Turn the ignition key to the On position, (engine off).
b. Connect the scan tool to the data link connector and turn the ignition to the Run position, (engine off).
c. Select “ECU View.”
d. Scroll down and select “WCM” in the list of modules.
e. Select “Misc. Functions.”
f. Scroll to “WCM Replaced.”
g. Press “Start.”
h. Press “Next.”
i. Select “Show Keyboard.”
j. Enter the vehicle PIN.
k. Select “Next.”
l. Verify PIN is correct.
m. Select “Next.”
n. Follow on-screen prompts to complete WCM function programing for Tire Pressure Monitoring (TPM) and so on.
o. Turn the ignition key to the Off position. Wait 30 seconds.
p. Turn the ignition key to the On position, (engine off).
q. Select “ECU View.”
r. Scroll down and select “WCM” in the list of modules.
s. Select “Misc. Functions.”
t. Select “Program Ign. Keys” and follow on-screen prompts.
u. Select “Complete.”
v. Verify ignition key will start the vehicle and the RKE functions operate.
Caution: If the vehicle is equipped with a Shaft Lock Module, then at least one ignition key must have been programmed to the new WCM before the new Shaft Lock Module is “married” to the new WCM.
4. Is the vehicle equipped with ELV?
a. Yes >> Proceed to step 5.
b. No >> Repair is complete.
5. Program the ELV as follows:
a. Select “ECU View.”
b. Scroll down and select “WCM” in the list of modules.
c. Select “Misc. Functions.”
d. Scroll to “ELV Replaced.”
e. Press “Start.”
f. When complete, verify the steering shaft lock mechanism is operating.
Remove and insert the key from the ignition lock cylinder and listen for solenoid “click” at the lower end of the column.
Courtesy of ALLDATA.