The acronym PATS stands for Passive Anti-Theft System. It is called “passive” because it requires no action on the part of the driver. With this system, Ford likes to play annoying little games of PATS hide-and-go-seek. That is to say, they can’t seem to decide where they want to put the PATS system. Not only do they play hide-and-seek with it, they keep changing how it operates. There are five different PATS systems, so while the driver can be “passive,” you will need to be aggressive and review technical information specific to the vehicle you are servicing prior to beginning any diagnostic work on a PATS system.
The Key
 The PATS system uses a key (Photo 1) that contains a tiny electronic device called a transponder (Photo 2) located inside the handle. The transponder emits a radio frequency code that is read by the PCM or PATS module (system type dependent).
The key is electronic, but requires no batteries. It is powered by a radio frequency field surrounding the opening of the ignition key cylinder. This RF field is created by the transceiver that is located at the open end of the cylinder just beneath the column shrouding. The RF frequencies are picked up by a tiny coil located in the transponder  that serves as an antenna. The coil then transfers that energy into a tiny capacitor as an electrical charge. The newly charged capacitor serves as a battery to temporarily power the transponder’s logic circuitry. Once powered up, the logic circuitry then returns its coded message back through the coil. The coil once again serves as an antenna, but only this time it is sending instead of receiving. The coil emits its coded message out of the head of the key via radio waves to be picked up by the transceiver.
The Transceiver
The duties of the transceiver are to supply power to the transponder in the key head, receive the transponder’s coded message, and then to send that encoded message to the PATS module or PCM via hard wiring.
The transceiver may communicate with the key twice, depending on the system type. The first reading comes as soon as the “key-in” sense switch has been tripped. The second comes when the cylinder is switched to the “on” position. For systems where the PCM performs all of the PATS functions, there will only be one code reading. That reading will take place at the key-on position as soon as the PCM “wakes up.”
On a system that contains the PATS module in the cluster, the cluster will “wake” as soon as the door handle was lifted to enter the vehicle. The cluster will be ready to receive the code reading long before the key-in sense switch is tripped by the driver.
The transceiver module is a slave to the PATS module. The transceiver makes no “decisions.” Even when to read the key code is a decision that is not in the “hands” of the transceiver.
 The transceiver is located at the open end of the cylinder just beneath the column shrouding. It is secured by one screw, usually a T-20 non-security style torx. The body of the transceiver is square with a loop that extends from the side of it to surround the opening of the ignition key cylinder. (See Photo 3.)
The PATS Module
The PATS module can be either a standalone module, it can be integrated into the instrument cluster, or all functions of the PATS can be contained inside the PCM, depending on year and model.
The duties of the PATS module are to:
Initiate the key read.
Store the key codes in non-volatile memory.
Compare the user’s key code against the stored key codes.
Sending “OK to start” and “do not start” messages to the PCM via the SCP network or hardwiring depending on year and model.
Perform diagnostic checks.
Control the theft indicator light.
The Warning Light
The PATS warning light may be a red light on the cluster that says “Theft” or a red LED light on the top of the dash anywhere between the left side of the dash to the center. The warning light serves as both a visual deterrent to thieves and information feedback to the driver or technician.
The theft light will flash in two-second intervals when the key is off. This is only a visual deterrent on vehicles with PATS only. The light will flash rapidly or stay on steady in the event that an incorrect key code, or no code at all, is received by the PATS module or PCM.
For normal operation on a good working PATS system that has received a valid key code matching one of the stored codes, the theft light will come on and then turn off after three seconds. That is called “prove-out.” The bulb prove-out feature is also needed to observe during key programming and it is very important to observe when diagnosing a no-start condition on a PATS-equipped vehicle.
PCM
Depending on the exact PATS system being used, the PCM may assume all of the duties of the PATS module. At the very least, the PCM is what disables the engine in the event that a theft has been detected.
Over the years, the PCM’s strategies have changed in this regard. On the older systems, the PCM would only deny the fuel pump and injectors in the event of a theft. On these older systems, the starter would still engage and the ignition system would still fire. If a technician were to spray carburetor cleaner or propane into the intake manifold, the engine would still fire up and run on the artificial fuel supply. The engine would then die when the artificial fuel supply ran out. This has caused misdiagnosed fuel pumps, fuel pump relays, PCMs and more when the technician failed to observe the theft light operation and also jump to conclusions.
The newer systems have included a starter interrupt into the PCM’s strategies. So that the newer ones not only deny fuel, they also deny starter engagement. The PCM denies or authorizes the starter engagement by controlling the ground side of the starter relay. The ignition switch will supply positive power to the relay while in the start position and the PCM simply completes the ground if the key is recognized, or breaks the ground if the key is not recognized.
System Operation and Servicing
 The system in this example is from a 2000 Lincoln LS, which contains the PATS module inside the instrument cluster. The scan data seen here is scanned from the IC, see Figure 1.
In order to be able to recognize what is “bad” about any system, we first have to know what is considered “good.” This first capture shows the PATS system operating as expected from a good system. Although this system does have a problem (which we’ll look at soon), it is working normally in this first capture.
Antiscan: The anti-scan is off. Anti-scan is a 20-second time period where the PATS or PCM will not scan key codes at all. This occurs when the PATS has been activated by sensing a key code that does not match one of the stored codes. This is part of the security strategies.
CCNT_IC: There is one stored fault code in the IC. This PID displays the number of continuous fault codes currently stored in a module.
MIN_KEY: This system requires a minimum of two keys stored in memory. This PID shows how many keys this system is required to have stored at a minimum amount to start. Some of the older systems only required one, but two has been the basic standard for years.
N_KEYCODE: This system has five keys stored in it. The driver may not have all of these keys in his or her possession, but this is how many are presently counted as valid key codes by the PATS system. There is normally a maximum of eight allowed by default, but some can have an unlimited number feature turned on by use of a capable scan tool. These codes can be erased by a capable scanner.
PATS_TYPE: This is a timed system. There are two types of PATS systems; timed and coded. Timed systems are found in the North American regions. Coded systems are in Europe. This just means that, for a timed system, a time-out procedure must occur before security access can be granted to the technician for PATS functions such as adding keys or erasing keys. For older systems, the wait was eight minutes. For modern systems, the wait is 10 minutes. For a coded system, a password must be entered to grant the user access to such PATS features.
SERV_MODULE: Is this a service module? Yes or no.
SPARE KEY: The spare key feature is enabled. This means that the owner of the car can add a new key at any time they would like without a scan tool. All they need is two previously programmed keys. Turn one key to “on” for three seconds, then another programmed key to “on” for three seconds, then turn the non-programmed key to “on” for three seconds. That should add the new key. This feature can be turned on or off by a capable scan tool.
SPAREKEY#: This is a controlling PID that can be toggled by this scanner to turn on or off the spare key ability.
THEFT_LAMP#: This is a controlling PID that can be used to toggle on and off the theft warning light to test the bulb and circuits.
UNL_KEY: The unlimited key function is turned off so the maximum allowed number of keys in this system is eight.
For the graphed PIDs, please bring your attention to the place that I marked as “Point 1” in red. Looking at the data at that point, you can see by IGN_KEY that this is the point where I slid the key into the ignition cylinder and tripped the key-in sense switch. Looking at the PID IC_IGNSW we can see that the status of this PID is showing the change from “key out” status to ignition switch “off” status. Also notice the PID IGN_RUN is staying constant at the “off” position. That is because I only inserted the key, I did not turn the key on.
Looking at the MASTERKEY status indicates that the key being used is the master key (the first key programmed in the list of acceptable keys), and that key was read and verified at the moment I slid the key into the cylinder. PCMID shows that the PCM’s identification information is stored in the IC so that the IC is able to recognize this PCM during the “handshake” when the PCM wakes up. A new cluster or remanufactured cluster would show “NO” for a status until a parameter reset is performed to acquaint the new IC with the PCM.
 PCMVER stands for PCM verify. It is a yes or no status as to whether or not the PCM’s ID matches that of the stored ID in the cluster. At the moment I slid the key into the cylinder, the PCM was not able to be verified by the cluster since I never turned the key to the “on” position to wake up the PCM. Looking at the PATSENABLE PID, you can see that the IC initially authorized the vehicle to start because it recognized the key. However, after about five seconds (the “Point 2” mark), the IC changed its status back to disable because it was never able to verify the PCM was the one that matched the stored PCM ID code.
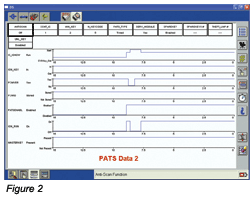
In Figure 2 you can see how the system behaves when driver rolls the key to start, and then back to run after the engine runs. You can see the key was cycled to the crank position (IC_IGNSW), the PCM’s ID was verified (PCMVER), and the cluster continued to allow the vehicle to start and run (PATSENABL).
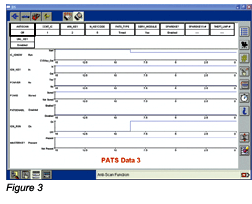 The IGN_RUN status drops to “off” momentarily because this PID is only concerned about the key being in the “run” position. The “start” position does not count as a “run” position and therefore receives an “off” status. Again, this is normal operation. Time to see what happens when something goes wrong, Figure 3. This LS had an intermittent no-start condition with a rapidly flashing theft light. I managed to capture it while it was acting up. Do you see what is happening? This vehicle failed to start, along with a flashing theft light because the PCM’s ID was not able to be verified. The PCMVER PID stayed at “NO.”
Something occurred that caused a communication problem between the IC and the PCM at 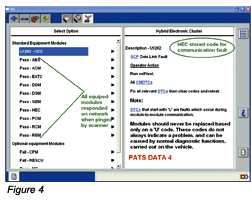 “handshake.” This could have been a faulty PCM, a faulty IC, problems in the data network wiring (such as a short to ground or high resistance), interference from another module on the network (such as shorting and drawing the buss down), or power and ground supply problems to the IC module or the PCM (but most likely to the PCM such as a bad PCM relay or ignition switch). Naturally, in this case we’d want to look at the stored code and see what it is pointing to. So, the fault codes were checked, and a network test was run to see what modules responded. See Figure 4 and Figure 5.
The TSB that the scanner flagged, TSB-01-16-04, pointed to the culprit. The fix was to add a tiny jumper harness at the base of the steering column at the brake light switch, in the steering column harness.
PATS Functions/Programming
 Programming new keys is pretty straightforward. First, security access must be granted. On a timed system, this requires a bit of a wait. On this system, it is 10 minutes (or 600 seconds as shown by the tool).
After the waiting period is complete, the PATS menu can then be accessed. See Figure 6. The functions are straightforward from here. To add a key, simply select the “Program additional ignition key,” then follow the prompts that tell you to insert the key and turn the ignition on. Select “Ignition key code erase” to erase all stored keys. However, the technician will need two keys ready to program (assuming it is a two-key minimum 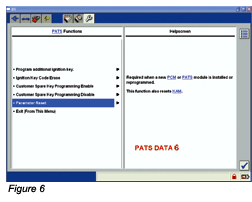 required system) back in afterward by cycling the keys three seconds apart selecting that option. The customer’s spare key adding ability can be turned on or off from this menu. If the PCM or PATS module (IC on many vehicles) is replaced (system dependent), a parameter reset will be needed to acquaint the new module to the existing module, either PCM or PATS module. After selecting this, the tool will ask which one was replaced and remind the tech that two keys will be needed to program back into the system when complete. If the menu is “exited,” then it will require the eight- to 10-minute access time again to re-enter the PATS function menu.
Even though Ford keeps reshuffling the PATS system every so many years, it’s not a hard system to diagnose and repair. The majority of the failures come down to the transceiver or the key. Generally, the fault codes that are set when there is a failure are straightforward in dealing with the problem at hand. I hope I’ve been able to take some of the “smoke and mirrors” out of this system to aid in tackling them successfully.