 by Underhood Service staff
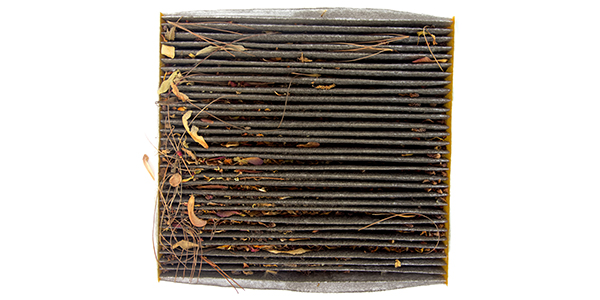
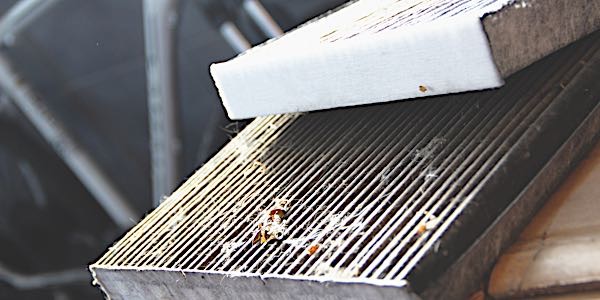
Often called the “hidden filter” because many motorists don’t realize their vehicle has a separate air filter for the passenger compartment, cabin air filters are put there for a reason — the health of the vehicle’s occupants.
However, not routinely inspecting the CAF and allowing microbes, bacteria, dust and molds to build up on these units could, in fact, lead to health issues for passengers, as well as their vehicles.
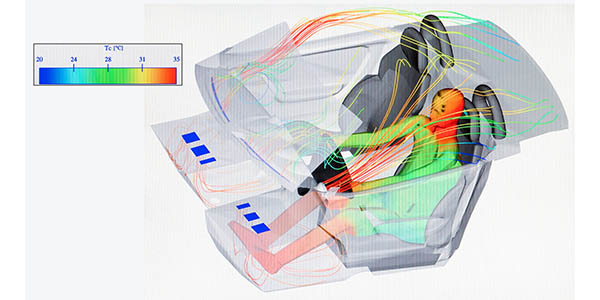
You see, CAFs are a critical part of a vehicle’s ventilation, heating, air conditioning and defrosting system.
In addition to the benefits of breathing cleaner air, when the cabin air filter is dirty or clogged, less air passes through the filter.
This makes it harder to keep the air clean and flowing, hampering the performance of the HVAC system and shortening the life of vital system components.
CAF replacement is an issue that is facing a growing number of vehicles on the road. In fact, close to 80% of all new vehicles have one of these filters — or a place where one can be installed.
The best way to tell if a vehicle has a cabin air filter, or factory provisions for installing a cabin air filter, is to check the vehicle owner’s manual. Also check the catalog listings for cabin air filters by year, make and model.
If a vehicle has a cabin air filter, it will usually be located at the base of the windshield (open the hood and look in the cowl area for a small access door), or somewhere behind the glove box in the HVAC assembly (look under the dash for an access door).
On some vehicles, the glove box has to be removed to access and replace the filter.
Most cabin air filters are flat panel filters, but some have unusual shapes so they will fit the HVAC inlet duct. Some may also be in two sections to make replacement easier.
These filters can trap pollen, dust, smoke and other pollutants that would otherwise enter the vehicle and possibly irritate the nose and lungs of the driver and passengers.
Service Interval
The service life of a cabin air filter depends on two things: the type of filter (dust or combination dust/odor) and operating conditions.
A filter on a vehicle that is driven frequently on gravel roads will not have the life of a filter in a vehicle that is driven in a cleaner environment.
 Exposure to heavy traffic (especially diesel fumes) and urban pollution can also shorten the life of a combination dust/odor filter.
 As a general rule, most cabin air filters should be changed every 20,000 to 30,000 miles — or more — often depending on the size and capacity of the filter.
Many vehicle manufacturers recommend replacing the filters every 12,000 to 15,000 miles or once a year. Refer to the vehicle owner’s manual for specific service interval recommendations.
Most of these filters are highly efficient and have electrostatically charged fibers that do an excellent job of trapping even the smallest particles (down to 0.3 microns!).
Most cabin air filters will stop 100% of all particles that are 3 microns or larger in size, and 95-99% of particles in the 1-3 micron-size range.
Some cabin air filters also trap odors, and are called “combination” filters.
These filters have an extra layer of activated carbon that reacts with odors and other airborne pollutants to neutralize them before they become objectionable. The filters can even reduce the levels of carbon monoxide and oxides of nitrogen from the exhaust of other vehicles.
The levels of these pollutants can be quite high in heavy stop-and-go traffic, and it’s not unusual for the concentration of these pollutants to be several times higher inside a vehicle than outside.
Studies have shown that driver reaction times are slower when the driver is being affected by poor air quality.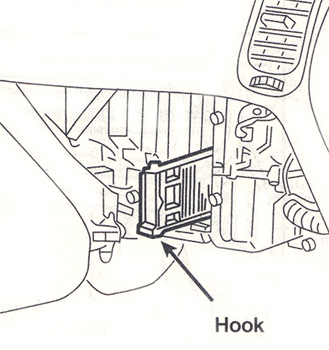
Since many motorists are not aware their vehicles have these filters, ask your customers if they have checked their cabin air filters lately.
It may stimulate some conversation, as well as increased filter sales at your shop.
The following are examples of where to find the CAF in a variety of vehicles, courtesy of ATP, www.atp-inc.com.
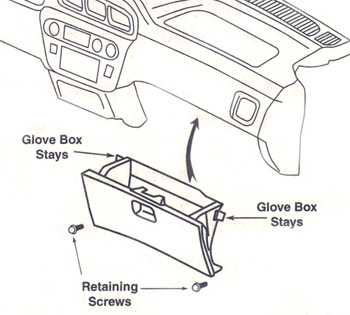
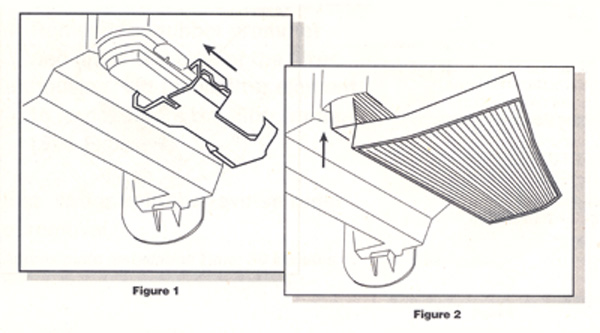
Honda CR-V, Insight, Odyssey and Pilot and Acura MDX
1. With the glove box open, remove the glove box stays from both sides (see Figure 1).
2. Remove the two glove box retaining screws from underneath the glove box.
3. Remove the glove box.
 4. Remove the glove box frame bolt and screws. Remove the glove box frame.
5. A horizontal section of the dash obstructs the filter door. This section can be cut and removed to service the filter.
Discard the cut section.
6. Remove the filter cover, then remove the filter. See Figure 2.
7. Remove the filter from the filter frame (CR-V only).
8. Install the new filter in reverse order of removal.
9. Reinstall the filter cover and glove box frame.
10. Reinstall the glove box in reverse order of removal.
Approximate installation time: 30-45 minutes.
—————————————————————-
 Nissan Altima, Infiniti G20
The filter is located behind the glove box assembly inside the cooling unit.
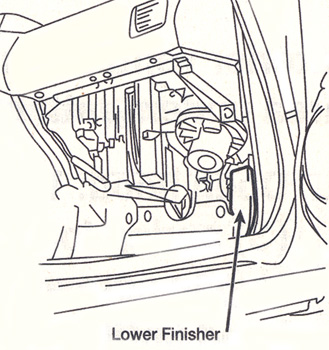
1. Remove the passenger-side door seal adjacent to the glove box assembly and lower finisher. For G20 models only, remove the lower finisher plastic nut and the metal clip on the side. See Figure 3.
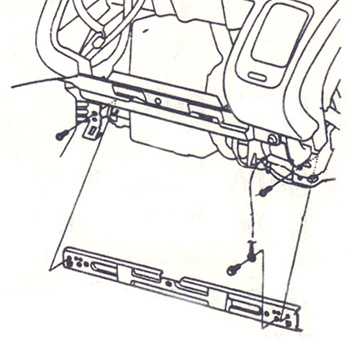
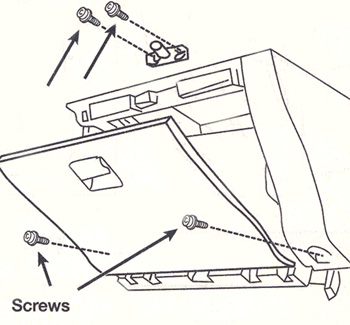
2. Open the glove box drawer. Remove the screws securing the metal striker and the screws at the top corners of the glove box compartment. Remove the screws at the bottom corners and disengage the clip securing the upper right corner of the glove box assembly. See Figure 4.
Caution: Do not disconnect the yellow airbag electrical connector or disturb the airbag control module.
Note: Some applications may not have vent filters installed inside the cooling unit and modifications must be done to install the filters. See steps 3, 5 and 6. For applications that do have the filters inside the cooling unit, see steps 4, 5 and 6.
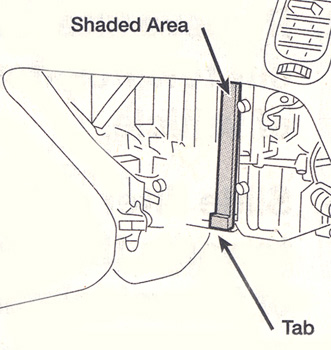
3. Cut out the plastic section indicated by the shaded area above the tab with a utility knife. See Figure 5a. Caution: Do not allow the cut plastic strip to fall inside the housing.
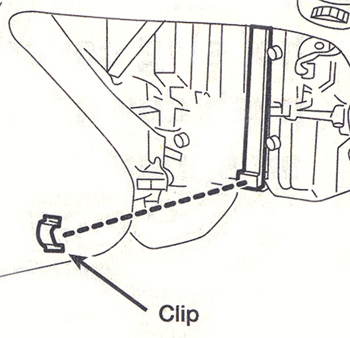
4. Remove the vent filter clip. Slide the bottom filter out toward the rear of the vehicle. Then pull down on the top filter and slide it out of the cooling unit. See Figure 5b.
5. The filters must be aligned with the plastic hook at the bottom. Insert the top filter inside the cooling unit first, then slide the filter to the top. Insert the bottom filter and secure with the vent filter clip. See Figure 6.
6. Replace the glove box assembly in the reverse order of removal.
Approximate installation time: 30-40 minutes.
————————————————————–
Lincoln LS, Ford Thunderbird
The filter is located under the passenger-side cowl cover.
1. Turn the ignition to the On position.
2. Turn on the windshield wipers. Once they point up, turn off the ignition.
3. Open the hood.
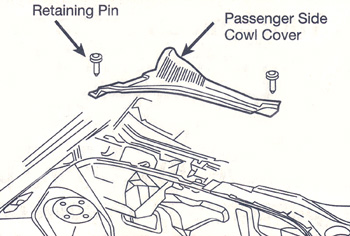
4. Remove the five retaining pins from the passenger-side cowl cover, and remove the cover. See Figure 7.
5. Remove the filter element by sliding the filter up.
6. Install the new filter and cowl cover in reverse order of removal.
7. For Lincoln LS applications, reset the A/C Filter Life on the message center of the instrument panel by doing the following:
With the key in the Run position, scroll through each of the system messages by pressing the Status button located above the radio until you reach “A/C Filter Life.” Press the Reset button located above the radio.
Approximate installation time: 25 minutes.
———————————————————————-
Chevrolet/GMC Sierra, Silverado, Suburban, Tahoe, Yukon, Avalanche, Denali, Cadillac Escalade
The filters are located underneath the center portion of the instrument panel.
1. Remove the HVAC hush panel. Screws hold it on. See Figure 8.
2. Remove the screw that secures the filter retaining bracket. It is located underneath the center portion of the instrument panel.
3. Pull down the first filter. Reach in and pull the second filter toward the rear of the vehicle and then down.
4. Install the new filters in the reverse order of removal.
Approximate installation time: 25 minutes.
—————————————————————————
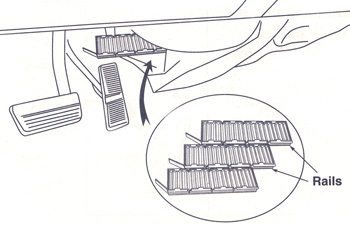 Buick Park Avenue, Cadillac Seville
The filter is located under the dashboard, to the right of the accelerator pedal.
1. Locate the filter door. Pull the door down to open.
2. The filter is removed in three parts. The filter opening allows only one part of the filter to be removed at a time (see Figure 9).
3. Pull a section of the filter out. Repeat until all three sections are removed. (See inset of Figure 9.)
4. Install filters in reverse order of removal. Make sure to engage each filter to the previous one using the rails built into the filters (see inset).
5. Close the filter door.
Approximate installation time: 30-45 minutes.
——————————————————————————–
 Chrysler Pacifica, Town & Country, Voyager, Grand Voyager, Dodge Caravan and Grand Caravan
The filter element is located under the passenger-side dashboard, inside the filter housing.
1. Slide the filter housing cover clip to remove the cover. See Figure 10 (left).
2. Pull down to remove the filter element.
3. Replace the filter element, which can be folded at the slits to ease installation. See Figure 10 (right).
4. Reinstall the cover, slide the clip to the locking position.
Note: When installing a new filter, make sure the airflow arrow is pointed in the same direction as on the old filter.
Approximate installation time: 30 minutes.