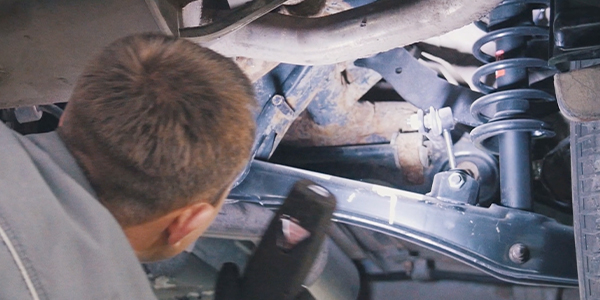
This month, we find ourselves in a familiar environment — under a car or in the wheel well. The good news is you’re under a Mazda car or truck that will present few surprises in terms of service procedures, while providing the additional service opportunities we’ve come to expect from undercar repairs.
A vehicle can find its way onto the lift for many reasons, and it’s up to us to take advantage of performing a quick undercar inspection every time, even if the initial goal is to replace a rear O2 sensor. It takes only a couple of minutes, and not only presents service opportunities for the shop, but also could prevent a serious problem for the customer. Look at it more as a service you provide and you’ll find that new customers appreciate it, and the regulars will expect it.
 UNDERCAR INSPECTION
I like to stop the car at a comfortable level on the way up and walk around it, shaking and spinning the wheels. While you’re at it, take a look at the tire condition, noting any unusual wear, which could tip you off to other problems. You might as well check the pressure while you’re there. Being in a self-serve gas station state, we’re as likely to find over-inflated tires almost as frequently as soft ones.
Spin each wheel; make sure the brakes are releasing and there are no unusual noises. Grab the wheel, top and bottom, looking for movement in the suspension as well as the wheel bearing. Do the same thing side to side; apply enough pressure that any side movement in the ball joint or inner control arm bushings will be discovered. This is also when any ripped or damage CV boots should be noted. Don’t overlook the brake friction material and components during this quick inspection.
This brief assessment, while important, won’t be sufficient if the car is presented to you with an undercar-related noise or driveability complaint. If that’s the case, the first step should be a test drive with the customer to identify the problem. This is particularly true in the case of noises. Not only will it save time in the diagnostic process, but it will help ensure a quality repair by confirming that you’re chasing the noise that’s getting the customer’s attention.
NOISE COMPLAINTS
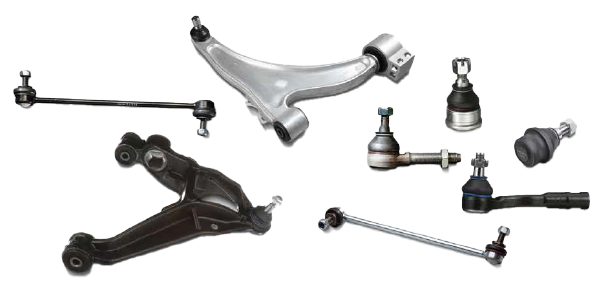
The most common complaint is a knocking noise when the vehicle is driven over rough surfaces. When the wheel hits a sharp bump, there is a resulting solid knocking noise. Often it will be described as something hitting the bottom of the car. Many times, it can be heard as the car is driven over the driveway apron. The first step to any diagnostic procedure is to check the steering components to be sure there is no excessive play. Then turn your attention to the (anti) sway bar attaching hardware. Any play in the links or support bushings will result in the knocking noise. On many Mazdas, you’ll find sway bars on the rear as well as the front. Like most undercar work, the diagnostic procedure is straightforward.
On the older models, the links are simply bolts tying the sway bar to the lower control arm, with bushings isolating the parts to prevent metal-to-metal contact. It’s easy to check the condition of these bushings with a visual inspection. It’s not unusual to find vehicles that are missing one of these links. The average customer won’t notice that the bar is disconnected, but he/she will certainly be aware of the noise caused by the bar hitting the control arm.
Later-model Mazdas use a link that resembles a small tie rod assembly. To check them for wear, take a pry bar and exert upward and downward pressure on the bar, looking for play in the joints. Any play will result in a knocking noise. Don’t overlook the bushings that support the bar to the chassis; any clearance in these bushings will result in a substantial noise. The tie rod-style link can present a challenge when trying to remove the worn unit. They may resemble tie rods, but they don’t have the tapered stud that would allow you to remove the nut without the stud spinning. The end of the stud will accept a 5 mm Allen wrench that may allow you to get the nut off, but you’ll often be faced with a rounded-out hole and no way to hold the stud. To get a grip on the stud, pry the socket off the ball and grab the ball with a pair of vice grips.
Another common noise issue is a creaking sound that may be heard when the suspension is moving or when the wheels are being turned. This one can be a little tougher, since it’s often an intermittent problem and can have more than one cause. If the noise is apparent when the wheels are turned, it’s typically a frozen ball joint or tie rod end. To diagnose the culprit, grab your stethoscope and listen while the car is on the ground, with the joint loaded and with an assistant turning the wheels or pushing up and down on the fender. It should be no problem to find the offender.
When faced with this situation, try to find the bad joint before the car is put on a lift to allow the wheels to hang. It’s not unusual to have the noise temporarily disappear after the joints are moved to the end of their travel limit.
Another potential trouble spot could be the control arm bushings and the related hardware. Although not as common as a rusted ball joint, any metal-to-metal contact at the bushings will result in a noise. The contact could be the result of loose or damaged hardware, allowing the center of the bushing or the hardware to rub against the chassis where it mounts. The bushing could be so badly worn that it’s allowing the arm to move far enough to make contact. Keep an eye out for rusty dust. Any sign of rust around a bolted assembly is a sure sign of movement or contact. Also suspect these bushings if you’re chasing a knocking noise when the brakes are applied.
THAT’S A TRICKY ONE
While we’re talking about noises, let’s touch on some that aren’t actually suspension related but could trick the customer — and maybe even you — into thinking so. Brake pads rattling in the brackets can do a good job of imitating bad sway bar links; the difference being that the pads make more of a rattling noise. It can be eliminated by applying light pressure to the brake pedal while road testing. If the noise goes away, you know it’s the pads.
Another source of a “knocking” noise is a bad CV joint. Although that clicking noise is familiar to us, that isn’t the case for our customers. The same holds true for exhaust shield rattles and noises resulting from the exhaust contacting the body. It’s so important to confirm the complaint before we start looking. What is obvious to us is just a noise to the customer.
What about the struts? It’s been our experience that the struts themselves rarely are the cause of noise complaints. And the mounts, for the most part, are very reliable. The only problems we’ve seen with Mazda strut mounts were on the early ’90s 626s that were equipped with automatic transmissions. For some reason, the strut mounts and bearings on that particular car were a problem. They would bind up, and the resulting noise was hard to miss. By now, the parts on those models have likely been updated, and they will be less challenging to diagnose.
TIRE WEAR
If the car is brought in because of a handling or tire wear problem, the first step in the diagnostic process is to extract as much information as you can from the customer. Remember, the customer doesn’t know what information we need to repair the car; it’s our job to ask.
A simple “It doesn’t feel right” is not enough. Ask, “Does it drift to one side? Are you chasing it down the road?” Be sure to get an idea of what they think may have caused the problem. Mazdas, like most modern vehicles, just don’t go out of alignment to the point of causing a problem that the customer will feel. Ask if any work was recently done: Were tires replaced or rotated? Did the problem gradually get worse or was it a sudden change?
Before you go for the initial road test, take a couple of minutes to walk around the car. Put a knee to the bumper and do a quick shock check to make sure you don’t have a dead one. Look at the tires and check them for unusual wear patterns. Most importantly, check the air pressure. No car will handle well with 60 psi in the left front, while the others are at 20 psi.
After the road test, get the car on the lift and check the suspension and steering system for worn components. Just use our quick inspection: Grab the wheel at the three and nine o’clock positions and give it a good, solid push and pull; any looseness should be investigated. Do the same at the 12 and six o’clock positions.
Don’t forget to check the rear. Spin the wheels to be sure you don’t have a brake hanging. Take a good look at the struts; be sure there’s no leaking or obvious damage. Ask the customer, have any parts been recently replaced? Look at the tie rods and rear control arms to see if some well-meaning alignment tech has made an ill-advised adjustment. Be sure the steering moves freely through its travel. A seized ball joint or tie rod end will make a car feel very spooky on the road. A frozen shock or an axle that doesn’t plunge should have shown up on the initial walk-around check you did before the road test. Take a hard look at the tires for any evidence of tread separation or alignment problems. Most pulling complaints are the result of tire-stagger problems. Grab a tape and measure the circumference of all the tires — a variation of an eighth of an inch is enough to cause a pull. If the tires are in good shape, rotate them to get the most similar-sized ones on the same axle. Uneven wear is a good indication of which wheel may have a problem, telling you where to concentrate your efforts.
If no obvious problems are found, it’s time to check the alignment. We check the camber first, since any changes there will result in a change to the toe setting. If the camber is off, it’s a pretty good bet you’ve found the problem, and it’s probably a result of a bent part. It can sometimes be tough to find the damage, but armed with the camber reading, you’ll better know what you’re looking for. Excessive positive camber means the bottom of the wheel has been pushed in; too much negative camber means the top is in. Look closely for flaking paint on the strut, or unusual wrinkles in the sub-frame where the control arms mount.
BRAKE WORK
We all do brake work every day, but let’s take a little time and go over some of the basics, and be sure to include the brakes in any undercar inspection.
The most important step is a thorough inspection of the system. While front pads may be the obvious problem that got that Protégé on the lift, before you dive into that job, inspect the rest of the system. Take a good look at the rear shoes; we’ve seen the friction material separate from the shoes on some older cars. The safety consequences of this problem are obvious. Take a look at the hardware including the self-adjustment and hand brake mechanisms. Don’t overlook the wheel cylinders; check for leakage as well as free movement of the pistons.
Since you’re going to flush and bleed the system, this is the time to be sure the bleeders will open and aren’t plugged. At the same time, look at the brake hoses and the steel lines to confirm their condition. If all looks good, clean out the dust, check the drums and you’re ready to take care of the front with no unexpected surprises.
When it comes to replacing the pads, the same good habits apply to both the front and the rear. By now, I’m sure we’re all aware of the risk involved with simply pushing contaminated brake fluid backward through the ABS. The risk of creating blockages in the ABS modulator is just too great to overlook. There’s really no reason not to open the bleeders and slowly retract the pistons, catching the bad fluid in your bleed bottle. If you’re going to bleed and flush the system as part of the service, you might as well get rid of the most abused fluid right away.
With rear disc brakes on the Protégé and 626, Mazda uses a rear hand brake and caliper setup that’s a little different than what we’re used to seeing. Rather than having to turn back the piston from the pad surface side of the piston, Mazda gives us an access hole in the backside of the caliper where a hex key is inserted to retract the piston. A bolt is used to plug this hole and does a good job of keeping the gear mechanism operational and serviceable.
When reassembling, turn the hex key until the pads contact the rotors and back it off about a third of a turn, to ensure good hand brake operation. This assumes you’ve checked the cables and linkages for free movement and have lubed as required. Be sure to check the hand brake when you’re done, to confirm it functions as expected and, just as importantly, has no drag when released. Otherwise, the pad replacement should be routine. No matter where you live, there’s no debating that brakes live in a hostile environment, resulting in rust and corrosion that has to be taken care of to ensure a quality job.
BASIC CHECKS
As the pads are being removed, it’s important to look for anything that isn’t moving freely. Are the pads worn evenly? Anything else indicates that the workload isn’t being distributed evenly and there’s a good chance that the pads are hanging up. It’s not unusual for the customer not to notice these problems since they tend to come on gradually.
As you start to replace pads, the system inspection should continue. Open the bleeder and push back the pistons on the calipers. If the model you’re working on retains the pads with cross pins through the caliper (for example, the Protégé and 626 through the ’90s), you may have a challenge getting them to move. We have good success with penetrating oil and rotating the pins to loosen them. Resist the temptation to simply drive them out; you’ll quickly peen the end over, raising the level of the challenge. In many cases, the best solution for all involved is a high-quality rebuilt assembly. Of course, that’s also the best direction if there’s any resistance to the piston returning in the bore. Mazda uses a single-piston caliper and relies on the caliper housing moving on slides to apply the outboard pad. If the slides are frozen, it will become evident with the pads removed; you should be able to move the caliper with little resistance. Needless to say, a quality brake job would include restoring free movement and lubricating the sliders as required.
The last place to look for the source of a problem will be the most obvious — the pads themselves being stuck in the bracket. Be sure to replace or at least remove the plated anti-rattle clips from the bracket and clean up the bracket where they sit. The final step is to use a high-quality brake lube on the slider hardware as well as on any areas that make metal-to-metal contact.
As I mentioned, there is a profitable alternative to the extra time required to restore the performance of a caliper assembly: The availability of affordable loaded or friction-ready calipers for all popular applications are often a better choice for both you and the customer. You have the peace of mind of installing a quality part with the protection of a warranty for both you and the customer.
The question of loaded versus friction-ready calipers goes to the shop’s policy on friction material. While loaded calipers can offer a good value, you want to be sure they include a pad you’re comfortable installing. If your policy is premium pads on all jobs (which is a good one), or if only one caliper needs to be replaced (although I prefer to replace them in pairs), friction-ready units would be the best choice.
All these good efforts are for nothing if we put that fresh friction material against a rotor that’s not flat, rusted or warped. The reality is, with the way price points have changed, most will have enough rust buildup and heat damage that replacement would be justified and no one will argue that new rotors go a long way toward a quality repair. Another upside to replacement versus resurface is you’ve restored the mass with a replacement rotor, while you remove it with a resurface. This makes the resurfaced rotor more likely to warp as a result of heat.
I hope you found this review helpful. You don’t have to be a Mazda specialist to perform good, profitable service on these vehicles. All it takes is a good plan, solid work habits and good undercar knowledge — a successful combination for you and your customers.