In order to improve the serviceability of the ABS system, the ECU was subdivided and has been established as a spare part. This service bulletin details the replacement procedures of the ECU as a spare part.
Applicability: 1997-2004 Legacy, Outback and Baja (excluding VDC-equipped vehicles); and 1998-2004 Impreza and Forester.
Repair Procedure:
1. Turn off the ignition switch.
2. Disconnect the negative terminal from the battery.
3. Disconnect the air intake duct from the air box.
4. Remove the air cleaner case from the inner fender.
Removal of ECU:
Note: When removing the ECU, the brake pipes remain connected.
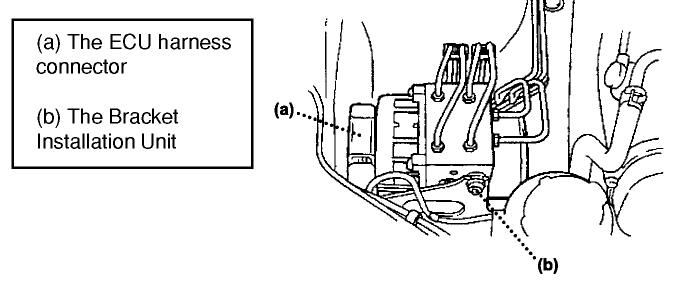
- Disconnect all electrical connections from the ECU (top and bottom).
-
 Remove the two installation bolts (M8) from the bracket of the hydraulic unit and the ECU assembly. See Fig. 1.
 - Lift the hydraulic unit and the ECU assembly from the bracket by about 5 cm (0.2 inches) and support it with a small piece of wood. Caution: Be careful not to deform the brake pipe during this procedure.
-
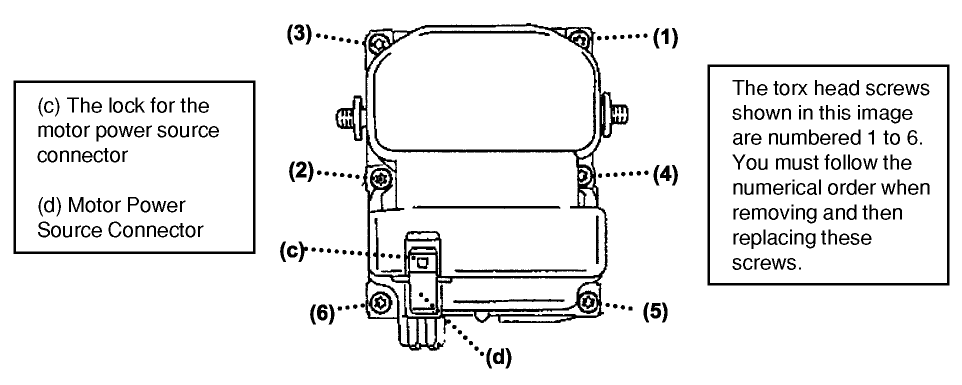 Unlock the connector for the motor power source and disconnect the connector as shown in Fig. 2.
 - Remove the six torx head screws (T20) which join the hydraulic unit and the ECU. Note: Do not reuse the torx head screws once they are removed.
-
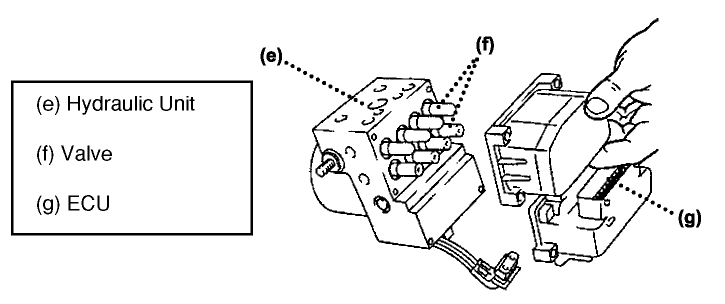 Remove the ECU from the hydraulic unit by gently pulling it. See Fig. 3.
 - Note:
- Do not insert anything into the gap between the ECU and the hydraulic unit.
- Do not pry the ECU, but pull it straight from the hydraulic unit.
- Do not reuse the seal from the ECU.
Installation of New ECU:
- Confirm that the sealing surface of the hydraulic unit is clean. Note:
a. Do not machine the sealing surface.
b. If the sealing surface is damaged, replace the ECU as well as the hydraulic unit and the ECU assembly with a new one.
c. Clean dust or foreign material from the sealing surface with a clean cloth and alcohol.
d. Do not blow compressed air onto the ECU surface or the hydraulic unit - In order to prevent damage on the valves protruded from the hydraulic unit, do not tilt the ECU against the hydraulic unit when assembling.
- Install the new ECU.
- Temporarily tighten the six screws by hand. Note: Do not reuse the screws that were previously removed from the ECU.
- Tighten the six screws in the exact order shown in Fig. 2; use the specified tightening torque of 2.65 +/- 0.30 Nm(1.95 +/- 0.22 ft.-lbs.) (26.4 in.-lbs.).
- Make sure the screws are securely tightened by visually confirming that there is no clearance between the ECU and the hydraulic unit.
- Connect the motor power source connector to the ECU. Note: Confirm that you hear a clicking sound when locking the connector lock.
- Install the hydraulic unit and the ECU assembly onto the bracket and tighten the two nuts with a tightening torque of 18 +/- 5Nm (13.28 +/- 3.69 ft.-lbs.) (44.28 in.-lbs.). Note: Securely attach the damper under the hydraulic unit with the hydraulic unit and the bracket.
- Reconnect the ECU harness connector with the ECU.
Restoration of Surrounding Parts:
- Install the air cleaner case.
- Install the air intake duct.
- Connect the negative terminal to the battery.
Testing After Replacement:
- Confirm that the ABS warning light comes on normally and then turns off when the ignition switch is turned on.
- Connect the select monitor and confirm in the first display that the model year, driving system and transmission system are correct.
- Confirm that the ABS warning lamp does not light when starting the engine and driving up to more than 12.5 mph (20 km/h). Note: If something abnormal was found in the above three testing procedures, follow the repair instructions described in the diagnostic procedures of the vehicle’s service manual.
Courtesy of ALLDATA.
For additional information, visit www.alldata.com.