One of my favorite pieces of shop equipment is the on-the-car brake lathes. Not only does they resurface the rotors to the center line of the wheel bearings, they speed the job up in some cases. Its a win/win situation.
 I remember the earlier models of on car lathes that were a complete pain to set up. Not with today’s equipment, they are painless if you know wat you are doing. There are several hub-mounted models on the market, but the basics are the same.
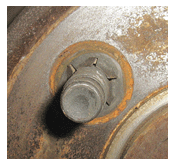
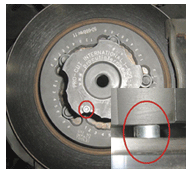
I start by removing the little push on retainer that is used to hold the rotor in place at the factory before the wheels are bolted on.
I do that for a couple of reasons. One is so that there is no chance the retainer can interfere with the quality of the machine mounting. The other reason is just to give the next technician a quick visual reference that the rotors have been resurfaced at least once.
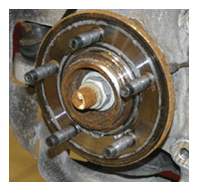
 The next step it to mount up the lathe’s hub adapter. At no time should there be an impact wrench used here.
Many times, these adapters even have such a warning found on them.
And they’ll also have a torque specifications listed as well to warn against over torquing. I’ve worked in shops where someone thought they could use an impact on these as long as they were careful. Then one day the adapters just crumble from fine cracks in it that were caused by over 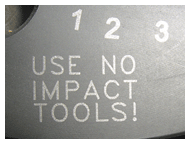 torquing. These adapters are expensive. I’ve seen them run between $300.00 and $500.00 dollars each. The good new is however, as long as they don’t abused, they never wear out.
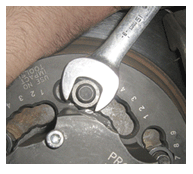
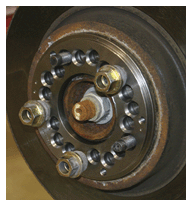
All of the nuts should be used around the adapter and tightened evenly by hand.
On the hub of this model of lathe is an alignment pin that must be observed when mounting the machine to the adapter.
 Once the machine is pushed up to the adapter with the alignment pin properly engaged, there is a hand operated screw in the center of the machine’s drive shaft to tighten.
This is a hand knob, which means it only needs to be hand tightened. Please, leave the giant pair of tongue and groove pliers in your tool box for this step, they are not needed. Some lathes have a nut and draw bar, use only the provided wrench.
 After this step, this machine shown here will adjust itself. Just plug it in, push the reset button, and then the start button. The digital display starts by showing the run out of the mounted machine, then adjusts down. Some models have a “plate” that is between the adapter and lathe that the operator adjusts. After the adustment for runout is performed, the lathe will give you a green light to cut. Some new lathes have “Anti Chatter Technology” that oscillates the machining speed of the lathe and eliminates the buildup of vibration (chatter) that can occur when machining at a fixed speed. Now, just like a bench lathe, the cutting bits must be set for cutting depth and run to the fiction surface of the rotor closest to the hub.
 This machine has a hand crank shown here to run the cutter blades to the hub with.
This knob on this machine is spring loaded and telescoping. It engages the cross feed drive train when it is set to “pop” inward as seen in the picture. This makes the machine cross feed and cut.
Front rotors and rear rotors usually machine in the same way with these machines, but when cutting the rear rotors on limited slip differentials the transmission MUST be placed in neural. Some full time all wheel drive vehicles may require the rear drive shaft to be lowered on one end. Most lathes on the have enough power to turn some of the difficult to turn axles and differntials.
 After machining is complete, open air mounted wheel speed sensors and tone rings should be cleaned. Of course, that should be done during a brake service anyway. However, it is more critical after machine a rotor right over top of the sensor since it will be showered in metal dust.
It certainly is possible to machine hub type rotors with serviceable bearings in this manner as well. Let’s be real about this and acknowledge the fact that many shops out there have and do machine these rotors without ever touching the bearings. Just because we can do this, doesn’t mean we should.  A brake service is traditionally the only time these bearings get inspected and serviced. So, the proper thing to do would be to perform a wheel bearing service on these vehicles, then machine the rotors with the on car lathe. Some shops may do this automatically with a brake service, and some may make it a separate chargeable service. Either way is correct, as long as the opportunity to service these bearings is not just swept under the rug and ignored.
Keep the cutting bits sharp, keep the machine clean and in proper repair, and your on-th-car lathe should make you as happy and productive.