I’ve always loved the puzzle. Check Engine warning lights have become an everyday chore for me over the last five years. It’s a challenge that extends my interest and creativity in the auto service profession.
Before I deal with some specific Mercedes-Benz faults that I’ve researched, I must say that the ability to really solve these puzzles in any car depends upon two important factors. First, and most important, is a working knowledge of the system involved and the specific nature of the fault that’s been recorded. This means knowing what conditions must exist to set up the evaluation that failed, as well as the nature of the test that failed. The second factor is the nature of the tooling available for testing the criteria being faulted.
In a relatively short magazine article, I certainly can’t teach the systems, but I can show a number of techniques that can change 70-80% of Mercedes Check Engine lights into money-making repairs, that will boost customer satisfaction in the process.
ADAPTION CAPABILITIES
Probably my favorite fault codes are the ones that deal with the adaptation capabilities of the system. In my CIS days, we (as technicians) centered the system so that electronic feedback control could work equally well correcting both rich and lean. In these cars, the adaptation fault codes were O2 sensor codes. The controller recognized when the O2 sensor was stuck at the rich or lean stop. Being stuck against a stop usually wasn’t the O2 sensor’s fault and the problem always boiled down to a mechanical mixture issue. With the change to electronic injector control (done to facilitate single cylinder cut-off necessary for future OBD II), the ability to center the mixture range was built into the software. In these first systems, LH and HFM, the diagnostic controls necessary for U.S. emissions control were not yet incorporated into the engine management hardware or software. These cars had their Check Engine light controlled by the diagnostic module (DM).
So, in the late ’90s, we started seeing the first of the real fun adaptation codes on the DM. There’s an M-B service bulletin applying to the Jacksonville Zone (I live 80 miles from Jacksonville, FL). It talks about the Code 19 Check Engine light and, while the concept of adaptation isn’t mentioned, it says that a new controller is the solution. This code, if read from any simple description, blames the injectors. But the real problem is that the system has reached its adaptive limit. In the Jacksonville case with 119 model V8 engines, the lower partial adaptation and maybe the upper partial adaptation would bump against 0.85. This meant that the original fuel calculation of 1.00 had been reduced 15% to 0.85 under one or both of the measuring criteria. The way Mercedes repaired this problem was to increase the software’s corrective capabilities. In cars that I’ve repaired with the new software, the mixture stabilizes at around 0.81 after two years (my oldest test case).
On all Mercedes vehicles with adaptation codes, it’s necessary to reset the adaptation after repairs to the original 1.00 value. On the early LH and HFM systems, the relearning after such re-adaptations can take weeks and is not very usable to diagnostics unless you have a chassis dyno. For perspective, I want to explain a short research project I did on a 600SEL that had the estimate of both controllers to solve the Code 19 problem. The lower partial load correction was at 0.85 on one bank and 0.89 on the other. The upper partial was above 0.90 on both banks. At first, I readapted and drove the car. I gave it back to the customer, and it took two weeks to readapt to the point of setting the light. I finally put the car on the dyno and did the relearn using the aid of the scanner.
After doing the adaptation a few times, it became apparent why it took so long on the street. The program requires achievement of a certain condition: Load 40-80kg/hr; rpm 1,600-2,200. Once stable at that condition (easy to achieve on a dyno), the car’s adaptation program goes active and it requires holding those conditions for maybe 10 seconds in lower partial. If you try to recreate these conditions on the road, it’s almost impossible except when driving against exactly the right angle hill. At the load stated, the car accelerates unless it’s on the right-size hill and quickly exceeds the rpm criteria, stopping the adaptation process.
We did a number of parts swaps, as the system on this 12 cylinder is actually two 6-cylinder systems. The swap that won was changing the air flow meters. We found that no matter where we put one of the units, we always got a 0.85 lower partial after the relearn. A new unit saved a bunch of money, for the moment.
For the moment, as Mercedes eventually found out, 15% was too little built-in correction, and all the cars since the ME engine management system have had 32% correction capabilities from 0.68 to 1.32. All replacement controllers for early LH and HFM systems also come with the new capabilities, solving the problem on early cars. You must recognize that the real problem in all these instances is that the mixture has changed from the standard. In the case of a 0.85 car, the system is subtracting 15% fuel to keep the range of correction in the center (remember what we did with CIS!). This brings me to the current, most common code going: The P0170/P0173 adaptive limits code.
ADAPTIVE LIMITS CODE
On the latest M-Bs, this most common code usually means one of two types of Air Mass Meter (AMM) failure. The first type, AMM failure, results in failure of the partial load multiplicative correction at 1.32. This means they are correcting a lean mixture by adding 32% more fuel to the original 1.00 calculation.
The second type of failure is more interesting. In this failure the output of the AMM is not linearly skewed as in the first. The partial load will probably be in the range of 1.10 to 1.20 or so. This correction is multiplicatively applied to all range of fuel control from cold start to idle. At idle, this AMM runs fairly accurately and, as a result, the Closed Throttle Position (CTP) additive correction has to repair the rich-running condition caused by the multiplicative correction. It does this with an additive correction of up to -1.0 ms (removing fuel). The limits of correction here are -1 ms to +1 ms.
Most of the P0170/0173 codes are on V6 and V8 models and AMMs are the common problem, but the two codes refer to right and left bank and they can be used to evaluate air leaks. One should always look to air leaks in cases of positive additive CTP corrections.
MISFIRE CODES
Leaving fuel adaptation, I need to make a small mention of another group of fairly unique Mercedes attributes in adaptation: Throttle and sensor ring. Mercedes uses something it calls sensor ring adaptation to compensate for regular deviations of crankshaft acceleration rate that appear at particular load and rpm blocks. This crankshaft acceleration rate is what is evaluated for misfire determination, so the adaptation is done to prevent driveshaft, flywheel, motor mount and other rhythmic vibrations from distorting this calculation. I suspect that many of the misfires of unknown origin come from mistakes the software makes in identifying a misfire, which then, of course, shuts down fuel at that injector, assuring there is a misfire until the key is cycled.
My wife may have had such a condition with her in-warranty ML320. She had a misfire on cold start nearly every day and would have to shut off the car and restart it to remove the misfire, and a misfire code would be set. It went to the dealer and the first repair was to readapt the sensor ring. This made the problem go away for more than two weeks. At the next visit, they replaced the ME control unit. I had looked at the load/rpm sensor ring blocks both before and after the new controller was installed, and the number of blocks was increased by at least three times from four to maybe 16 with the new software on the new controller. I believe that during the heavy, low-speed turning in reverse, the normal judder of early M-B 4WD was being misinterpreted as a misfire.
Throttle adaptation is one area that is fairly simple, but because M-B uses throttle control for idle control, cruise control and drive-by-wire, it’s very important when evaluating any of these problems to be sure that the throttle is adapted. It’s a PID on most scanners and is also a menu item under adaptations of most scanners. All that is necessary with most scanners is to erase the old adaptation and relearn with the key on and engine off for 30 seconds, followed by the key being switched off for 10 seconds.
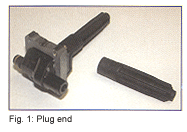
There are a number of simple things to look for with Mercedes misfires. My first advice is to be sure no one has erased the adaptations on one of those P0170 cars. When they lose that 1.32 adaptation and then run at 1.00, they will set random misfire codes. Remember that most specific single-cylinder misfires (P030x) are caused by the resistors at the spark plugs, including the ones located below coils. They can be so common, intermittent and hard to view with a scope, that we’ve started replacing the three beneath the coils (p/n 000 156 36 42) when changing spark plugs on HFM motors (see Fig. 1). We see plenty of coil problems and usually achieve a diagnosis by moving the coil to another cylinder.
 The P04xx group of codes probably are the gravy of the emissions business. From EGR, to secondary air, to evaporative emissions control, these codes represent the testing of emissions systems that mostly have no driveability performance effect. These are the codes the customers hate. In my small window on the trade, it appears that the pieces designed to do monitor tests are not designed to perform as the safety and hardware items have been. Most of these codes are for failing two tests over time. The tests are often run only once a drive cycle, so it takes a while for them to get run and, thus, the light can stay off for long periods of time with the problem still existing.
All of these fault codes are best tested with the activation programs built into proper scanners. In the case of EVAP codes P0440 through P0455, Mercedes uses a vacuum-style test of the system for vapor leaks and current supply calculations from internal dropping resistors to evaluate solenoid control. In normal operation, the engine controller pulses the purge valve in varying amounts, pulling air over the fuel vapor absorbed in the charcoal canister, moving it into the engine for burning.
 To evaluate the system for leaks, a cap is placed over the charcoal canister air inlet and a vent valve placed there is closed. Closing the canister seals the system, and the subsequent opening of the purge valve allows the tank system to be placed under a small vacuum. The test for this system is straightforward with the help of a scanner. The scanner needs to interpret the tank pressure and be able to close the vent valve. When run by a scanner, you are told to pull no more than 25 millibar (mb) on the system and then watch the decay over time. It can’t drop more than 5 mb in 60 seconds.
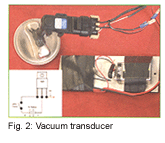
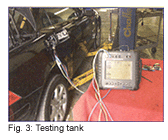 I built a tool based on this design that’s posted on iATN (see Fig. 2). Based on a 5V-powered GM tank pressure sensor, we made a connection through a new gas cap (see Fig. 3). I built this tool because even though M-B scanners will use a manually run test, BMWs and Volvos use a forced monitor with pass/fail results. In these cars, the test is run and, if it fails, there are diagnostics. But if it passes, you have no help. The tool allows you to watch what is happening during a forced monitor or a manual one such as what M-B uses.
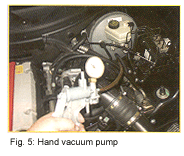
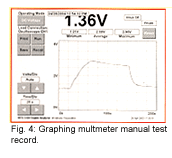 In Fig. 4, we have a graphing multimeter record of a manual test we performed on a SLK230. The first ramp is the period where the vacuum is created in the tank. It is pulled by a hand vacuum pump at the purge line to 25 mb, as determined by the scanner (see Fig. 5). The peak is 25.4 mb. At the peak, the hand pump has stopped and the leak criteria is that the system must not leak more than 5 mb in 60 seconds. The increased leak rate slope starts when the scanner reopens the vent valve. At that point, the scanner had 21.3 mb. From the graph, you can see that the time interval is well over 60 seconds and the drop is 4.1 mb, which is well within the criteria.
 In the second graphing multimeter image (see Fig. 6), a 0.040-in. hole has been drilled into a piece of hard plastic vacuum line placed between the hand pump and the purge line. It was originally covered with tape and the vent valve closed and the system hand- pumped to a little over 25 mb again. The small down slope is the natural system decay, and the larger slope is after the tape is removed. The slope of the line now is way beyond the failure spec of 5 mb per 60 seconds.
This imaging gives a context to the testing of small leaks. The testing of large leaks is very seldom an actual leak. The car 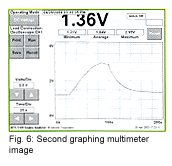 looks at the upward slope as in the GMM images. The slope of that section depends on the rate of hand pumping in these tests. When the car runs the test, the test value must be achieved in a certain time. If a leak is too big, then the pressure in the tank never rises or rises too slowly. The SLK we were testing had a large P0455 leak code. The problem was that the line coming out of the charcoal canister to the tanks was plugged. There was no leak but, because the tank never saw the vacuum that was applied, the assumption was made in fault analysis that all of the vacuum had leaked rather than make it to the tank. We’ve also found the purge valve itself to cause large leak codes due to being plugged with charcoal or not opening at all.
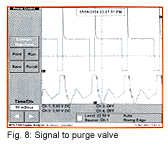
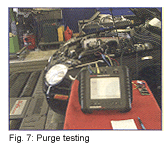 While working on the SLK, we used our new toy to mimic another uniquely Mercedes purge test. This test is not used on the SLK, but we set it up for view. On many mid-’90s cars, M-B had both an Air Mass Meter and a MAP sensor installed. During purge testing, the MAP sensor was shunted to the purge line from manifold vacuum by a switchover valve. During purge, the controller looked for pulses on the MAP signal in frequency with the purge flow duty cycle. In Fig. 7, we’ve mounted the GM tank sensor tool into the line after the purge valve and the output is channel 2 on the scope pattern. Channel one is the signal to the purge valve (see Fig. 8). This mechanism for faulting the purge valve is used on 202 models with HFM and 129 models of ME, using 104, 119 and 120 motors and maybe others.
 TESTING FOR OTHER CODES
Secondary air codes are another type of code made simpler with the use of a good scanner. Secondary air injection is used for burning the rich mixtures of cold start and for heating both the O2 sensors and the catalyst. They have to be shut off before closed-loop fuel control can take place. M-B uses an intrusive test with the O2 sensors to evaluate the “causal chain” of secondary air. Causal chain is a M-B text term that baffled me for a time. I’ve now come to the conclusion that this phrase means that a fault in causal chain means that everything necessary for a result to happen, happened, but the result didn’t happen. In the case of secondary air injection, it means that the air pump was turned on and the check valve was directed open, but nothing happened.
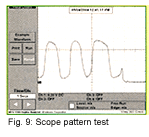
To make this evaluation, the car and scanner causes the air pump and check valve to work on a car in closed loop and the O2 sensor voltage must reach either 80 mV on early cars or 40 mV on later cars within a certain time span. I used my scope to verify such activity on a 1999 E320. I did cheat and use the scanner for activation, but I backprobed the O2 sensor for the output. I swear this is a real scope pattern of the test (see Fig. 9). It almost looks too perfect.
 Most M-B problems with secondary air originate in the vacuum controls and sometimes the electrical components of the pumps (including clutches on belt-driven pumps) and weak O2 sensors. The real nasty ones are the restricted passageway causal chain codes. These are happening mostly in 119 engines.
A quick way to determine if the reduced capability of a system is O2 sensor or secondary air flow-related, is to first run the test above. If you get only a drop to 100 mV before fuel correction moves it back up, try as a second test to monitor the O2 sensor and crack the line to the brake booster. With a good sensor, the value will pass the 40 or 80 mV criteria, without even making the car run bad when the vacuum line is cracked.
At this time, I haven’t heard of any way to clear the restricted secondary air passages in 119 heads except by head removal, making this the all-time most expensive fault code for a failure of a non-performance test.
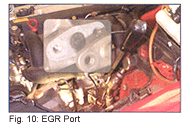
EGR codes are fairly simple on most M-Bs. They are often vacuum control problems, but most commonly the pipes that carry the EGR into the intake get clogged. One interesting note about these clogs is that the clog is not from EGR gasses. The clogs come from oily PCV vapors in the intake baking onto the pipe carrying the EGR gasses. So when looking for the restriction, start at the intake end. On 104 motors, this is the common place (see Fig. 10). On 112 and 113 motors, there is a stainless pipe that enters the intake in the middle rear. It must be removed and then can be easily cleaned.
 A proper scanner again gives the basics in testing through activation. If it activates with noticeable motor effect and still sets a code, the chances are high that the line is restricted. One can do a similar test by teeing into the vacuum to the EGR and driving. EGR will take place at most throttle settings other than closed and full. Once vacuum control is verified, a vacuum placed on the valve with the engine running at idle finishes the effect of the scanner test. If it passes both tests, and still sets a code, look to the pipe.
There are lots of other codes but space is short, so the last code I want to talk about is another strictly M-B code. It is the upshift delay codes P1700 and P1701. These codes would only apply to the mechanically controlled automatic transmissions used before 1996. Those transmissions used a throttle pressure cable (control pressure) for determining shift points under various loading. In order to heat the CAT and reduce the cold running time, Mercedes used an electrically controlled, vacuum-operated bellcrank-type lever action to change the capabilities of the control pressure cable. In other words, when cold, vacuum at the switchover valve is switched to a vacuum chamber at the transmission end of the shift cable. There, the actuator movement changes the effective length of the cable. The common problem here is the diaphragm in the actuator element, but testing is simple.
The first test is to see that vacuum is at the switchover valve when running. Next take the line to the transmission from the switchover valve and apply vacuum. In the common failure, the element won’t hold vacuum, and you’re done with diagnostics.
If the vacuum element holds vacuum, then you must tee into the line at the element and evaluate the vacuum when cold. If there is vacuum at cold running, and a code is present, then evaluate the shift against the criteria. The element is adjustable on the replacements and the cable is always adjustable. A poorly adjusted shift cable adjustment could make the added shift delay not large enough to satisfy the controller.