Big exhaust pipes, big tires, big rims…some of that stuff may seem, well, ridiculous sometimes, but it can mean big profits. It’s funny, some people will spend two grand for a set of rims for a $500 car. But if that’s what they want to do, why not help them spend their money?
If you’ve ever thought about installing vehicle security systems, keyless entry or remote start systems, then here are a few tips.
 Many keyless entry, vehicle security and remote start systems have multiple options that are programmable but also sometimes require more wiring work or added relays to make these features operational. Start by making sure you know what the customer expects from the finished product.
For example, do they want to have only the driver’s door unlock on the first button push and all others unlock on the second? Do they want to be able to open a power sliding door or lift gate with the remote? Do they want driver 1 and driver 2 memory features to adjust based on which remote is used or button is pushed on the remote? These are just some of the things that need to be discussed before you start your work.  Naturally, the customer’s desires will have to be compared to the kit being installed to ensure it’s capable of meeting their expectations. But remember, the more features they want, the more complicated and time-consuming the wiring will be, which will affect the price of the install job.
Make sure you have all of the accessory company’s instructions as well as the vehicle’s wiring diagrams. Many times, the appropriate local dealer will offer a kit that is licensed by the manufacturer. This might be a little more pricey, but they typically offer the benefits of vehicle-specific wiring instructions that will usually tell you exactly where certain vehicle wires are located for easy access, like “Green/Blue  wire under driver’s sill plate.” Also, many of these kits will come with a warranty that is backed by the dealer. So, if the unit fails at some point in the future, the dealer can fix it and you won’t have to worry about it. Some makes offer a lifetime warranty on these add-ons as well. So where you purchase one of these kits is something to consider.
Beginning the Install
 One of the first things to do is choose a mounting location for the control module. You want some place that is out of sight and doesn’t interfere with any factory equipment on the vehicle. You have to also think about where the wiring has to route to get in and out of the module as well. If it’s a vehicle security system, then it’s very important that the module is solidly mounted against the body of the vehicle, or solid dash framing, since most will contain a built-in shock sensor. It has to be able to “feel” vibrations in the vehicle’s body. If it’s strapped to a heavy wiring harness somewhere, it may not “feel” that window being busted out.
 You also have to be mindful of any factory theft deterrent systems already in place. For example, a vehicle with a transponder key will require some type of key code generator that emits an RF key code if the vehicle is getting a remote start system added. Of course, that also means that the key code generator then also will require its code to be added to the vehicle’s list of acceptable key codes. This may or may not require the use of dealer-level scan tools. Sometimes this only requires the customer’s two already programmed keys. If the vehicle requires a scan tool that you don’t possess, many locksmiths are equipped to add the key code for you.
 Some of these systems can appear rather frightening peeking at them in the box. See Photo 1. After pulling the wires out of the box for a closer look, they can sometimes seem even more unnerving. See Photo 2.
Remember that, not every wire here will be used. Some (close to half actually) will be cut off short, taped over and not used. That’s because many of the wires are for features that will not be used for this installation type for this vehicle.
So, now it’s time to tame down this mess. This is one place where the vehicle-specific wiring directions come in handy. Group together all wires that head off in the same direction from the determined module  mounting area. For example, group all wires that go up the steering column together, all that go to the driver’s kick panel area together, all that go out under the hood together and so on. InPhoto 3, all of the wires that run up the steering column have been grouped together. In Photo 4, you can see other sets being grouped off together based on where they end up. This step significantly tames the mess down to where the installing tech can begin to see light at the end of his tunnel. It also lays the groundwork for a neat, factory-like install.
 If you look at Photo 5, you’ll see many wires that are just lying loose and not grouped together. These are the extra ones that were mentioned earlier. Roughly about 50% of what was originally seen as intimidating, nightmarish rat’s nests of wires will not be used. Now they have been isolated and are ready to be cut off short. Not so scary-looking now, is it?
Time To Take It Inside
This victim…er, ah…patient…is a 2008 F-SuperDuty Diesel (see Photo 6). This will be a keyless entry,  vehicle security and remote start system in one. Naturally, I didn’t take pictures of every single wire connection and programming step for this article. If I did, this magazine would be a lot thicker this month. But I think you’ll get the idea.
The mounting location for the module has been picked out. It will be the driver’s side behind the dash and bolted to the firewall, which means some tiny holes will be drilled (See Photos 7 and 8).
 If you do any drilling, you obviously need to first look on the other side of what you’re drilling through to see what’s there: fuel lines; wiring harness; brake lines; or a several hundred dollar control module. Be sure to seal the screws with something like having plumber’s putty or silicone applied to the threads. Pull interior panels off that will be needed to access wires. Usually this means the steering column shrouding, the driver’s kick panel and driver’s door sill. Occasionally, a few other panels will also need to be removed, but most of the time your work will center around the driver’s side (see Photos 9 and 10).
  While holding a grouped set of wires so that the connection to the module is at the module’s mounting location, route the group in a manner that does not interfere with anything else in the vehicle and so that it ends up in its destined location.
In Photo 11, the grouped wires end up at the ignition switch. Holding the wires in a manner as to mark them for length, I now know where my cuts will be. Before I cut the wires, however, I wrap them into a taped harness of their own, starting from the ignition switch end and heading back to the module end. I’ll repeat this method for other grouped wires based on where they end up. (See Photo 12.) You can see how the harnesses are now really taking shape.
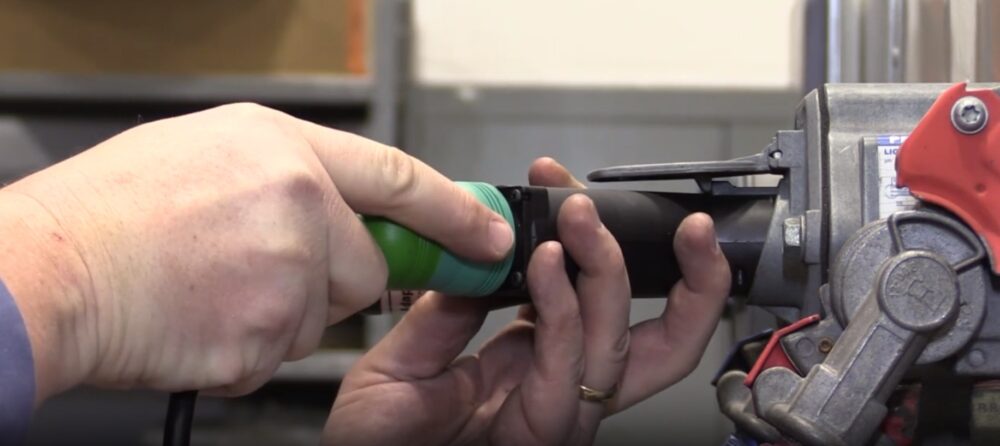
 Solder all connections because scotchlocks and buttsplices can fail over time. How you insulate a connection can vary. There are drawbacks to heat shrink, although most people consider that the best way. As seen in Photo 13, I cut the factory wire to be able to install the shrink tube over the wires before soldering it back together. On an older vehicle, I probably would have removed the factory wire from its hard shell to slip the shrink tube over it. However, on newer vehicles, it seems that the locking tabs in the shells are getting much more delicate and break much easier. The vise grips (hemostats can be used) are there to hold the heat shrink back and act as a heat sink, thereby preventing the tube from shrinking while soldering.
 Be sure to route your harness away from danger (see Photo 14). In many cases, even though there will be connections made for power locks, lights and more, you might be surprised to find out how little dismantling around the vehicle will be needed. In this case, the majority of the body-related connections are made in one common location under the driver’s sill plate (see Photo 15). You should never have to tap into paired twisted wires. If the wires are twisted around each other, then
  they are either communication wires, wheel speed sensor wires or crash sensor wires. Also stay away from any wires that are in bright yellow sleeving, because those are likely air bag wires. Regardless of the color code that the wiring diagram or installation instructions indicate, twisted wires and yellow-sleeved wires are not what you want when you hook these things up. Look for that needed wire elsewhere.
Well, there you have it. A little time consuming, but not hard. The manufacturer of the system will have some instructions in the box to follow as well, including how to program the unit as needed. There won’t be any special tools needed to program things like remotes, illuminated exit, auto locks, diesel time delay  before crank (glow plug timer) and such. It will be more of a matter of pressing the override/valet button, pumping the brake pedal, or pushing the lock and unlock buttons in a sequence. But the vehicle may have other factory features that may need a scan tool in order to get it to accept the add-on system. So, just be aware of these issues before jumping in and you should be “demon-free.”