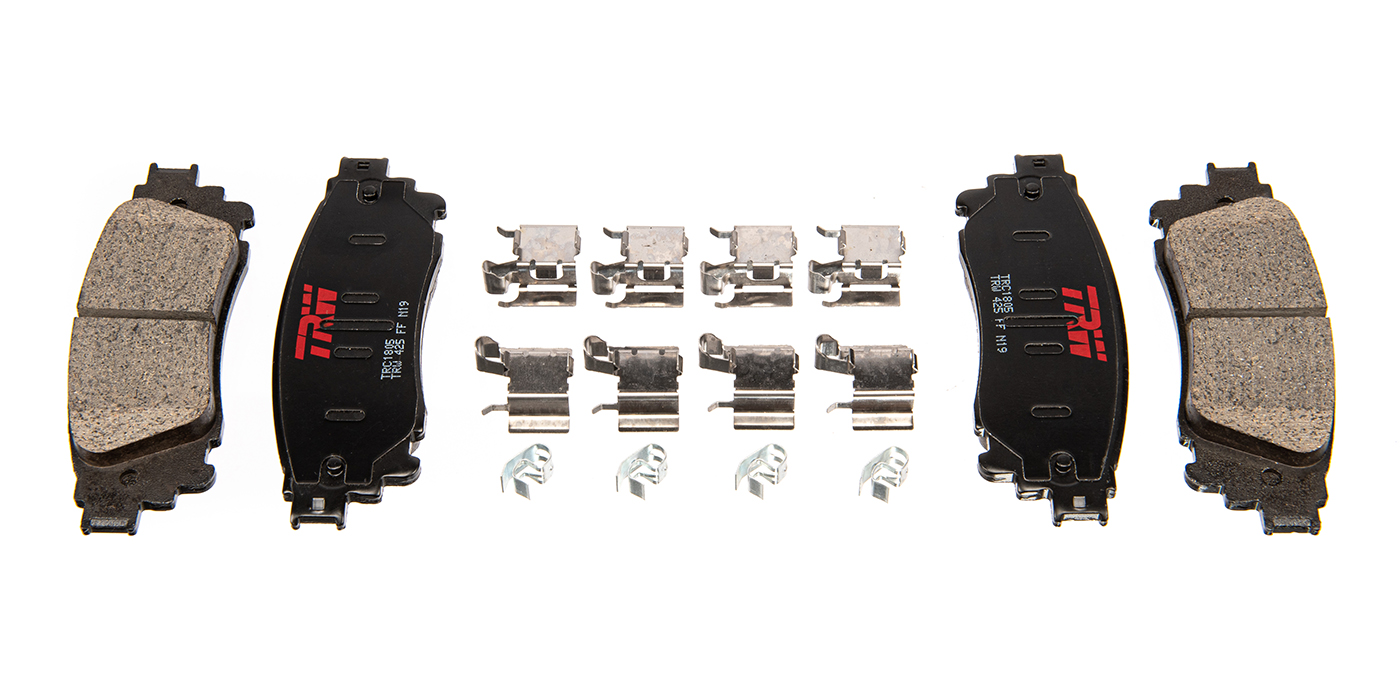
d bridge bolts.
Opposing piston calipers are bolted to the knuckle and have pins to position the pads. Drum brakes have return springs to return the shoes to a rest position and hardware to hold the shoes to the backing plate. The shoes return to a fully retracted or rest position when the master cylinder releases pressure to the wheel cylinder. There is no compensation for lining wear.
 In some cases, the master cylinder may contain residual check valves to prevent air from being drawn past the wheel cylinder cup seals when the shoes are retracted by the return springs. Before 1955, drum brakes required periodic adjustment. As the linings wore, the piston in the wheel cylinder would have to travel further to engage the shoe with the drum friction surface. The return springs would retract the wheel cylinder piston to its rest position. This caused the brake pedal to move closer to the floorboard when the brakes were applied. This was commonly referred to as low pedal.
Adjusting the brakes would move the shoes closer the drum friction surface and reduce the travel of the wheel cylinder piston. It also required more fluid in the wheel cylinder to apply the brakes. Adjustments were made by manually turning the notched wheel on the adjuster with a brake spoon for the self-energizing type.
The dual-servo drum brake with leading and trailing shoes requires a wrench to adjust the eccentric adjusting cams located on the backing plate. It took a good “sense of feel” to adjust the brakes evenly. The process was to tighten the adjuster or eccentric adjusting cam to a point where the shoes contact the drum friction surface and backing off the adjuster or eccentric adjusting cam to where the shoes just cleared the drum. It’s all in the “feel” as you turn the wheel and move the adjuster or eccentric cam.
 Bendix/Wagner
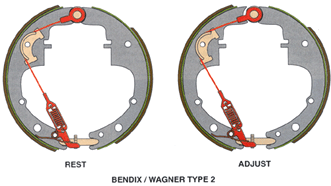
The Bendix/Wagner self-energizing brake has a single anchor pin located above the wheel cylinder. The primary shoe is identified by its length and position on the shoe. The lining segment is shorter than the lining segment on the secondary shoe and is positioned toward the adjuster or heals of the shoe. When the brake is applied, the master cylinder applies hydraulic pressure to both wheel cylinder pistons.
The primary and secondary shoes engage the friction surface of the drum. The wrapping motion of the primary shoe transfers pressure through the adjusting screw and drives the secondary shoe against the anchor pin and friction surface of the drum.
The secondary wheel cylinder piston is held in its rest position as the secondary shoe is driven against the anchor pin.
The adjuster mechanism is attached to the secondary shoe. It is a mechanical device that is made up of the three components.
First, an adjusting screw that is a threaded device like a nut and bolt. The head of the bolt is a notched wheel with a cylindrical pin. A washer and slotted cap fits over the pin and engages web section of the secondary shoe. The nut is also a slotted cap that threads onto the bolt and engages the primary shoe.
Second, a lever moves on a pivot to engage and turn the notched wheel.
Third, a cable or linkage is attached to the lever and the anchor pin to move the lever at its pivot point. There are springs and retainers to hold the mechanism in place.
The adjustment takes place when the vehicle is in reverse and the brakes are applied or when the parking brake is engaged. The cable or link attached to the anchor pin pulls the lever mechanism based on the movement of the secondary shoe.
When the brakes are applied, the lever cannot move the adjuster screw because the brake pressure is being used to apply the shoes. The adjuster lever mechanism must store the adjustment and turn the notched wheel when the brake is released.
There are two types of Bendix/Wagner self-adjusters. Type 1 uses a cable attached to the anchor pin and hook that is attached to the adjusting lever. A guide holds the cable in place. A spring connects the lever to the primary shoe to contain the adjuster. Type 2 uses a cable attached to the anchor pin with a spring and guide that attaches to the lever.
Type 2 uses the same cable guide as Type 1. On Type 2, the lever is connected to the secondary shoe with a pin and return spring. A spring connects the primary and secondary shoe to contain the adjusting screw.
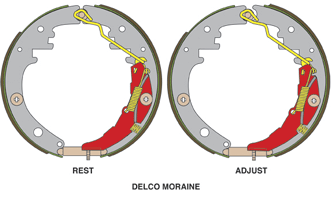 On the Delco Moraine type, the adjuster uses a lever assembly, linkage and adjusting screw. The lever assembly is made up of the adjusting lever with spring-loaded link. The linkage is attached to the anchor pin and spring-loaded link of the assembly. The lever is attached to the secondary shoe at the shoe hold down. A lever return spring is placed between the lever assembly and shoe. A spring connects the primary and secondary shoe to contain the adjuster.
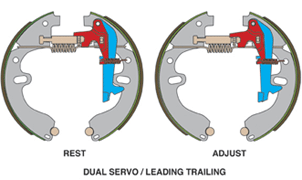
Dual Servo
Dual Servo brakes use two primary shoes and two anchor pins. The pistons of the wheel cylinder apply both of the shoes. The adjuster is located under the wheel cylinder. The adjuster uses an adjusting screw and notched wheel and lever in the same way as the Bendix/Wagner. A lever is attached to one of the shoes to adjust the notched wheel. The lever is usually part of the parking brake assembly.
There is no pressure on the adjusting screw when the brakes are applied allowing the lever to turn the notched wheel. A return spring is used to contain the adjuster in the same manner as the Bendix/Wagner type. This is different from the Bendix/Wagner type where the adjustment takes place after the brake is released.
 Adjuster Inspection
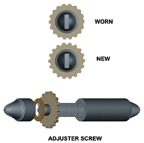
The lever and notched wheel are in contact and move against each other every time the secondary shoe moves off the anchor pin. A groove can be worn in the lever and the notched wheel will also wear. A grove worn in the lever can prevent the adjuster from working properly. The wear on the notched wheel can easily be determined when it is compared to a new adjusting screw. The cable can be stretched or frayed.
Springs and linkage can also become worn. Don’t forget that there are left and right adjusting screws. If you install one on the wrong side the lever, it will turn the screw the wrong way.
In a disc/drum application, the automatic adjusters play an important role in maintaining proper brake balance during the time when the shoes are seating to the drum. The linings on most premium replacement shoes are eccentrically ground to produce a clearance at the shoe’s heel and toe.
This allows for a closer drum-to-shoe clearance. As the brakes are applied, the center of the lining contacts the drum first. As hydraulic pressure increases, the shoe will flex allowing the lining to completely contact the drum friction surface. As the shoes wear in, there will be less flex in the shoe and it will closely fit the contour of the drum.
For the first 100 miles or more, the adjuster will be the most active and keep the brake pedal at its proper height. After the shoes have seated, the adjuster will turn the notched wheel in small increments. Replacing the adjusters can provide your customer with a repair that ensures proper brake applications and pedal height.