Have you looked at technical service bulletins lately? Especially ones for vehicles built since 2004? The fixes have changed drastically. I remember a time, not too long ago when the fix in a typical TSB was to install an updated part. From where I stand now in a Ford dealership, it seems like the hardware replacements have been pushed aside for software replacements. It seems like every set of bulletins that are handed to me month after month, the fix is or includes “reprogram module to latest calibration.”
Honestly, I don’t recall PCM replacement being as popular of a fix in years past as what PCM reprogramming is today. Could it be that it’s a side effect of more complex software? Sloppy program writing? Or is it just because software is a cheaper part to warranty than hard parts? It could be a combination of all three reasons and others not mentioned. Regardless of why reprogramming is getting to be so common, it’s clear that the average shop needs to be able to do it.
Typically, when someone talks about reprogramming a module, it’s the PCM they’re talking about. However, almost every module on a vehicle today is programmable. For some models, every module on it has to be programmed during replacement — even the radio. The software within the module provides it with its instructions. Changing that program changes that module’s personality. This can include:
Changes to alternator output for PCM-controlled alternators;

Idle rpm;
Transmission shift points;
A/C compressor clutch cycling;
Acceptance of updated parts;
Base injector pulse width; and
Even things like data bus communications and air bag deployment issues.
 So how is this done? There are many programming devices on the market, but what I’ll use here is Ford’s IDS. There are several ways to program a Ford PCM using the OE tool. The following screen shots are a collection of programming modules over a large period of time and various Ford vehicles. All of these procedures are performed through the DLC.
Simple Reprogramming
Let’s say that there is a software update to fix a driveability concern. The technician would select “Module programming” from an option menu. See Figure 1.
 Then select module reprogramming, plus the module to reprogram. Notice in Figure 2 that the PCM, TCM and RCM are the menu choices.
After choosing “PCM” to reprogram, the tool displays the status of whether or not there is a calibration update available, along with the file name of the file it wants to load if the user continues. See Figure 3.
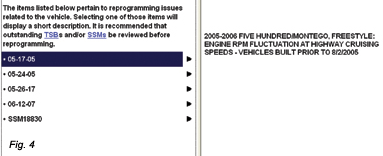
If “no” is selected, programming will be aborted. If “yes” is selected, then the tool will search its database for the matching file name. If the file is not already in the tool, the tool will need to download the file from the OE website. After the tool has located the correct file, a list of TSBs may be displayed that show what TSBs the reflash will address. Each of the TSBs listed in Figure 4 are involved in this reflash. The user should be aware of each.
 After accepting, by selecting the check mark, the tool displays an important warning. The battery must not be allowed to go dead, neither in the car or the tool, during programming. Also, things like the fan and fuel pump may run during programming. These should be disabled, not only to preserve the battery power, but also to eliminate electrical noise.
After selecting the check mark, the old software is erased.
After erasure, the new software is loaded.
 Sometimes, new PCM software also requires new TCM software.
This procedure ends with a key dance. The tool instructs the user to turn the key off, then start the engine, then shut it off. It ends by clearing all fault codes because various modules may have set “U” codes during programming.
So what happens if there is more than one calibration file available? It does happen occasionally. In those cases, you’ll be asked a rather questionably worded question (see Figure 5):
 “Has the following TSB been performed, or do you want to perform it?” Sounds a little like double talk to me. That one question sounds like two separate questions. Personally, I feel it should be asked in two steps. Has the following TSB been performed? Yes/No. Would you like to perform it? Yes/No. After all, if I’ve already performed the TSB, why would I want to do it again? What it’s really asking is, have you just now performed the TSB or are you about to.
 For example, the TSB listed here (07-12-11) is about correcting a battery drain issue on 2004 and 2005 Explorers. The fix includes replacing the PCM and programming the new PCM with the file that the tool will select if you choose “yes.” So, in that case, you have already performed the TSB (the new PCM should be installed).
In another case, one involving a Contour transmission where gear ratios may change during repairs, you may not have physically performed the TSB but you’re about to and are just doing the reflash part first. In which case, that is also a “yes.” If it helps, just ignore the first half of this question and read only 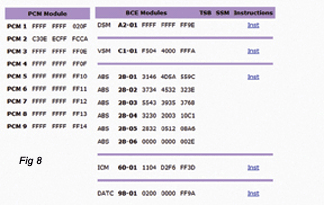 the second half as “Would you like to perform this TSB?” In either case, you must be aware of what is involved in these TSBs that are being addressed. Problems will likely arise if a reflash requires new parts to accompany it and you fail to install the new parts but still load the new software.
Programmable Module Installation and AS-Built
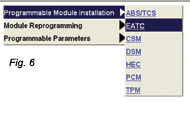
When a new module is installed that requires programming, usually the easiest method is to perform a “PMI.” PMI stands for “Programmable Module Installation,” in reference to the choice that is selected out of the option menu, and then the type of module that will be replaced. See Figure 6.
 The module makes a copy of the module’s configuration data (program) and instructs the technician to install the new module.
Normally, all that’s required next is for the technician to install the module and select the check mark. The tool then instructs the user to turn the key on and it automatically programs the new module with a copy of the original module’s configuration.
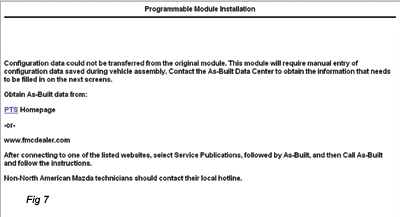
Occasionally, something may be wrong with the original module that will not allow this. Then, the user will be promoted to manually type configuration information into the module. See Figure 7.
 The Ford website contains the configuration information for the various modules and is searched by VIN number. The code is displayed in a manner that is not plain English. See Figure 8.
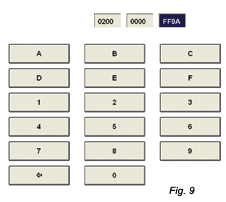
The user then manually types the data in on the next screen. In this case, the DATC module (Dual Automatic Temperature Control) was being programmed. In the code, the “98” indicates the module being addressed. The “01” indicates what line the data will be typed into. The data here is “0200 0000 FF9A.” There is only one line of data for this module. See Figure 9.
 Once the check mark is selected here, the module is then configured with this information.
This module has now been loaded with the original programming that the original module left the factory with. The user will need a subscription to the website to obtain this.
Blank Module or Module Overwriting
Using IDS, if a PCM has the wrong calibration loaded into it for the vehicle, the PCM can be overwritten. For example, let’s say someone has installed a used PCM from a vehicle that had California emissions onto a Federal emissions vehicle, and needs to load the correct calibration. The easiest way is to let the IDS self “ID” the vehicle. It will provide a description of the vehicle and ask, “Is this correct?” The user should then answer “No.”
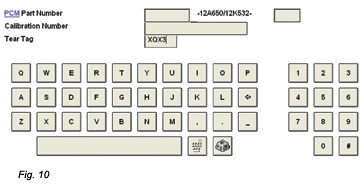
 The IDS will then say that the wrong calibration code has been loaded into the PCM and will take the user to a screen that allows him or her to load the correct calibration by choosing one of three methods — PCM part number, calibration code or tear tag. See Figure 10, where I have typed in the tear tag, which can be found on the PCM part number tag. See Photo 1. This four-digit tear tag is “XQX3.” Taurus can be easily found on the passenger side inner fender. The tear tag should be on the PCM sticker.
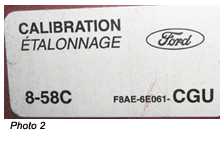
The calibration code can usually be found on a white sticker in the driver’s door jam (see Photo 2), and occasionally on the driver’s rear door jam if it’s not in the driver’s front door.
The PCM part number can be found on the PCM, but if the PCM that’s in the vehicle is from a donor vehicle, then that number may not be wise to use. After all, it won’t be fruitful to overwrite the wrong calibration code with the wrong calibration code all over again. However, the PCM part number can still be used. With a subscription to the Ford website, the tech can access the online part number listing for various parts that were installed on the vehicle. This listing is called the Historical Vehicle Bill of Material (HVBoM). This is VIN-number specific.
Blank module programming is similar to a module that has been incorrectly programmed. The big difference will be when the tool goes to “self ID” the vehicle. The module will be blank so it won’t ID it. Instead, it will make three attempts and if the module still won’t ID, it will give the user the chance to manually select in a vehicle description from drop-down menus. Then, the tool will send the user to the screen where the user can choose to program by part number, calibration code or tear tag.
The OE tools may be the easiest way to program a module, but they are not the only way. Since it’s impractical to own the OE tool for each make a shop may service, the shop can opt for a more universal approach. A J2534, also referred to as a J-Box or a Pass-Thru, may fill that need. It can give a shop the ability to load calibration codes, program PATS keys and change axle ratios. A J-Box will do this for multiple makes, rather than just one.
It wasn’t long ago that we were all discussing that reprogramming would be a necessity for future vehicles. Regardless of what tool(s) you choose to program modules with, one thing is clear: the “future” is now. These vehicles are on their way to your shop. You may have already run into these problems a few times and had to send them to the dealer. But is that something you want to keep doing?


