Drive belts are an often-overlooked component during routine maintenance service intervals
Drive belts last so long on late-model imports that it’s very easy to forget about inspecting them during a scheduled maintenance interval. In the early days of import cars, drive belts didn’t last as long because many were made from a leather belt joined together by a mechanical coupler or from cut leather links that looped together to make the belt adjustable. Of course, given the low engine speeds and accessory loads of many early imports, leather belts served the purpose very well. Today, however, belt materials and construction are critical to the durability and function of the modern drive belt.
V-BELTS
The rubber V-belt, which has undergone many internal design changes over the years, served well into the 1990s as a method of transmitting engine torque to accessories like the alternator, power steering pump, air conditioner compressor, water pump and exhaust air injection pump.
High-load accessories, such as the alternator, often required two V-belts to transmit engine torque from the crankshaft to the accessory. As accessory loads increased and engine compartment space decreased, stacking enough V-belts to handle accessory loads became an engineering nightmare, especially in transverse engine compartments that allow little room for multiple V-beltdrives. Worse, still, the thick cross-section V-belts would create excessive internal heat at high engine speeds and accessory loads. In addition, insufficient belt tension causes slippage that increases belt-operating temperatures that ultimately result in rapid belt failure.
SERPENTINE BELTS
The “flat” serpentine belt began replacing the rubber V-belt in many popular applications during the 1980s. Whereas the torque transmission capabilities of the V-belt were primarily limited by the contact area between the sides of the belt and the driving pulley, the serpentine belt’s torque transmission qualities were limited only by the belt’s width and the degree of “wrap” around the grooved driving pulley. In fact, the contact area and the subsequent torque-transmitting capabilities of the serpentine belt became so high that a single serpentine belt could supply enough torque to drive all of the typical import’s engine accessories.
Of course, the design of the serpentine belt allows an automatic tensioner pulley to be placed in the accessory drive system to maintain a very precise and constant tension on the serpentine belt. The fact that the serpentine belt operates under such precisely controlled tension contributes greatly to its overall durability and reliability. In addition, due to its thin cross-section, the serpentine belt builds up very little internal heat during high-load conditions.
TORQUE LOADING
To get a better understanding of how much torque a belt must transmit from the crankshaft to an accessory, let’s look at a few examples of accessory load. Since an air injection pump moves air at nearly zero pressure, very little torque is required for operation. The water pump, on the other hand, requires more torque as the engine speed increases.
Since the power steering pump operates on demand, its torque requirement depends upon whether the vehicle is being parallel parked or driven at highway speeds. Similarly, the air conditioning compressor is very much an on-demand accessory that requires substantial amounts of engine torque when the compressor clutch is engaged. Of course, the compressor’s torque requirement depends upon variables such as ambient air temperature and the pumping capacity of the compressor itself.
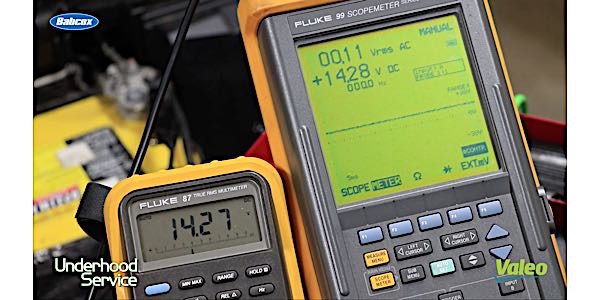
In contrast to the other accessories, the alternator places the heaviest and most constant load on the drive belt. For this reason, the alternator V-belt on older imports was the first to wear out and fail. Regarding load demands, the typical import requires at least 15 amps to operate the engine electronics, the electric fuel pump and supply field current to the alternator. If the vehicle is being driven at night with a full lighting, heating, ventilating and sound system load, it may require 60 amps of alternator current just to keep the battery fully charged.
Under these conditions, the serpentine belt is driving alternator output to 60 amps of current. Considering that 746 watts equals one horsepower, 60 amps x 14.2 battery volts = 852 watts or 1.14 horsepower of alternator load.
Of course, if the air conditioning is engaged, we could possibly add another horsepower to the belt load. Beyond this, the math gets impossibly complicated and I think it’s fair to say that the little thin strip of rubber and cord we call a serpentine belt is performing a gargantuan task!
V-BELT WARNING SIGNS
Most drive belts provide ample warning before they fail. The old V-belts, for example, would lose tension as they began to wear out. When this happened, the belt would emit a shrill squeal when an accessory such as an alternator, power steering pump or air conditioning compressor was engaged.
In addition, as a V-belt began to age, it would develop cracks on its inner circumference and when these cracks became deep enough, the belt would break in two.
When diagnosing a slipping V-belt, always make sure the belt is not contacting the bottom of the driven or driving pulley. If the belt has become excessively worn or too narrow for the pulley, it will polish the inner circumference of the pulley. The same symptoms exist if the pulley itself has become worn beyond specification. Last, if the drive surfaces of the belt become glazed for whatever reason, the belt should be replaced.
SERPENTINE WARNING SIGNS
As with conventional V-belts, manually adjusted serpentine belts will tend to slip and glaze when they are not tensioned properly. The tension on a manually adjusted serpentine belt is measured with a tool designed for that purpose. When a tool isn’t available, the proper tension can be approximated by using one’s fingers to twist the belt midway along the belt’s longest pulley-to-pulley span. If the belt is tensioned correctly, the belt shouldn’t twist more than 1/4 turn.
In contrast, automatically tensioned serpentine belts shouldn’t slip or glaze unless the tensioner has become worn out. When inspecting a serpentine belt, always check for signs of fraying along the sides. A frayed belt, unfortunately, indicates that one or more pulleys are misaligned due to improper installation, loose mounting bolts, broken accessory mounting brackets or misapplication of a replacement pulley.
As the rubber in the serpentine belt ages, it begins to crack on the inside V-grooved circumference. Although manufacturers’ specifications usually allow several cracks per inch of belt, it’s always best to examine the belt for one major crack across the belt width, especially if the belt is removed for an accessory replacement.
When inspecting pulley alignment, always test for excessive endplay in the crankshaft and accessories. In some cases, alignment can be checked by wrapping a string around the center groove in the pulleys. When this is done, the string’s path should be been designed by at least one major belt manufacturer for this specific purpose.
Last, always inspect any serpentine belt for road debris embedded in the belt. Obviously, if a fender well or under-chassis splash shield is missing, the belt will be exposed to a large amount of road debris, which will result in shortened belt and pulley life or in a catastrophic failure of the belt itself.
SALES OPPORTUNITIES
Drive belts should always be examined when any accessory such as the alternator is being replaced. In addition, drive belts should receive a visual inspection during any routine vehicle service such as a lubrication and oil change. In any case, if an accessory isn’t functioning to specification, always check the drive belt for glazing and correct tension.
In most cases, selling a new drive belt will increase both the customer’s sense of security and the shop’s bottom line.