Of all the technical innovations of the past century, the plastic-insulated copper wire is one of the most dependable components found in the modern automobile. Sure, this summer I had three different cases of the copper wire actually being broken inside the plastic insulation. In the first two instances, I had the intake air temperature (IAT) sensor leads broken inside the insulation just a half-inch from the sensor connector. In these cases, I would speculate that the wire core was initially weakened when the metal terminal was crimped to the wire and finally separated due to normal engine vibration. In the last case, I don’t have an explanation because the break inside the insulation occurred about 4” from the mass air flow (MAF) connector. Maybe General Motors got a batch of defective wire, because a failure of this type is normally rare.
The Shiftless Chevy
Of course, not all wiring failures are caused by manufacturing errors. Last summer, a long-time customer brought in his 2002 Chevrolet Silverado K1500 pick-up truck with the Check Engine light on. My scan tool retrieved a DTC P0758, which indicated a problem in the 2-3 shift solenoid circuit. The P0758 is stored when the PCM commands the 2-3 shift solenoid on and the voltage level in the yellow/black wire connecting the 2-3 solenoid to the PCM remains either too low or too high. When the DTC P0758 is stored, the PCM commands third gear only, increases line pressure and inhibits torque converter clutch engagement.
A test drive verified that the transmission had defaulted to third gear and that the P0758 was a hard or repeatable failure. In this case, the truck would coast when the throttle was lifted because an overrun clutch was the only clutch engaging third gear. In normal operation, the overrun clutch would be locked in by engaging one or more of the friction clutches. This particular default operation is normal because the PCM is operating the transmission in a mode that prevents clutch plate or other mechanical damage.
 Solenoid Analysis
As mentioned above, the P0758 is set when the PCM senses either high or low voltage in the wire linking the PCM and the solenoid. A high voltage, for example, might indicate a failure within the PCM’s 2-3 driver circuit. A low voltage, on the other hand, might indicate an open or shorted-to-ground solenoid circuit.
When automatic transmissions fail because of shorted solenoids or worn ignition switches, multiple DTCs are usually stored because the circuit failure randomly occurs in any forward gear. In this case, I had only a single DTC. In addition, when I used the scan tool to command the 2-3 solenoid on, the normal clicking noise indicating solenoid activation was missing. Removing the transmission oil pan revealed that no mechanical damage had taken place and that battery voltage wasn’t present at any of the solenoid assemblies.
Power Circuits
The most accurate method of diagnosing voltage problems is to probe the fuse box with a DVOM. All fuses should have close to battery voltage at either pin. On the 2002 Silverado, the transmission solenoids are powered by the “IGN0” fuse located in the instrument panel fuse box. Since IGN0 proved to have battery voltage at both pins, the next step was to examine a wiring schematic. The schematic indicated that a pink wire feeding the solenoid circuit was routed through the underhood fuse box to the transmission electrical connector. A red wire from the transmission connector supplied current to the various shift solenoids.
Mouse Patrol
Since the pink wire was enclosed in the PCM main wiring harness, the easiest point to begin testing was at the underhood fuse box. Fortunately, General Motors makes the underhood fuse box easy to disassemble and, after removing the fuse cover and loosening the fuse panel, I noticed some dry grass falling away from the fuse box base.
Of course, it’s obvious that the dark, enclosed space of the fuse box would make (you guessed it) a very nice home for a country mouse! After carefully lifting the fuse panel it became apparent that an enterprising rodent had taken up residence and had perhaps caused the transmission failure by gnawing the pink wire in two.
Safety Precautions
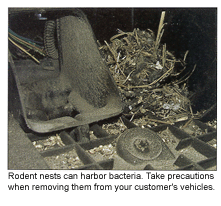
Hantavirus, which is a serious and occasionally fatal disease commonly experienced in the mountain states and southwest, is contracted via inhalation of dust from rodent nesting activities. To better understand the hazards of Hantavirus, I highly recommend researching information contained on several U.S. and Canadian government Internet websites. Each describes Hantavirus and its prevention in more authoritative detail than possible in this space.
In summary, always protect yourself by wearing rubber gloves and a HEPA respirator while removing the rodent nest. The recommended method of disinfecting the various components is by rinsing with a mild solution of laundry bleach and warm water. Because Hantavirus is contracted via inhalation, never use compressed air, a broom or a vacuum cleaner to remove rodent debris in a closed shop environment. If you are forced to use a vacuum cleaner, make sure it’s equipped with a HEPA filter and use it outdoors to reduce the probability of inhalation.
The Pink Wire
Of course, after removing the mouse nest and decontaminating the fuse box assembly, the simplest part seemed to be finding and repairing the broken pink wire. But, after lifting the fuse panel, it became apparent that the electrical system uses a dozen or more pink wires to supply current to various electrical circuits! Nevertheless, the task was simplified by using a curved radiator hose pick to gently tug on each of the wires contained in the PCM wiring harness. Eventually, I pulled a severed, 18-gauge wire out of the harness. About 20 minutes later, I retrieved the other end of the wire. To repair the wire in such a confined space, I soldered a 4” jumper wire to one end of the severed wire, slipped some shrink tubing in place, and then soldered the remaining end together. Case closed!
The Faltering 4-Runner
Of course, not all rodent-related cases result in hard failures like the Chevy Silverado. To understand how rodents can cause tough-to-solve intermittent driveability complaints, let’s examine a well-maintained 1996 Toyota 4-Runner equipped with the 3.4L V6 engine and automatic transmission. The owner, a real estate appraiser, had experienced a momentary, but severe loss of power twice while working in a remote mountain location. Needless to say, the appraiser became alarmed at the prospect of being stranded in the woods with a dead engine.
During the initial inspection, I discovered that the random loss of power hadn’t stored any trouble codes in the PCM’s diagnostic memory. Frustrated, I set my scan tool on “record” and proceeded with a test drive. As luck would have it, I accidentally hit the record button as I was driving, so I pulled to the side of the road to reset the record feature.
As I began to accelerate into the stream of traffic, the Toyota suddenly lost power. Suddenly, I saw a huge semi truck looming in my mirror, so I swerved to the roadside to let the truck pass. Naturally, I didn’t have time to record the incident. Afterward, the engine ran perfectly for another 10 miles of test driving.
Frustration
After returning to the shop, I scope-tested all of the vital engine functions including crank and cam sensor, fuel pump and secondary ignition. In addition to thoroughly checking the wiring and PCM ground, I also graphed the fuel pressure and tested for volume. Except for needing new spark plugs and a fuel filter, the 4-Runner was in exceptional condition and continued to run perfectly, mile after mile.
But, let’s get back to the basics. During the initial interview, the customer said that the Toyota had failed in rough mountain country. Clearly, driving on smooth paved roads wasn’t going to initiate the problem. More important, the loss of power on my first test drive happened as I drove over the rough shoulder along the highway.
Fortunately, I have a rough test track that runs alongside an abandoned railroad track. With the scan tool connected, I began giving the 4-Runner a thorough vibration test, hoping to initiate the failure. The 4-Runner ran perfectly until I neared the end of my test track. 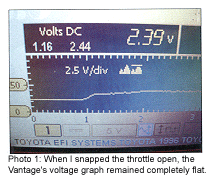 Suddenly the engine lost power and, just as suddenly, regained it. A quick glance at the scan tool revealed no relevant data. On the return trip, the Toyota again suffered a severe power loss, but this time the symptoms didn’t go away. I stopped and retrieved a series of P0300 misfire codes from the scan tool and also noticed that the up and down-stream oxygen sensors had driven completely lean.
Lean Mixture
The engine was running so poorly that I could barely idle back to the shop. Once in the shop, I carefully stepped out of the Toyota, opened the hood and connected my Snap-on Vantage Pro to the engine air flow sensor. When I snapped the throttle open, the Vantage’s voltage graph remained completely flat (see Photo 1). This flat voltage line indicated that the air flow sensor was underestimating the air flow into the engine. The immediate result was that the PCM wasn’t increasing the fuel injector pulse width enough to supply fuel to the engine at higher throttle openings.
 An Inventory Diagnosis
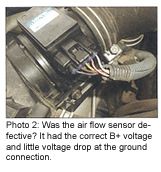
My immediate thought was that the air flow sensor itself was defective. After all, it had the correct B+ voltage and little voltage drop at the ground connection (see Photo 2). On the other hand, when discussing price and availability of the air flow sensor with my parts supplier, it became apparent that the sensor itself was a very slow-moving part and was available solely through the Toyota warehouse network. Call it “diagnosis by inventory” if you wish, but the price and availability of the air flow sensor caused me to take an even more detailed look at the air flow sensor assembly.
Mouse Patrol
Connected directly to the air filter housing, the air flow sensor is obviously exposed to any 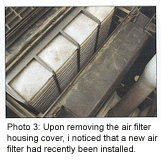 debris collected around the air filter. Upon removing the air filter housing cover, I noticed that a new air filter had recently been installed (see Photo 3). After carefully removing the new air filter, I noticed perhaps a half-dozen sunflower seed shells lying at the bottom of the air filter housing. Further examining the air intake system, I also noticed that the intake air came from inside the passenger side fender. Here again was the perfect stairway for an enterprising rodent. Not only had the air filter housing become a rodent hide-out, it had also become a rodent grocery pantry.
But, how could a sunflower seed shell have gotten past the air filter? The answer might have been when an unsuspecting lube tech had installed the new air filter. And how could a sunflower seed shell affect the air flow sensor? A further examination revealed that the tube holding the air flow sensor’s resistors was close to the size of the trapped seed shells.
Probabilities
 Could a seed shell intermittently restrict air flow through the sensor? Obviously, that probability was too much to hope for. Nevertheless, I carefully removed the air flow sensor, but found nothing. Discouraged, I reinstalled the sensor, attached the Vantage Pro and proceeded with still another test.
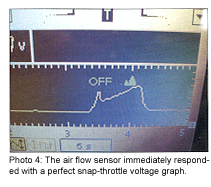
The air flow sensor immediately responded with a perfect snap-throttle voltage graph (see Photo 4). As you can see, the first voltage rise is the intake air filling the intake plenum. The second voltage rise is the intake air filling the engine cylinders as the engine speed increases.
Double-Checking
Of course, I might have jostled the air flow sensor enough to cause it to start working again. Or I might have accidentally dislodged the suspect seed shell when I removed the sensor for examination. Whatever the reason, the sensor was now working perfectly.
In light of the book value of the vehicle, the expense of replacing the air flow sensor and the probability that I had cured the problem, I recommended that the real estate appraiser cautiously drive his ’96 4-Runner on short trips and immediately call me if he experienced further instances of power loss. Several months later during a chance encounter, he told me that the Toyota was performing perfectly.
Is the case closed? In the driveability diagnostics trade, we really never know. Nevertheless, whenever the normal diagnostic process fails me, I go on what I call “Mouse Patrol.” After all, it might be a strand of grass, a malodorous smell or a couple of grains of pet food lying atop an engine that gives me my first clue to solving one of those head-scratching driveability complaints.