Well-designed and durable, the cars from Bavaria have had a reputation for handling and performance that many other manufacturers only aspire to. In the last 50 years, BMWs have gone from the three-wheeled Isetta microcar of the 1950s to today’s powerful and comfortable high-performance machines with all of the latest technology. One of my favorite expressions though, is that in the real world they are “just cars.” By that, I mean they will wear out, break and wind up worthless if they are not maintained, just like any other vehicle.
 In this article, I will cover some of the more common repair procedures we perform at the shop. Probably more than 90% of the BMWs we service are six-cylinder cars that range from mid-1980s to 2003 models. Some newer cars are just coming out of factory warranty service and, from what we’ve seen to date, not much has been done maintenance-wise under the factory service policy. That gives the independent service shop an incentive to get into the service and maintenance of these “Ultimate Driving Machines.”
NECESSARY TOOLS
There is not much on a BMW that would surprise most experienced import car technicians. From electrical systems to brakes, transmissions to suspensions, everything is pretty basic or easily recognizable. There are a few special tools that are desirable if you are going to do regular maintenance.
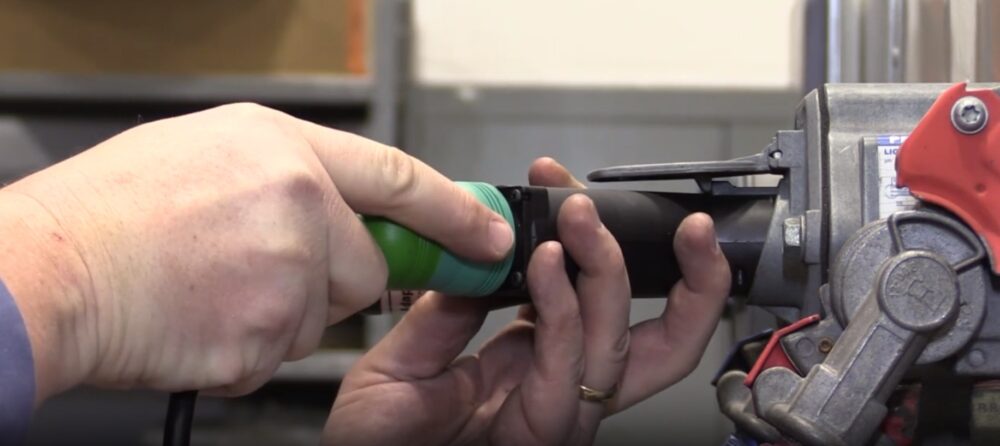
Fan wrenches would be the first items I would secure (see Photo 1). Having a way to remove the fan clutch nut (always reverse thread) from the water pump is almost a daily necessity in our shop. The tool to hold the pulley from rotating comes in handy on many other cars as well.
Other equipment is needed to reset the service and oil change indicators. Software for popular scanners or a BMW-only reset tool are available for a low price from several sources. Some of these small testers can even read and reset fault codes. A scanner with software to perform basic OBD functions and allow activations is a great tool for more in-depth diagnosis.
A vacuum test-and-fill system for the cooling system is another handy item. Without the vacuum filler, the filling and bleeding of the cooling system can be incomplete and time consuming. We used to get a lot of return visits for “topping up” before we had ours. Of course, a radiator adaptor is a must; one adaptor fits all BMWs from the mid-1980s on.
COOLING SYSTEM
The most common repair we do on BMWs is cooling system work. That is why fan wrenches get such a high rating as must-have tools. Every week we replace water pumps, radiators, thermostats and belts in large numbers. Parts are usually readily available, but be aware of varying quality between brands. There are also many possible upgrades to prevent repeat failures, so spend some time tracking down upgraded parts as noted.
 Regarding the water pumps on all BMW engines, the pump housing and bearing are too small for the load imposed by the belts, high-engine speeds and heavy fan clutch. Additionally, the factory-installed pumps have had plastic impellers for years, and the impellers crack or disintegrate. The replacement pumps with a tin impeller aren’t much better for reliability. Look for a replacement pump with a brass or cast-iron impeller for a lasting repair (see Photo 2).
If you’re working on a BMW that has had any kind of overheating problem, or you’re replacing a radiator, thermostat or even belts, spend a few more minutes and inspect the water pump to prevent a comeback. Water pump removal with the shroud and fan off is quite simple using the following procedure:
Loosen the four bolts holding the water pump pulley, then loosen the tension on the main accessory belt and pull it off of the water pump pulley.
Slide the belt out of the way to keep from soaking it with coolant. Release pressure on the cooling system.
Remove the pump pulley.
Remove the four 6 mm nuts holding the pump to the front of the engine.
Use two 6 mm bolts with at least 20 mm of thread to press the water pump out of the front cover using the threaded holes on each side of the pump housing.
Tighten the bolts evenly side to side to slide the pump out straight.
Inspect the recess in the block, especially if there are any missing parts from the impeller. Be careful here as the edges of the recess may be sharp; sharp parts of the impeller may cut as well.
Reinstallation is just the reverse. Use some silicone paste to make sliding the pump back in easier.
 The thermostat housing on BMW models has been plastic for many years. With overheating, the housing tends to warp, crack and leak. A pressure test can easily make you believe the water pump is leaking when, in actuality, it’s just the thermostat housing which is mounted directly above the pump on six-cylinder engines. There are metal replacement housings for most models (see Photo 3). I strongly recommend upgrading the housing when a thermostat is needed. On earlier M50 series engines, upgrading the housing will also upgrade the sealing medium from a paper gasket to the later-formed silicone seal ring.
Like most other automakers, BMW has used radiators with plastic tanks for several years. Regardless of the type of coolant that’s used or the service history, these radiators have a tendency to fail, usually with the upper hose connection blowing off. Often this is caused by another problem, such as a water pump impeller failure, which causes excessive heat. Another problem is that most of the radiators do not have any kind of reinforcement inside the hose neck, and over-tightening can cause failure.
Another source of leaks can be the small overflow connection. On some early models, the nipple is just clipped into the radiator and a repair kit can be purchased for repair. On later models with the nipple molded in, the leak is often just a deterioration of the hose, or the crimp-type clamp  has loosened. Repair can be as simple as trimming the end of the hose and reclamping it.
I really don’t know what was wrong with screw-type hose clamps. Other than the obvious benefits during manufacture, the recent change to plastic, clip-on connections (see Photo 4) has made for some interesting battles when trying to disassemble for repairs. One thing that works for us is spraying the connection liberally with penetrating oil. Release the clip and then use a gentle rocking motion with two pry bars to apply even pressure to remove. On reinstallation, I coat the O-ring with silicone paste, put the clip in the engaged position and slide it on until there is a noticeable “click.” A gentle pull to double check is a good idea.
BELT PROBLEMS
BMWs built since 1993 have used multi-rib belts for the accessory drive. For the most part, the belt systems are trouble-free and relatively long-lasting. Noise problems are almost always caused by failure of one of the components driven by the belt, or used to tension it. Belt quality again can vary from manufacturer to manufacturer, so staying with a quality brand is best. Generally speaking, European belts seem to work better on European cars. Size does matter, and “close” to original length can mean the difference between quiet and noisy.
The typical procedure to replace the drive belts follows. The example given is for a 3 series, six-cylinder. You can do the belt replacement without removing the fan, shroud or hoses. On some cars it might be tight, but the time saved makes it worthwhile. This procedure is done from under the car.
Remove the lower front splash shield if it still exists.
Use a 30 mm box end wrench to turn the lever for the A/C belt damper clockwise. This will loosen the belt enough to twist it off of the compressor pulley, then release the tensioner arm and remove the belt from the crankshaft pulley.
Locate the tensioner pulley for the main belt to the right of and between the water pump and crankshaft pulleys.
Pry the pulley cover off to reveal the retaining bolt for the pulley. This will usually be an 8 mm socket head or 16 mm hex head bolt. Use the appropriate wrench to turn the bolt clockwise, which will release tension on the belt.
While holding the tensioner, twist the belt off of the power steering pulley and release the tensioner. You will notice now that if you used a wrench that is too long, it will interfere with removal. Put the belt back on the power steering pulley and restart the procedure with your wrench in a better starting position.
Now the belt is loose, but trapped between the fan and the engine. You can, with practice, hook the belt over one of the fan blades and just turn the fan while moving the belt into the fan shroud as each blade passes by. One turn will put the belt on the radiator side of the fan so you can remove it.
Before putting the new belt on, turn all of the driven and guide pulleys by hand to make sure there is no binding. Also inspect for any movement in the shaft of the water pump, as this would be the time to replace it if there is any doubt. Also look up at the bottom of the thermostat housing for any signs of leakage.
Start the new belt back on in the same way as removal, only in reverse. Hook the new belt over a fan blade and turn.
Start the belt onto the water pump, tensioner, and crankshaft and alternator pulleys. With the belt hanging off of the power steering pulley, turn the tensioner as noted above, and slide the belt into place over the power steering pulley.
Reinstall the A/C belt by placing it over the crankshaft pulley, tensioner pulley, and then turn the tensioner lever to slide the belt over the compressor pulley. Having a belt that’s the right size makes all of this possible. Even a few millimeters too short can make this a bigger job than it needs to be.
Double-check that both belts are seated on the pulleys and routing is correct. Put the cover back on the tensioner pulley to keep it from collecting dirt.
Reinstall the lower splash shield and observe the belt while running the engine to make sure the belt is tracking properly.
EMISSIONS REPAIRS
Another common repair we perform is to the secondary air injection system used on most BMW models since 1995. This is one system where having the scanner software to perform activations can be a  real time saver. Since the air injection works only for a short time after the first start up, and then sporadically during normal driving, getting a handle on the system’s various components can be difficult. By activating the various components individually, the wiring, relay, switchover valve and pump can be tested. A failure will be easily pinpointed.
We replace a lot of secondary air pumps (see Photo 5). When replacing the pump, make a quick inspection of the inlet and outlet of the pump. The two common causes of pump failure are water or exhaust entering the housing from the inlet or outlet. If water has entered through the inlet, make sure the source of water is resolved, depending on the model and location of the pump (inside the engine compartment, or in the front corner of the car behind the bumper).
 Also make sure that the inlet is not broken or sitting in an area where water can collect. If there are signs of exhaust in the outlet side of the pump, replace the check valve (see Photo 6) at the exhaust manifold and make sure the switchover valve (vacuum control for the check valve) is operating correctly and not holding the check valve open. Failure to check the system operation can cause a quick failure of a new pump. This is where a scan tool with the ability to perform activations comes in handy.
OIL CHANGE
A new customer who has just come out of factory service may not want to hear that the extended intervals for oil changes were not a great idea. But with the number of these cars coming in with sludging, noisy lifters and oil consumption concerns, educating the driver is very important. Oil deteriorates faster or slower depending on initial quality, driving style and environmental issues. Once the oil fails, major engine failure doesn’t take long.
We recommend using a part- or full-synthetic oil, of at least 10W/30 viscosity and change intervals of no more than 5,000 miles. For the type of driving encountered here in Seattle, that works best. For hotter or colder climates, mountain driving or racing, the recommendations would be different. Change the filter element every time the oil is changed.
FINISHING UP
I’ve covered just a few of the more common maintenance issues in this article. The main point is that general maintenance on BMWs isn’t much different from others. With a few special tools, and a database of information, BMW repair can be a profitable addition to the vehicles serviced in your shop. The number of these cars on the road today will mean service work for years to come.