Uh oh. The Malfunction Indicator Lamp (MIL) is on, and you’ve just found a misfire code. It’s a code P0304, which tells you cylinder number four is misfiring. There are no other codes and the engine has a steady miss. Now what?
Misfire diagnosis in this kind of situation should be fairly easy. You have a code, you know which cylinder is misbehaving, and you can hear and feel the misfire. The cause has to be one of three things: Ignition, fuel or compression. The hard-to-diagnose misfires are the ones that come and go and don’t set any codes. These are the ghosts that can drive you and your customer crazy. Fortunately, the supernatural has nothing to do with the problem. The underlying cause is still ignition, fuel or compression related. The challenge is pinpointing the cause and correcting it.
Intermittent misfires are almost always caused by a weak spark or a lean fuel mixture. That piece of knowledge may not tell you what exactly is causing the misfire, but it should help you plot a diagnostic course in one of two directions.
 Random misfires are another type of misfire that can be hard to nail down. Random misfires that jump around from one cylinder to another may also be caused by a lean fuel condition or a weak spark. The challenge here is figuring out what’s upsetting the fuel mixture or robbing the spark. The underlying cause is often a vacuum leak in the intake manifold or one behind the throttle body that allows unmetered air to bypass the air flow sensor. A lean misfire can also be caused by an EGR valve that is jammed open or isn’t fully closing.
TRACKING MISFIRES
No engine fires every cylinder 100 percent of the time. Misfires can occur at idle, when the engine is pulling hard under load, at high rpm and during throttle transitions as the air/fuel mixture changes. A few misfires are to be expected under these conditions and should cause no major performance problems or significant increase in emissions. But if the misfires get out of hand and occur too often, they can make the engine idle or run rough, stumble when accelerating, waste gas and fail an emissions test.
On 1996 and newer vehicles that are Onboard Diagnostics II (OBD II) compliant and have misfire detection, the OBD II system tracks and counts misfires. The misfire monitor runs continuously on vehicles that have it anytime the engine is running. On most applications, the OBD II system uses the crankshaft position sensor (CKP) to look for subtle changes in the speed of the crankshaft between cylinder firings. If the crank suddenly slows a bit, it indicates a misfire. The only problem with this approach to detecting misfires is that the misfire monitor can sometimes be fooled when the vehicle is driven on a rough road. Consequently, some OBD II systems are programmed to temporarily ignore “misfires” under rough-road conditions.
On some vehicles, the amperage of the spark current is analyzed when each spark plug fires to determine if the mixture burned or not.
When the OBD II system detects a misfire, it stores operating data such as engine speed, load and warm-up status. While the misfire is happening, the OBD II system is supposed to flash the MIL lamp once a second to alert the driver. Because this might distract the driver from her cell phone conversation, sipping her Starbucks coffee or yelling at her kids in the back seat, the OBD II system will set a temporary misfire code after the second such occurrence. From that point on, the MIL lamp should flash every time the misfire returns. If the same thing happens on the next trip, the MIL lamp should blink as before and remain on even when the misfire ceases.
If the misfire problem has gone away and doesn’t recur on the second or following trips, the OBD II system may erase the temporary misfire code and forget the entire episode. The code may also be erased if no misfires are encountered under similar driving conditions during the next 40 drive cycles.
Knowing this, you should always look at the history freeze-frame data when diagnosing a misfire code. If the code was set when the engine was cold, chances are the OBD II system is being overly sensitive and there is no real misfire problem. Check for any technical service bulletins (TSBs) that may be out on the vehicle for false misfire codes. The cure, in many instances, is to flash reprogram the PCM so the OBD II system will be less sensitive to misfires.
On some cars (Volkswagen, for example), it’s possible to set false random or individual misfire codes when doing a cranking compression test. If this happens, just clear the codes after the test so the MIL lamp doesn’t come on later.
 QUICK DIAGNOSIS WITH A CODE
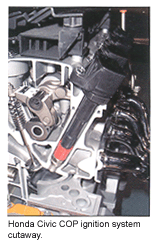
On OBD II cars, the OBD II system will not only identify misfires but also coil and injector problems. Consequently, if the MIL lamp is on and you find a code for a misfiring cylinder and a second code indicating an injector fault for the same cylinder, bingo – the engine probably has a bad fuel injector. Likewise, if you find a misfire code for a cylinder and also a code indicating a coil fault for a multi-coil distributorless ignition system or coil-on-plug ignition, you can probably bet on a bad ignition coil.
In cases where there’s a cylinder misfire code but no other codes, the ignition or fuel delivery system may be borderline and not yet bad enough to set a code of its own. A shorted or open fuel injector solenoid, or a shorted or open coil, will usually set a code, but a dirty or weak fuel injector or a weak coil probably won’t set a code.
Bad spark plug wires are a common cause of misfire codes. After 50,000 or so miles, the OEM wires may be leaking current to ground or other wires, shorting the spark before it can reach the plug. Also, internal resistance may be increased, raising the required firing voltage to the point where the engine may misfire under load. Check the resistance and if it exceeds specifications, replace the wire set.
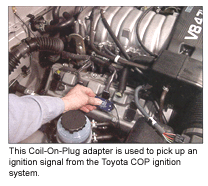
SCOPING IT OUT
An oscilloscope is a good tool for identifying and analyzing misfires, but using a scope takes some know-how and experience. Suffice it to say that anybody can “see” a misfire on a scope, but figuring out whether the cause is ignition or fuel related requires an understanding of ignition waveforms.
Once you’ve identified the problem cylinder, you can look at the primary and secondary patterns for that cylinder to get more diagnostic information. The dwell section of the firing line just ahead of the spark will tell you what’s going on in the primary side of the system. The spark line in the firing section after the spark occurs will tell you what’s happening in the cylinder and coil.
Misfires can be spotted by observing a secondary parade pattern that shows the firing lines for all the cylinders on one trace. The peak firing voltage for a misfiring cylinder with a shorted plug or plug wire will be lower than the others. But don’t forget that low compression and an overly rich fuel condition can also cause the same kind of readings.
If a normal, or lower-than-normal, firing voltage drops even lower when the throttle is snapped, it may indicate a plug wire that is shorting to ground.
If one of the peak firing voltages is spiking significantly higher than the others, the misfiring cylinder may have a bad plug wire with excessive resistance, a badly worn spark plug or a plug with an excessively wide gap. Lean fuel conditions can also cause firing voltages to jump.
Note: If the spark burn lines for all the cylinders are higher than normal (indicating a lean fuel mixture), the underlying cause would point to something that affects all cylinders such as an intake manifold leak, leaky vacuum hose, leaky EGR valve, leaky throttle gasket or low fuel pressure (weak fuel pump or bad pressure regulator).
A rich fuel mixture in an individual cylinder is less common, but can occur if the fuel injector leaks. A more common condition would be a rich condition in all cylinders caused by a dead oxygen sensor or coolant sensor that prevents the computer from going into closed loop, or a faulty fuel pressure regulator that feeds too much pressure to the injectors.
Something else to look at in the spark burn line is the amount of “hash” it contains. A good cylinder will show a relatively clean line with little hash. A lot of hash, on the other hand, occurs when ignition misfire or lean misfire conditions are present.
The duration or length of the spark burn line can provide more clues about what’s going on inside the cylinder. The duration of the spark line for a “good” cylinder should usually be 1.3 milliseconds or longer at idle with a 0.045- to 0.050-inch plug gap. A shorter spark line would indicate a weak spark, possibly due to a lean fuel condition (dirty injectors or vacuum leaks) or low compression (burned exhaust valve or bad head gasket). If the duration of the spark line is longer than about 2 milliseconds, the air/fuel mixture is running abnormally rich. If the burn line is shorter than about 0.75 milliseconds, the cylinder is running too lean.
 The last thing you want to look at in the primary ignition pattern is coil oscillations. If the coil is good, there should be at least two, and preferably three or more, oscillations after the burn line. Fewer oscillations would indicate a faulty coil.
MORE CHECKS
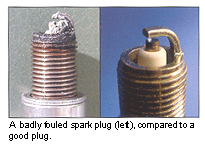
Hands-on checks you can do include removing and inspecting the spark plugs, plug wires and ignition coil (and cap and rotor if the engine has a distributor). Look for obvious problems such as worn or fouled spark plugs, cracked insulators, loose or damaged plug wires, and cracks or carbon tracks on the coil, rotor and distributor cap. If a spark plug is wet when you remove it, it probably isn’t getting any spark.
If firing voltage is low (weak spark), measure the coil’s primary and secondary resistance with an ohmmeter. If it’s out of specifications, replace the coil. Also, make sure the coil is receiving normal voltage from the PCM or ignition module. If it’s low, check the charging system for anything that may be reducing the alternator’s output (battery and alternator cable connections, ground connections and voltage output).
One thing to keep in mind here is that low coil output can also be caused by a faulty ignition module or coil driver circuit in the PCM. A lot of coils are replaced unnecessarily because problems like these are overlooked or misdiagnosed.
Simple checks that can be completed to identify a misfire caused by a fuel delivery problem include checking the injectors and fuel pressure. Are the injectors getting normal voltage? Is the PCM driver circuit energizing the injectors? You should hear a buzzing noise if the injectors are pulsing. A test light or logic probe should also flash when connected to each injector circuit.
You can also observe injector performance on a scope and check its response to changes in the air/fuel mixture. First of all, a flat line would tell you the injector is dead or not receiving voltage (depending on where the line falls on the screen). If the injector is working, the line should drop when the injector turns on, then peak when the current is switched off.
The injector scope pattern will tell you how long the injector is on. If you make the air/fuel mixture artificially lean by momentarily pulling off a vacuum hose, and/or artificially rich by feeding some propane into the manifold, you should see a corresponding change in the injector on-time as the computer responds to input from the oxygen sensor. No change would tell you either the O2 sensor is dead or that there’s a problem in the computer.
Injectors can also be checked with an ohmmeter with the engine and ignition off. If resistance is not within specifications, you’ve found a bad injector that needs to be replaced. Over time, the insulation around the injector coil can corrode, causing the coil to short out. Depending on how the PCM driver circuit is wired, a shorted injector may kill all the other injectors too, so it’s important to figure out if the problem is the injector(s) or the PCM.
Dirty injectors and low fuel pressure can also starve the engine for fuel and create a lean fuel mixture that misfires. If fuel pressure is within specifications, the fuel pressure drop across each injector should be tested to see if one or more are clogged. There are some really cool testers available for such testing that will automatically test each injector without having to remove the injectors from the engine. This can be a real time-saver when injectors are hard to reach.
If a lean misfire condition is due to dirty injectors, cleaning the injectors on or off the engine may solve the problem. If the injectors are too badly clogged to be cleaned, they will have to be replaced.
COMPRESSION
If ignition and fuel delivery appear to be okay, that leaves compression (or the lack thereof) as the underlying cause of the misfire. The air/fuel mixture won’t fire normally if compression is leaking from the cylinder due to a burned exhaust valve, bent valve or leaking head gasket.
A leakdown test or cranking compression test can be used to see if the cylinder is holding or pumping up normal pressure. Low or no compression in a cylinder means the head will have to come off so the leaky head gasket or bad valves can be repaired.
Another reason for removing the head is if you find spark plugs that are heavily fouled with oily deposits. Oil leaking past worn valve guides is usually the culprit here. Installing new plugs will cure the symptom but not the cause. The permanent fix is to replace or reline the valve guides and to install new valve guide seals.
A spark plug that shows heavy whitish to brown deposits may indicate a coolant leak either past the head gasket or through a crack in the combustion chamber. This type of problem will only get worse and may soon lead to even greater problems if the leak isn’t fixed.
A cylinder also won’t fire normally if the valves are not opening and closing properly due to a weak or broken valve spring, or a rounded off cam lobe.
|
FUEL INJECTOR CHECKS
If a misfire isn’t ignition-related and you suspect the fuel system, here are some checks you can perform to diagnose the problem. First, make sure fuel pressure is within specifications, and that the fuel pump is delivering the required amount of fuel (typically a pint in about 15 seconds). Sometimes you’ll encounter a pump that delivers normal pressure at idle, but can’t pump enough fuel at wide open throttle to keep up with the engine’s appetite for gas. Check injector voltage. Backprobe each injector connector with a voltmeter or digital storage oscilloscope (DSO). The injector supply voltage with the key on, engine off should be the same as battery voltage. If you see a difference of more than 0.4 volts, there’s a problem in the supply circuit. Check the wiring and the injector power relay. When the PCM energizes (grounds) the injector, you should see the voltage drop to near zero. This verifies the PCM ground driver circuit. If you’re using a scope, you can also note the milliseconds of injector on-time and make sure it’s changing when you goose the throttle. Something else to watch for on the scope pattern is a little bump in the waveform that occurs after the ending voltage spike when the injector pintle closes. The bump should occur in the same place if the injector is working properly. If you see multiple bumps or the location of the bump is varying, it means the injector pintle is sticking or hanging up, or the injector is dirty. Note: Some scopes won’t show this bump in the injector waveform. Another injector test is to check the current flow in the injector circuit on your scope when the injector is energized. This can be done by attaching a low-amp probe to one of the two injector wires. When the injector is energized, the current waveform should start to ramp up as the magnetic field builds in the injector solenoid. When the injector pintle pops opens, it will create a slight dip in the trace, then continue to climb. No such bump in the trace would tell you the injector isn’t opening. When the PCM turns off the injector, the current waveform drops back to zero. What to look for here: A sharp vertical rise in the current trace when it starts to ramp up would tell you the injector has an internal short. Also note the peak current draw. If it’s over specifications, replace the injector. Another simple check that can be made is to measure each injector’s internal resistance with an ohmmeter. Disconnect each injector from its harness and measure the resistance across its terminals. If resistance is not within specifications (typically 3 to 5 ohms for a low-resistance injector, or 12 to 17 ohms for a high-resistance injector), the injector needs to be replaced. A difference of only 1 ohm less than specifications may be enough to prevent the injector from opening reliably under some operating conditions. Note: Injector resistance typically increases a couple of ohms as it warms up. Therefore, you should check the values twice: Once when cold and once at normal operating temperature. If resistance goes out of specifications when hot or cold, replace the injector. |