WARNING: On 2008-2010 KK models, the front knuckles are aluminum and the ball joints and tie-rod ends need to be torqued and turned an additional 90 degrees. The upper ball joint and tie-rod have a torque spec of 30 ft/lbs. Lower ball joints have a torque spec of 40 ft/lbs. Failure to follow the proper torque procedure will result in damage to the knuckle.
Instead of having to install offset ball joints and shims to adjust camber and caster, the adjustments are performed with the cam bolts in the lower control arms. The rear is not adjustable.
Overall, the Liberty is an easy vehicle to align. But, pay attention during the initial inspection.
Front Suspension
The Liberty’s front suspension uses upper and lower control arms. The replacement of the upper control arms can be tedious and require the removal of battery tray, power distribution center and other components to get at the passenger side upper control arm.
If serviced, the control arms should be tightened with the vehicle at normal ride height due to the bushings. It is important to have the springs supporting the weight of the vehicle when the fasteners are torqued. If springs are not at their normal ride position, premature bushing wear may occur.
The control arms are robust, but the stock ball joints proved to be the weak link. Jeep issued five recalls concerning ball joint failure for various 2002-2006 models. Most of the recall documents site corrosion of the joint as the cause of the failure. The culprit was water intrusion which was often blamed on poor sealing of the boot and/or missing heat shield on early models that allowed the boot to be degraded.
In most of the recall documents, Jeep warns of accelerated failures in rust belt states that use salts and brines. Make sure to check the VIN and production date to see what recall applies to the vehicle.
The upper joints should have zero play. The lower joints should have no more than 1.5mm of end play. To measure the lower ball joint, the suspension needs to be loaded. Attach a dial indicator to the base of the lower control arm and align the dial indicator’s contact point with the direction of the stud axis, touch the machined flat on the knuckle and zero the dial indicator.
Use care when applying the load to the knuckle so the parts are not damaged. Be careful not to tear the boot. From the front of the vehicle, insert a pry bar to get it rested on the lower control arm and use lever principle to push the knuckle up until the arm of the dial indicator no longer moves.
Rear Suspension
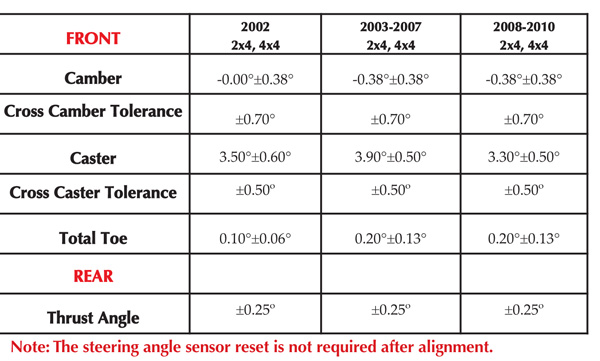
The rear suspension on the Liberty is non-adjustable and the only specification is for the thrust angle. When taking the initial readings, pay attention to the thrust angle and suspension setback. If the thrust angle is greater than specifications, inspect the rear suspension for damage or worn bushings.
On 2002-2007 models, the single upper control link looks like a boomerang and utilizes a single ball joint mounted to the axle. There should be no play in this joint. If it is worn, it may not change the thrust angle, but it will make noise.
On 2008 and up KK models, Jeep changed the rear suspension and ditched the single upper control arm for a four-link setup with a lateral link.
Ride Height
Front ride height is defined by the vertical distance between the spindle and the rear pivot point of the front lower control arm bolt. When the car rolls off the line, the two points should parallel, -+10mm.
Rear ride height is defined by the vertical distance between the top of the lower spring seat strike surface and the bottom of the jounce cup (true metal-to-metal jounce travel). This is to be measured vertically inside the coil from the point intersecting the inboard edge and the for/aft center of the jounce cup down to the strike surface. The distance should be 97mm -+ 10mm.
For the front and rear, the heights should not differ more than 7mm side-to-side.
Adjustments
Jeep has gone back and forth on whether they should install cams on the lower control arms, but every Liberty has the fences for the cams. Before you quote the price of the alignment, make sure to check for the cams.
Camber and caster angle adjustments involve changing the position of the lower suspension arm cam bolts. Moving the rear position of the cam bolt in or out, will change the caster angle significantly and camber angle only slightly. To maintain the camber angle while adjusting caster, move the rear of the cam bolt in or out. Then move the front of the cam bolt slightly in the opposite direction.
To increase positive caster angle, move the rear position of the cam bolt outward (from the engine). Move the front of cam bolt inward (toward the engine) slightly until the original camber angle is obtained.
To adjust the camber, move both of the cam bolts together. This will change the camber angle significantly and caster angle slightly.
The torque spec for the lower control arm bolts is 125 ft/lbs.
More in this series:
 |
Alignment Specs: 1997-2004 Chevrolet Corvette
With different front and rear run-flat tire sizes, the 1997-2004 Corvette must be aligned every 20,000 miles or when the smallest amount of abnormal tire wear is present. If the customer does not have this service performed, even the slightest amount of extra toe, camber or caster can result in an expensive… More
|
 |
Tech Tip: Alignment Specs for 2002-2006 Toyota Camry
Behind the Ford F150 and Chevrolet Silverado, the Toyota Camry has been the third best selling vehicle in the U.S. during the past decade. The 2002-2006 Camry was no exception with sales of more than 400,000 vehicles every year. More
|
 |
BRAKE JOB: Toyota Tundra Brake Caliper Upgrade
If a 2000-’05 Tundra or Sequoia comes into your shop with a complaint of brake pulsation, there are a few diagnostic steps that should first be taken before repairs are recommended. More
|
 |
Alignment & Suspension Specs: Ford Focus
In 2000, the Ford Focus represented a radical change in the domestic small car segment. Now as we enter a new decade, the current Focus platform is going into its last year of production and not too much has changed in the alignment department in 10 years, except the specs from year to year. The se… More
|
 |
Alignment & Suspension Specs: 2006-Current Chevrolet Impala
The 2006-current Chevrolet Impala represents the evolution of the GM mid/full-sized front-wheel-drive car. This generation of the Impala is solid and easy to work on. Gone are the quirks of previous generations. We will be concentrating on the civilian V6-equipped version that represents about 85 percent… More
|
 |
Alignment & Suspension Specs: 2006-2010 Honda Civic
Built on a high-rigidity unit-body platform, the 2006-current Civic has a MacPherson strut front suspension and multi-link rear suspension. The 8th-generation Civic switched from a high mounted steering rack to a low mounted one and significantly increased caster. In the alignment bay, the 8th-generation… More
|
 |
BRAKE JOB: GM H-Body Brake Job
Pad and rotor replacement is straightforward on this vehicle. But, there are some common errors that can be made if you are not paying attention. First, make sure the front caliper bracket bolts are tightened to 137 ft/lbs. If the bolts work their way loose, the driver may experience a sporadic low pedal… More
|
 Suspension & Alignment Specs: 2007-2010 Dodge Caliber