Chevrolet Equinox 2005-2011 Alignment and Suspension Specs

Alignment and Suspension Specs: 2005-2011 Chevrolet Equinox

The alignment process of the Equinox is mechanically straightforward. The front suspension is a MacPherson strut design with hydraulic bushings in the lower control arms. The rear suspension is a four-link layout.

3. Install the scan tool into the OBD II connector.
 
4. Turn the ignition switch ON, with the engine OFF.
 
5. Select Chassis/EBCM control system Vehicle Stability Enhancement System (VSES), special function test, and Steering Position Sensor Calibration.
 
6. Follow the scan tool directions to complete the automated centering procedure. This should include turning the steering wheel left 5º and right 5º and then straight forward.
 
7. Clear any DTCs that may be set. Perform the Diagnostic System Check to verify no current DTCs.
 
8. Test drive the vehicle. 
 
 
AFTERMARKET 
ADJUSTMENTS
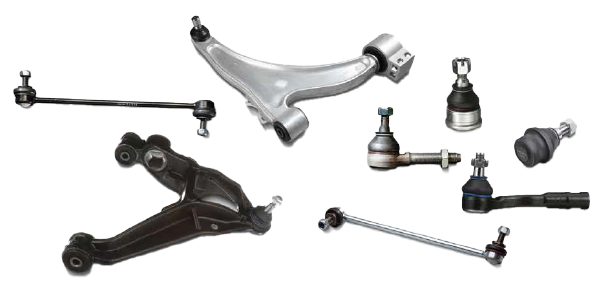
The strut front suspension is bolted to the knuckle by two bolts that make it possible to use the EZCam XR for alignment. This part is designed to adjust camber by up to plus or minus 1.5° without any modification to the strut or knuckle. It is used on many strut suspensions systems of similar design and is a commonly used part.  Ease of installation and adjustment make the EZCam a good alignment option. The Specialty Products part number 81260  is used on this front suspension.
The rear suspension consists of an independent multi-link that has a special cam nut used for rear toe and/or camber adjustment. Sometimes there is no cam nut installed on one of the two parallel arms. The frame brackets on both of these control arms are slotted and have shoulders stamped in the frame to accept  this special cam nut. Adjusting either of these arms without using the special cam nut is very difficult. 
 
As soon as you loosen the bolt, the arm will slam one direction or the other because of the vehicle weight. The vehicle can be lifted by the frame to make adjustment easier, but now the bushing is not in the loaded position when the bolt is tightened. This, as everyone knows, is a big no-no. Installing another cam nut, such as the Specialty Products part number 87420, will make adjusting the rear camber and/or toe on these vehicles much easier. Just remove the existing nut and install the cam nut so it is located between the frame bracket shoulders. Adjustment range for these vehicles is approximately 2 degrees. Dial in the necessary adjustments and tighten the head of the bolt making sure the bolt is not cocked or binding in the frame bracket. 
Douglas Hardy
Technical Trainer/Designer II
Specialty Products Company

You May Also Like

Nearly 5,000 To Participate In Auto Value, Bumper To Bumper ‘Festive Walk’ To AAPEX 2018

On Thursday, Nov. 1, nearly 5,000 Auto Value and Bumper to Bumper automotive professionals wearing matching yellow shirts will begin their “festive walk” from the Mirage hotel to AAPEX 2018 at the Sands Expo, temporarily shutting down the busy Las Vegas Boulevard along the way.

On Thursday, Nov. 1, nearly 5,000 Auto Value and Bumper to Bumper automotive professionals wearing matching yellow shirts will begin their “festive walk” from the Mirage hotel to AAPEX 2018 at the Sands Expo, temporarily shutting down the busy Las Vegas Boulevard along the way.

The group is scheduled to depart at approximately 8:30 a.m. (PDT) and start arriving at AAPEX for their day-long visit around 9 a.m. The group will include parts store operators, shop owners, technicians and service writers who are part of the Aftermarket Auto Parts Alliance. Las Vegas showgirls and a marching band will join in the festivities as the group makes its way to AAPEX.

Drive Belt Checklist: What Are You Missing?

You might have only one chance to sell a customer a new serpentine belt. With belts lasting roughly 90,000 miles, proper inspection at the time of failure is critical not only for selling the belt, but also for ensuring add-on sales and better customer satisfaction.

3 Reasons To Replace Cabin Air Filters In Winter

Often driven by an “out of sight, out of mind” mentality, most consumers don’t think about purchasing cabin air filters. That’s why educating consumers on the benefits of cabin air filters can be a shop’s best sales pitch for selling these maintenance add-ons.

VIDEO: Using Airflow To Sell Cabin Air Filters

Andrew Markel introduces an inexpensive tool that can assist in selling cabin air filter replacements. Sponsored by Auto Value and Bumper to Bumper.

airflow-selling-cabin-air-filter-video-featured
Air Conditioning Odor Causes

Air conditioning odors typically result from the uncontrolled growth of bacteria and other microorganisms in the evaporator. Research by independent laboratories has found fungi such as Aspergillus, Cladesporium, Penicillium and others growing on cooling coils and other A/C system areas.

ac air conditioning smells featured

Other Posts

Dorman Launches 300+ New Products In November

Among the new products is an OE FIX climate control module designed to fit 1.7M Chevrolet Express & GMC Savana vehicles.

Curing Springtime Air Conditioning Smells

Air conditioning scents can come from a host of things.

Steer Into the Future with Delphi Technologies by Your Side

Your vehicle’s steering and suspension is what not only ensures a smooth ride, but also its handling and safety. With over 98% vehicle coverage and trusted by over 26 major global OEMs, Delphi Technologies’ 8,000+ steering and suspension products are intelligence in engineering at its finest. Premium parts without the premium price tagAt Delphi Technologies,

Steering Systems Have Changed – Do Customers Care?

Power steering systems aren’t the same old same old. This video is presented by The Group Training Academy.