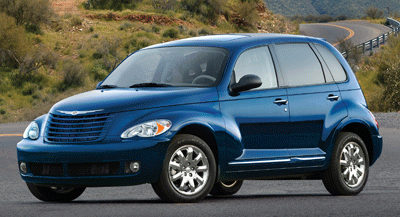
 The Chrysler PT Cruiser — the retro-styled, front-wheel-drive five-passenger compact vehicle — launched in late 1999 as a model-year 2000 vehicle.
Although classified as a truck in the U.S. by the NHTSA for CAFE fuel economy reasons, it was considered to be more like a car by most other standards.
Chrysler specifically designed the PT Cruiser to fit the NHTSA criteria for a light truck in order to bring the average fuel efficiency of the company’s light truck fleet into compliance with CAFE standards.
It was originally conceived as a Plymouth model, but received the Chrysler nameplate due to the expectation of the elimination of the Plymouth brand. The Plymouth brand ended in June 2001.
 The U.S. version came standard with a 2.4L 4-cylinder powerplant — a 16-valve, sequential multiple-point injection (SMPI) engine rated at 150 hp with 165 lb.-ft. of torque.
For PT Cruisers beginning with model year 2003, a 2.4L 16-valve, DOHC SMPI intercooled turbo 4-cylinder engine was introduced, rated at 180 hp with 210 lb.-ft. of torque.
Power was again increased for 2006 models with a 230 hp 2.4L, 16-valve, DOHC SMPI intercooled High-Output Turbo 4-cylinder engine.
After more than 1.35 million units produced, Chrysler discontinued the PT Cruiser model in July 2010.
Although the PT Cruiser had a generally good reputation for reliability, the vehicle has a few recurring issues reported by owners and technicians.
The most common underhood problem is the engine’s tendency to burn oil. Techs and owners should keep an eye on the oil level and may need to add oil on a regular basis for smooth engine operation.
Other underhood-related concerns include noise issues. According to Eric Seifert, ALLDATA automotive technical editor, some owners of the PT Cruisers have reported a strange noise from the engine compartment.
Most of these reports stem from earlier PT Cruiser years, particularly 2001-’04 vehicles equipped with either the 2.4L DOHC or the 2.4L Turbo engine.
 Drivers complain that the noise occurs when the vehicle is in park, and the engine is running between idle and 1,400 rpm at normal operating temperature.
The sound is heard at the upper end of the engine (cylinder head) toward the right front side (passenger side), and is irregular, not periodic or harmonious. The frequency of the noise will increase with rpm. The sound is more of a high-pitched “snapping” noise than a low metallic knock.
If the customer describes the noise and the installer determines that the sound is coming from the described location, the repair procedure involves chamfering the bore radius on cam bearing caps L2 through L5 and R2 through R5.
Before beginning the repair, review safety procedures in ALLDATA Repair.
1. Remove the cylinder head cover.
2. Remove L2 cam bearing cap (see figure above).
Note: Do not remove the L1/R1 or L6 cam bearing caps, or loosen the fasteners. Only remove one cam bearing cap at a time.
 3. Lightly chamfer the two bore radius edges with a small hand file, creating a 45° chamfer 1.0 to 1.5 mm in width along the edge of each bore radius.
Caution: Be careful not to scratch the bore surface of the cam bearing cap(s). Chamfer both bore radii.
4. Clean the part to remove any aluminum filings prior to reinstalling.
5. Reinstall the L2 cam bearing cap by loosely assembling the fasteners. Prior to and during the torquing of each fastener, twist the cam bearing cap by hand in a clockwise direction, as viewed from the top of the engine. Torque M6 fasteners to 105 in.-lbs. (12 Nm) while maintaining a clockwise twisting force on the cam bearing cap.
6. Repeat steps 2 through 4 for cam bearing caps L3, L4, L5, R2, R3, R4, R5 and R6.
7. Reinstall the cylinder head cover.
8. Verify the repair.
Chirping Problem
Another noise-related problem develops when the accessory drive belt causes a squeaking/chirping sound due to the power steering pulley being pressed too far onto the power steering pump shaft.
If the pulley is 0.4 mm or more from the end of the power steering pump shaft, then this condition usually exists.
If the driver describes or the technician experiences this symptom/condition, perform the Repair Procedure, which involves aligning the power steering pulley flush with the power steering pump shaft.
 Chrysler issued a bulletin to correct this problem on 2003-’04 PT Cruisers, and applies to vehicles equipped with both the 2.4L and 2.4L Turbo engine built on or before Sept. 11, 2003.
A special tools is required for this fix — a Pulley Remover/Installer, Matco MST93 or equivalent.
For the repair procedure, follow these steps.
1. Raise the vehicle.
2. Remove the right front tire and wheel assembly.
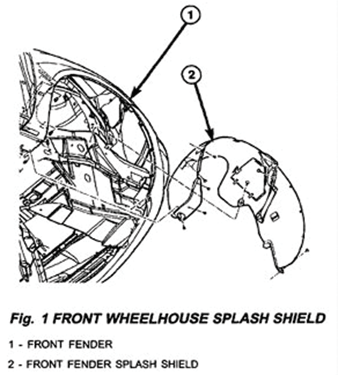
3. Remove the push-in fasteners attaching the splash shield to the frame rail forward of the suspension.
4. Remove the three lower front screws attaching the wheelhouse splash shield to the front fascia.
5. Relocate the splash shield out of the work area.
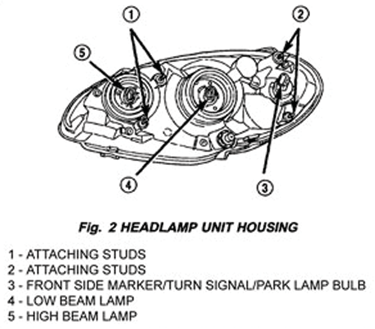
6. Remove the four nuts attaching the right headlamp housing.
7. Remove the right headlamp housing by lowering the right side of the fascia as necessary.
8. Disconnect the wire connector from the headlamp housing.
9. Install the Matco MST93 puller tool, or equivalent, on the steering pump pulley through the headlamp opening. Tighten the puller screw drive until the pulley is flush with the power steering pump shaft.
10. Reinstall the right headlamp housing.
11. Reinstall the right splash shield.
12. Reinstall the right front tire and wheel assembly.
Head Re-torquing
According to the Automotive Parts Remanufacturers Association (APRA) there also has been a revised cylinder head bolt re-torque procedure for many PT Cruisers.
 APRA says the information supersedes the previous technical bulletin, dated March 25, 2005. The previous bulletin should be removed from your files.
This bulletin applies to vehicles equipped with the 2.4L engine built between Feb. 1, 2004 and April 5, 2005.
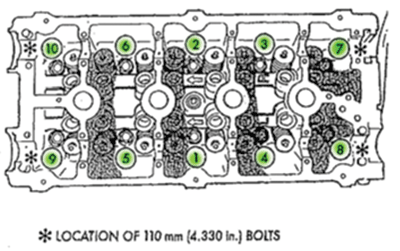
Whenever re-torquing the cylinder head bolt(s), be sure to follow the torque sequence as outlined below. If there are no external signs of damage to any parts, attempt the procedure below before replacing a cylinder head, cylinder head bolts or cylinder head gasket.
1. Using a 6” wobble plus extension friction ball and shallow socket following the torque sequence in the last figure, loosen one bolt at a time to 0 torque and then torque that same head bolt to 60 ft.-lbs.
2. Repeat step 4 for every head bolt one bolt at a time in sequence.
3. Verify that each head bolt is at 60 ft.-lbs. before performing the next steps.
4. After all head bolts have been verified to be torqued to 60 ft.-lbs., follow the torque sequence and turn the head bolts an additional 90° (1/4 turn) as shown in the last figure.
5. Following the appropriate procedures to install the cylinder head cover.


